I have had requests for an updated version of my “LXD Containers 101” video. This is it. The assumption is you are starting with Ubuntu 22.04LTS server running on a dedicated hardware with preferably 16GB or more memory.
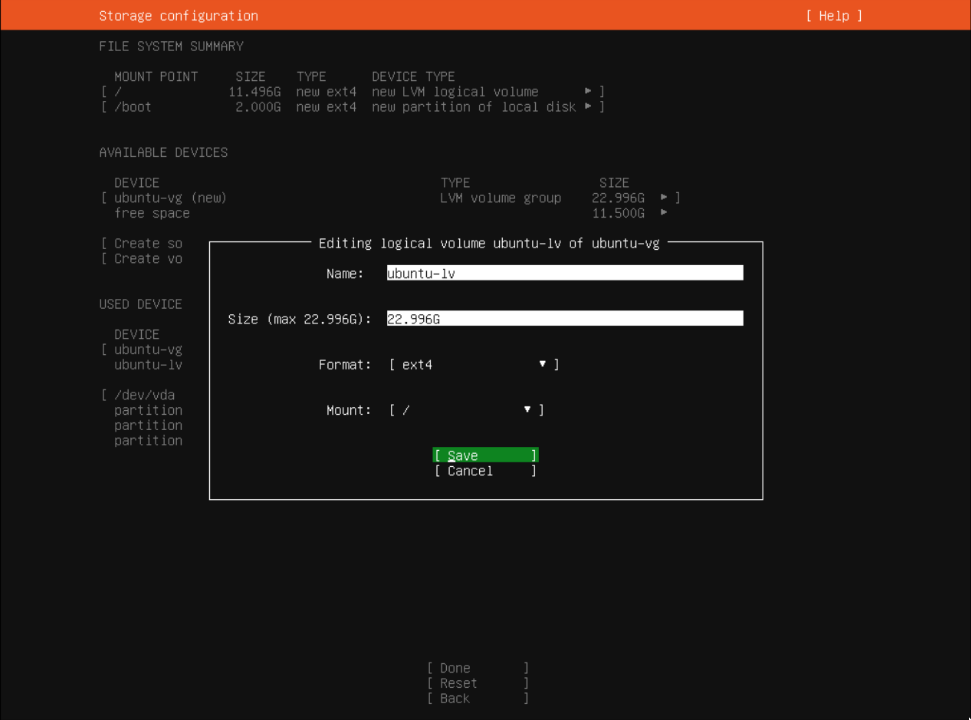
During your installation of Ubuntu 22.04 Server, be sure to expand your root file system to use the entire disk as shown in the video.
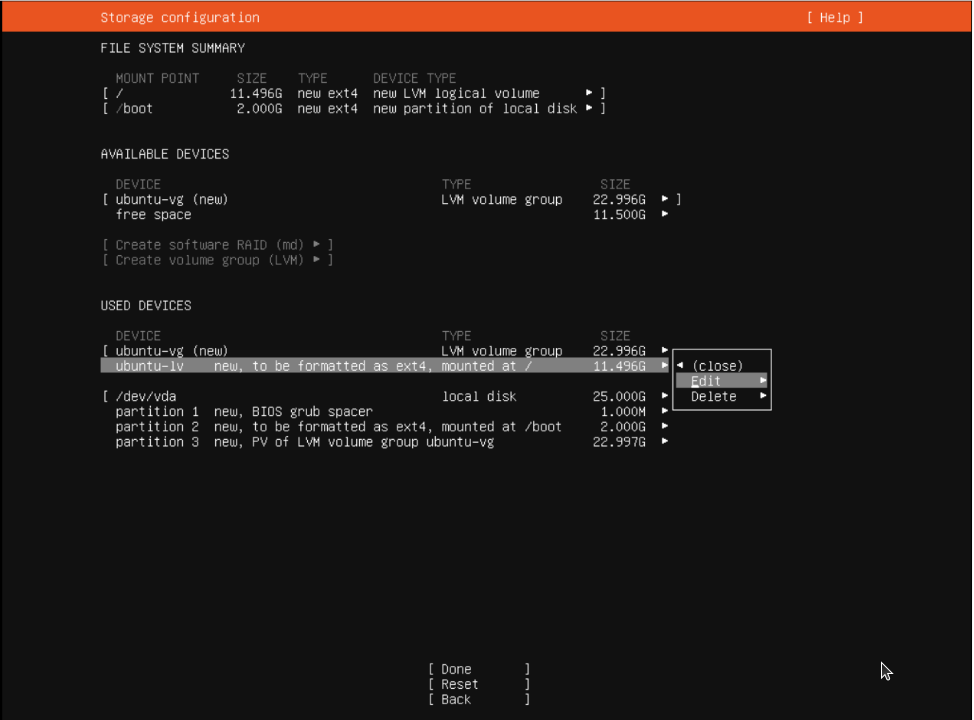
Set the Size of your root (/) volume to whatever the indicated max size is.
Log into your server via ssh after installation is complete.
ssh 192.168.1.x
We are going to create a software bridge which is sometimes referred to as a virtual switch. Move over to the Netplan folder.
cd /etc/netplan
You can safely delete all of the files in this folder or rename them to *.sav if you like.
Create a yaml file to create the bridge as discussed in the video.
sudo nano 00-installer-config.yaml
Put the following template in the editor session.
network:
  version: 2

  ethernets:
    enp5s0:
      dhcp4: false
      dhcp6: false

  bridges:
    bridge0:
      interfaces: [enp5s0]
      addresses: [172.16.1.247/16]
      routes:
         - to: default
           via: 172.16.0.1
      nameservers:
        addresses:
          - 1.1.1.1
          - 1.0.0.1
      parameters:
        stp: true
        forward-delay: 4
      dhcp4: no
In the above file, change enp5s0 to be the name of your Ethernet device (ip a) in the two locations shown. Change the 172.16.1.247 address to be your current address and subnet mask (ip a).
BIG GLARING NOTE: Some Linux systems use device eno1 which stands for Embedded Network Onboard. The “o” is a letter and not a Zero “0”. So, the device is “eno1” and not “en01”.
Another Note: your subnet mask will probably be /24 instead of my /16.
Change the via: 172.16.0.1 to be the address of your router and select any name servers that you want to use.
Save the file with CTRL O and Enter and CTRL X to exit the editor.
Apply the new network configuration:
sudo netplan apply
If all worked well, your physical Ethernet adapter (enp5s0 in my example) should no longer have an IP address and you should have a bridge0 device that has your IP address.

Move back to your home folder.
cd
Install LXD.
sudo snap install lxd
Configure LXD as shown in the video.
sudo lxd init
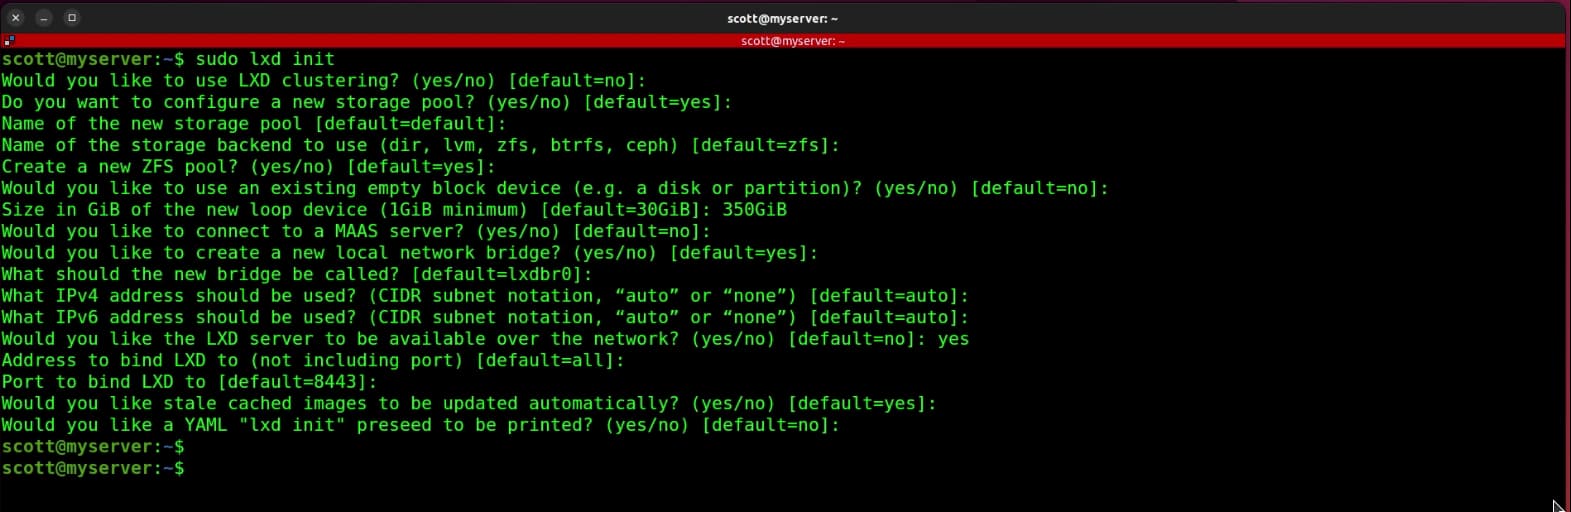
In the above screenshot, I set my LXD default pool storage size to be 350GB. My recommendation is to set this to be 70% of your root file system size. My root file system was 500GB in size.
Now that LXD is configured, we need to create a LXD Profile to use the bridge0 device to offer containers on your main LAN.
lxc profile create bridgeprofile
lxc profile device add bridgeprofile eth0 nic nictype=bridged parent=bridge0
You can now create a container using the above profile and you should see if get created with an address on your LAN.
lxc launch ubuntu:22.04 test --profile default --profile bridgeprofile -c boot.autostart=true
List your LXD Container(s):
lxc list
To enter your container for the first time in order to add a user account and/or configure it:
lxc shell test
When you are done configuring the container “exit” will log out of it and return to your Ubuntu Server (LXD host).
If you have a VLAN, you can create a profile for your VLAN. In my case, I created a LXD Profile for my IoT VLAN, which is vlan 30 on my network.
lxc profile create IoT
lxc profile device add IoT eth0 nic nictype=macvlan parent=bridge0 vlan=30
To create a container on my IoT VLAN:
lxc launch ubuntu:22.04 test-iot-vlan --profile default --profile IoT -c boot.autostart=true
Pro Tip: To update your LXD Server to the latest version:
sudo snap refresh lxd --channel=latest/stable