When you hear about the use of Virtual Private Networks (VPN’s), you generally think of a public VPN provider that provides many servers located throughout the world. With a public VPN, you use a VPN client at home to connect to one of these public VPN servers.
The typical purpose of a VPN is to encapsulate, encrypt and therefore hide your Internet traffic starting at a client computer all the way to the VPN server which is the endpoint of the tunnel. The use case for this is either hiding where you are going or hiding what you are communicating from your source network to a target server endpoint.
This is useful to keep your communication safe in public venues such as coffee shops, airports and other places offering public wifi since a VPN encrypts your traffic. This is also useful to obscure your Internet Service Provider from knowing what you are accessing. One of the primary use cases of a public VPN is geo-relocation. That means that you can use a public VPN service provider like NordVPN to virtually project yourself into another country like the U.K.
Another very prominent use of VPNs is from your home to your place of work. Companies use VPNs to allow you access to their internal network by projecting your computer inside their network. When you are connected to a company VPN, you are generally “tunnelled all” which means that you cannot reach anything on your own home network and that all traffic goes to and through the company network for security reasons.
Most company and public VPNs use a protocol called OpenVPN, L2TP/IPsec or PPTP (Point to Point Tunneling Protocol). PPTP is a fast and easy to use protocol that lacks security, but OpenVPN is open source and can be run on any port to look almost indistinguishable from https traffic. OpenVPN is very secure and uses AES encryption. Windows has only PPTP built in and OpenVPN is added on with third party programs. L2TP doesn’t offer any encryption which is why it is offered in conjunction with IPsec encryption. L2TP/IPsec uses UDP port 500 which makes it easier to distinguish and block at firewalls. IPSec is slower than OpenVPN but theoretically just as secure. So, you should be trying to use OpenVPN rather than PPTP if there is an option.
Wireguard is also free and an open source protocol that enables encrypted VPN traffic. Wireguard was designed to improve ease of use, high speed performance and a low attack surface for enhanced security. Wireguard traffic passes over UDP and can run on any user port number. As of March 2020, the wireguard protocol was incorporated into the Linux kernel. Wireguard does not come with any sort of a GUI user interface or a username/password authentication mechanism. Wireguard connections are managed with public/private keys.
Wireguard is Open Source free software for both the client and the server side. You can find out more about it at https://www.wireguard.com/. Wireguard does not have a built in username/authentication mechanism because OpenVPN has done a lot of work in that regard. Many vendors have provided a username/password front end implementation. Consider those front ends as a “wrapper” for Wireguard. Wireguard is not as good at hiding itself as a deep packet inspection trackable protocol as OpenVPN which can hide as https traffic. This doesn’t really matter though since all traffic in Wireguard is highly encrypted. NordVPN has a wireguard implementation called NordLynx. NordLynx is simply Wireguard with an authentication wrapper around it and other public VPN providers are doing the same.
So, here is how to create a Wireguard server and then connect to it at a very basic level. First, create a virtual machine or LXC container. In my case this is Ubuntu 20.04. Update it to the latest patch level.
sudo apt update
sudo apt upgrade
Next, we need to enable IP forwarding which will let this operating system instance receive incoming packets on its network interface and pass that traffic to another network.
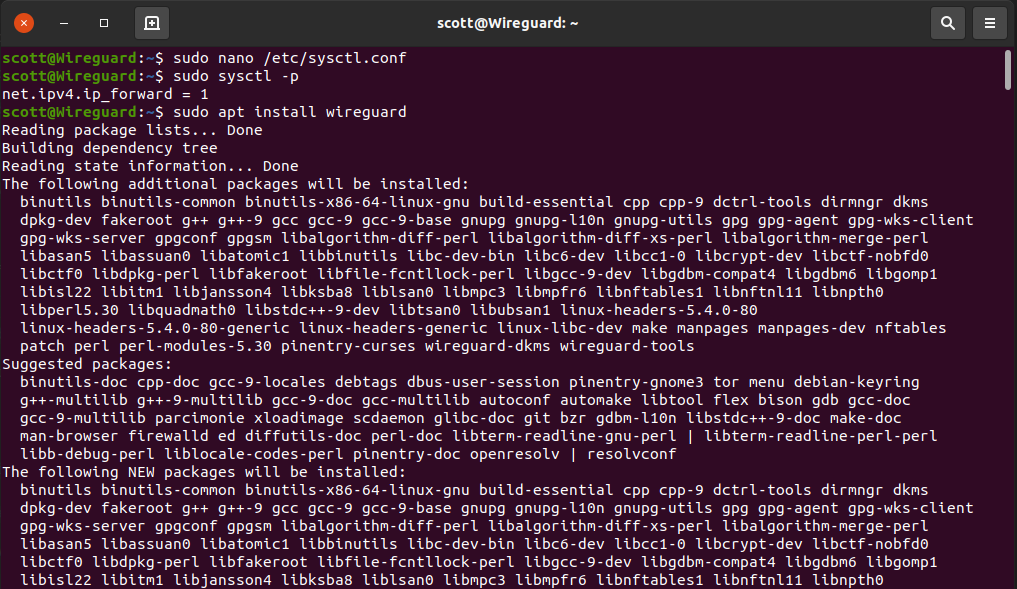
sudo nano /etc/sysctl.conf
Find the line that says “net.ipv4.ip_forward=1” and uncomment it.
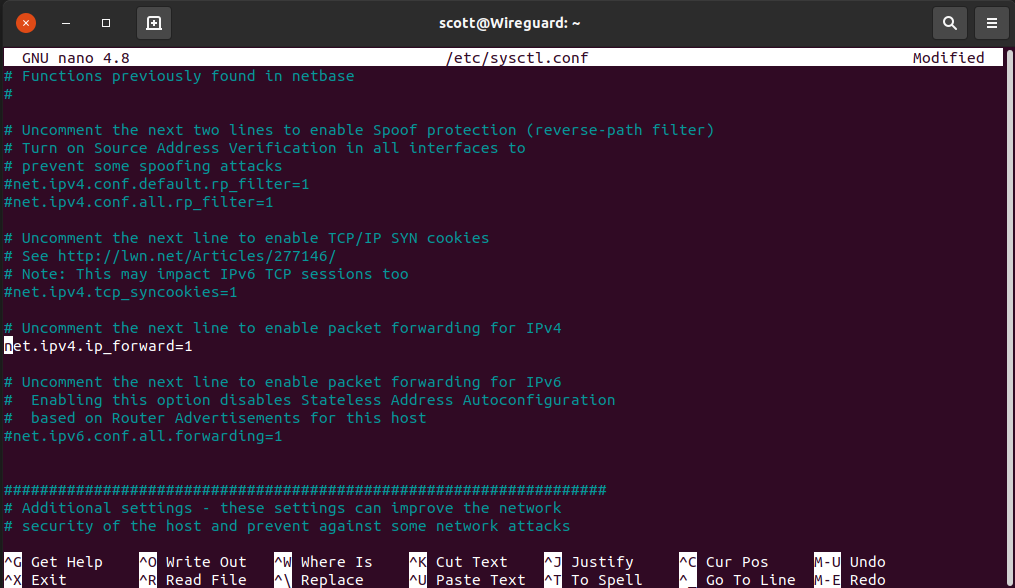
Then save the file and activate the changes:
sudo sysctl -p
Install Wireguard:
sudo apt install wireguard
Move to the Wireguard config folder.
sudo su
cd /etc/wireguard
Run the commands to create the public and private keys for the server:
umask 077; wg genkey | tee privatekey | wg pubkey > publickey
Now list the private key so we can copy it into the server config file (keep this safe, yours will differ):
cat privatekey

Create the server config fiie:
sudo nano /etc/wireguard/wg0.conf
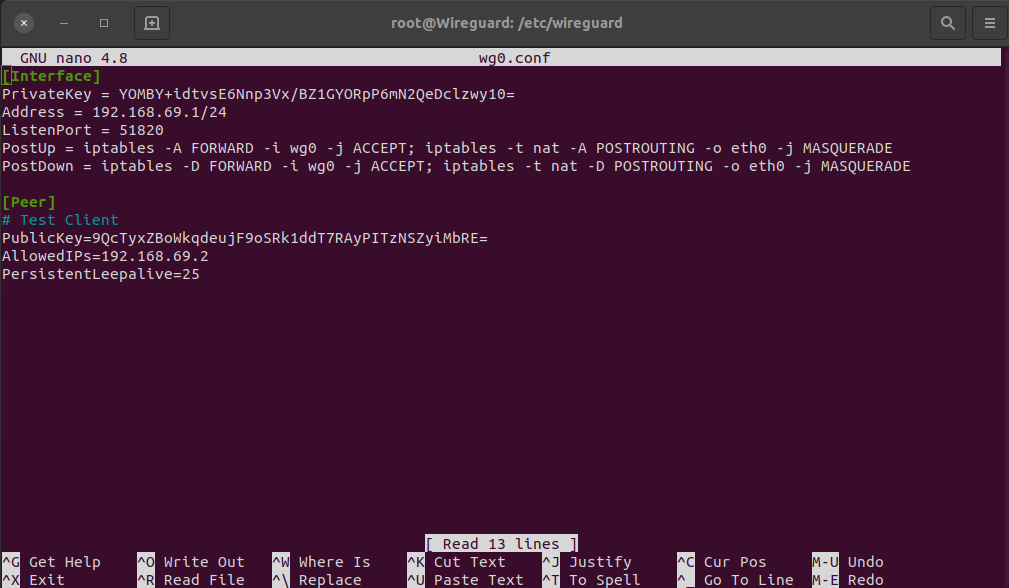
Put the following text in this file and put your private key in:
…
[Interface]
PrivateKey =
Address = 192.168.69.1/24
ListenPort = 51825
PostUp = iptables -A FORWARD -i wg0 -j ACCEPT; iptables -t nat -A POSTROUTING -o eth0 -j MASQUERADE
PostDown = iptables -D FORWARD -i wg0 -j ACCEPT; iptables -t nat -D POSTROUTING -o eth0 -j MASQUERADE
…
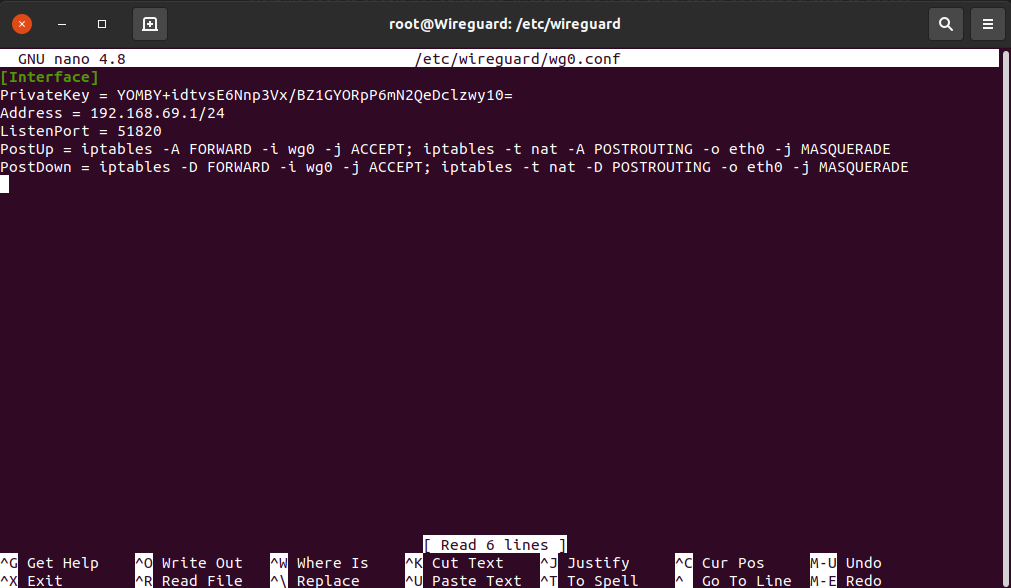
The address of 192.168.69.1/24 above is a private NAT address range through which Wireguard will route. To start your Wireguard server:
sudo systemctl start wg-quick@wg0.service
To set the server to start on reboot:
sudo systemctl enable wg-quick@wg0.service
Now, go to another computer that will be the “client” and also install wireguard. In the /etc/wireguard folder of the client, create a config file. Mine is named testvpn.conf
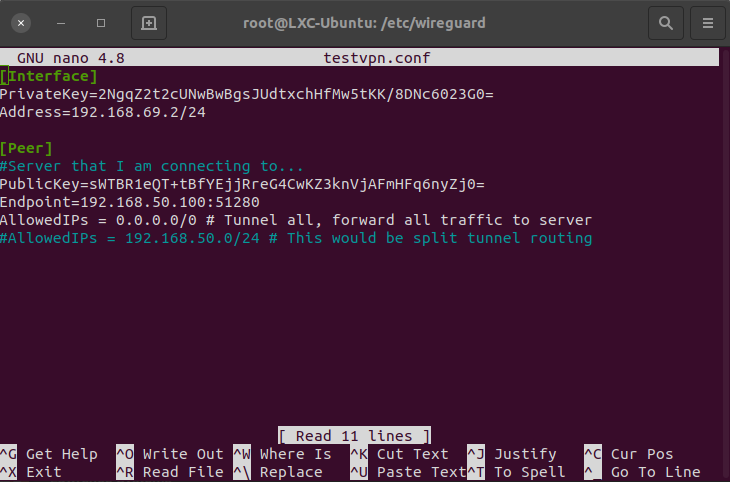
The private key above is the private key of the client system generated with the command:
umask 077; wg genkey | tee privatekey | wg pubkey > publickey
That we used on the server, except this time on the client. The public key is the public key from our server. The endpoint is the IP address of the server and allowed IPs at all zeros are tunnel all.
Back on the server wg0.conf file, we need to add a peer section to the configtestvp file to define the client:
In order to start the Wireguard tunnel on the client, you use:
wg-quick up testvpn
and to bring it down:
wg-quick down testvpn
Wireguard network links are shown using “ifconfig”. So in my example, the host would have network device “wg0” and on the client it would be device “testvpn”. You can name your configs and therefore devices anything you find convenient.
You can also do a "wg-quick status’ to see the current connections on either the server or the client.
So, once you create a Wireguard connection, it behaves just like any other Linux Network device. If your Wireguard service is not started, when you do the:
sudo systemctl status wg-quick@wg0
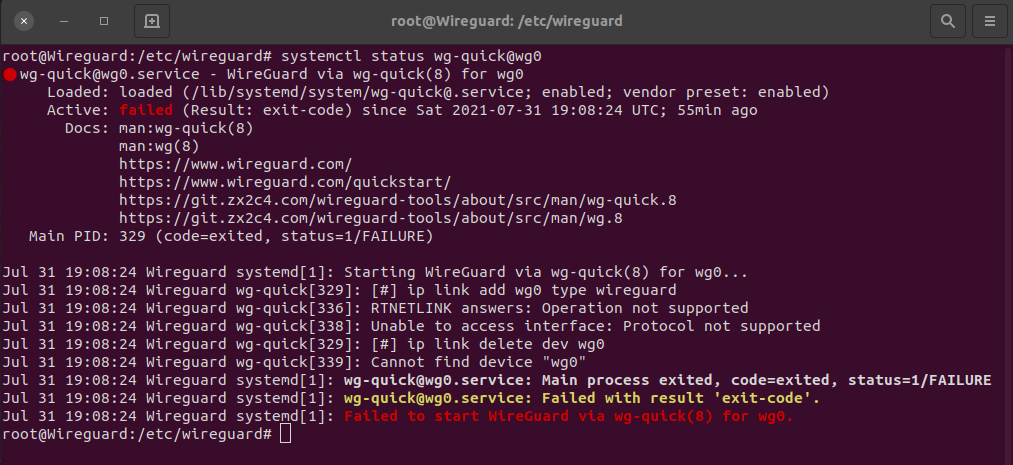
This means that Wireguard is not supported by your host kernel operating system. I used LXC containers in my examples on a host system with a kernel that lacked integrated Wireguard support and that is why it failed above. Wireguard support is a part of the Ubuntu 20.04 LTS release. Had I installed my Wireguard server on my baremetal desktop Ubuntu, it would have worked.
Wireguard has the ultimate simplicity and is very secure. You will find Wireguard clients for Windows, Mac, Linux, Android and IoS. It is a flexible, powerful and fast efficient protocol.
I described all the details in implementing Wireguard from scratch in order to explain how it actually works. Lots of providers have added their own frontends (NordVPN with NordLynx).
Wireguard is faster than OpenVPN and it can be configured on any port number.
Since I tend to also cover Ubiquiti Unifi Networking equipment, it is significant to point out that UnifiOS which is the underlying OS for the Ubiquiti UDM and UDM Pro routers as of v1.10 of their firmware has Wireguard support in the kernel. Some folks on Github have developed their own mods to take advantage of Wireguard in Unifi os:
https://github.com/tusc/wireguard-kmod
This probably means that both the site to site VPN and the L2TP server that we see in Unifi will soon be augmented in their SDN controller program with Wireguard functionality.