In the last video entitled “VLAN Connections 101” we saw how to use Netplan in Ubuntu to create a connection to a VLAN via a virtual switch. In this presentation we learn how to create a virtual switch to do the same in Windows 10 or 11.
In order to perform the steps in this video, you must have Windows 10 or 11 and they must be either the Pro, Enterprise or Education editions. This tutorial uses elements of Hyper-V virtualization that are not a part of Windows Home edition.
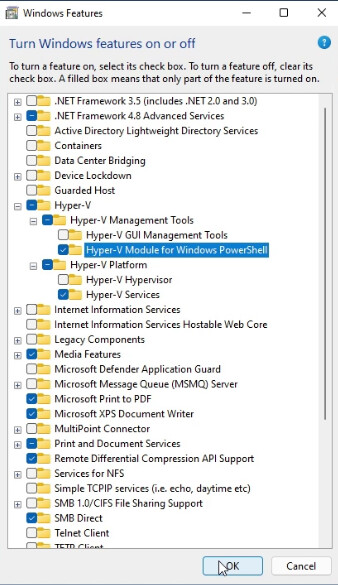
We need to enable Windows features. In the windows feature installation dialog, we have to install the two components called “Hyper-V-Services” and “Hyper-V-Module for Windows powershell”. This will also work if you enable all of Hyper-V.
A reboot is required to fully install the Hyper-V features.
Find out the name of your Ethernet adapter device by going into Administrative Powershell.
Press the Windows key + R to enter the run dialogue.
powershell
Hold CTRL + Shift when you click “OK” in order to enter PowerShell in administrative mode.
To find out the name of your ethernet adapter in powershell.
Get-NetAdapter
Add a new virtual Switch to your system substituting your ethernet adapter name:
New-VMSwitch -name VLAN-vSwitch -NetAdapterName "Ethernet Instance 0" -AllowManagementOS $true
Hyper-V automatically creates a virtual NIC without a VLAN tag as an artifact of creating the switch. We want to delete that NIC:
Remove-VMNetworkAdapter -ManagementOS -Name VLAN-vSwitch
To create a new virtual adapter for your VLAN, use the command below. Adjust your VLAN number and name accordingly.
Add-VMNetworkAdapter -ManagementOS -Name "VLAN100" -SwitchName "VLAN-vSwitch" -Passthru | Set-VMNetworkAdapterVlan -Access -VlanId 100
In order to get DHCP address from your router VLAN correctly, windows needs to be rebooted. A simple “ipconfig /renew” was not enough to make it work.
The VLAN adapters will perform reliably after a reboot and you can create additional VLAN adapters by additional “Add-VMNetworkAdapter” commands as I showed in the presentation.