Virtual Router Redundancy Protocol (VRRP) is most commonly used for network gateway redundancy between multiple ISPs, Firewall failover, and failover for key services. Some Ubiquiti Unifi Cloud Gateways use VRRP for what they call “Shadow Gateways”.
In this tutorial, I will show you how to use VRRP to create high availability self hosted applications with incus containers that automatically failover. I have covered this topic before in Automatic Failover: NginX Proxy Manager & SearXNG and also in High Availability Pi-hole & Local DNS.
I have created a bash script that can scan your network and identify any VRRP services that are defined. Edit a file on your desktop or server of your choosing:
nano vrrp_scan.sh
Paste the following code into the file:
#!/bin/bash

# ScottiBYTE's VRRP Scanner

# Check to see that tshark is installed
if ! command -v tshark >/dev/null 2>&1; then
    echo "❌ 'tshark' is not installed."

    # Try to detect package manager and suggest installation
    if command -v apt >/dev/null 2>&1; then
        echo "Install it using: sudo apt install tshark"
    elif command -v dnf >/dev/null 2>&1; then
        echo "Install it using: sudo dnf install wireshark-cli"
    elif command -v pacman >/dev/null 2>&1; then
        echo "Install it using: sudo pacman -S wireshark-cli"
    else
        echo "Please install tshark manually via your system's package manager."
    fi
    exit 1
fi

# Determine interface used for default route
IFACE=$(ip route get 1.1.1.1 | awk '{for(i=1;i<=NF;i++) if ($i=="dev") print $(i+1)}')
echo "Using interface: $IFACE"

TMP=$(mktemp)

echo "Scanning for VRRP Master Advertisements for 5 seconds..."
sudo timeout 5 tshark -i "$IFACE" -a duration:10 -Y vrrp -T fields -e vrrp.virt_rtr_id -e ip.src -e vrrp.ip_addr > "$TMP" 2>/dev/null

declare -A SEEN_VIPS
declare -A HOSTNAMES

# Parse VRRP info
while IFS=$'\t' read -r VRID MASTER_IP VIRTUAL_IP; do
    [[ -z "$VRID" || -z "$MASTER_IP" ]] && continue
    HOSTNAME=$(getent hosts "$MASTER_IP" | awk '{print $2}')
    HOSTNAMES["$VRID|$MASTER_IP"]="${HOSTNAME:-$MASTER_IP}"

    KEY="$VRID|$MASTER_IP"

    # Append unique virtual IPs
    if [[ -z "${SEEN_VIPS[$KEY]}" ]]; then
        SEEN_VIPS[$KEY]="$VIRTUAL_IP"
    else
        [[ ",${SEEN_VIPS[$KEY]}," == *",${VIRTUAL_IP},"* ]] || SEEN_VIPS[$KEY]+=", $VIRTUAL_IP"
    fi
done < "$TMP"

echo -e "\nVRRP Master Table:"
echo "--------------------------------------------------------------------------------"
printf "%-5s %-25s %-15s %-20s\n" "VRID" "Host (Name)" "Master IP" "VRRP Virtual IP(s)"
echo "--------------------------------------------------------------------------------"

# Combine and sort by VRID
for key in "${!SEEN_VIPS[@]}"; do
    VRID="${key%%|*}"
    MASTER_IP="${key#*|}"
    HOST="${HOSTNAMES[$key]}"
    VIPS="${SEEN_VIPS[$key]}"
    printf "%-5s\t%-25s\t%-15s\t%s\n" "$VRID" "$HOST" "$MASTER_IP" "$VIPS"
done | sort -n -k1 | while IFS=$'\t' read -r VRID HOST MASTER_IP VIPS; do
    printf "%-5s %-25s %-15s %-20s\n" "$VRID" "$HOST" "$MASTER_IP" "$VIPS"
done

rm -f "$TMP"
Do a CTRL O and enter to save the file and a CTRL X to exit the nano editor.
Provide execute privilege for the script:
chmod +x vrrp_scan.sh
This script requires the “tshark” application to perform the proper scans. If not installed, the script will prompt you to install it.

To install “tshark”:
sudo apt install tshark
The script will determine the network device that you use for your default route and will use that device to perform the scanning operation. In my tutorial, this was “bridge0” which the script automatically determined.
To run the script:
./vrrp_scan.sh
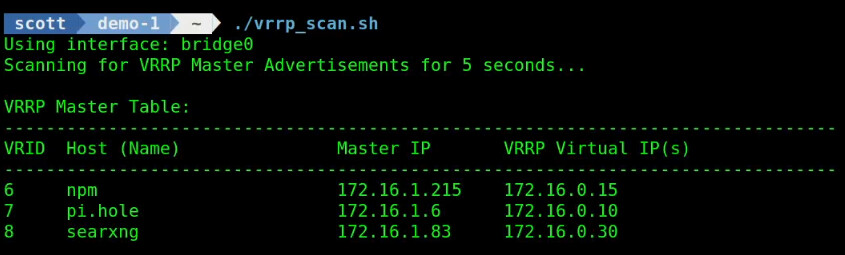
In my case, I already have VRRP services which I have installed and covered in previous videos.
Each VRRP service requires a Virtual Router Identifier (VRID) and this is a unique number from 1 to 255 for each of your applications. Each VRRP application also requires a Virtual IP address which must be unused by any other system on your network. Define the VRRP IP as a DHCP reservation or as an address outside of your DHCP scope.
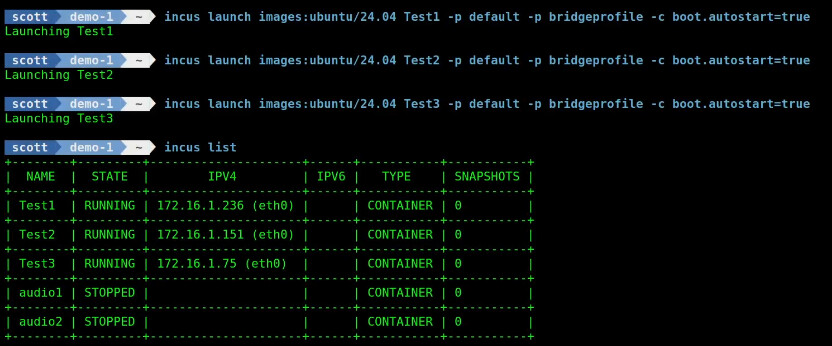
Now lets create a new VRRP service. To do that, we will be creating three incus containers that have addresses on my main LAN using the “bridgeprofile” discussed in my tutorial entitled Incus Containers Step by Step. I create three incus containers named Test1, Test2, and Test3. Normally you would want these containers to be offered on different servers for fail-over purposes. I just created my example on the same server for expediency.
Create the containers:
incus launch images:ubuntu/24.04 Test1 -p default -p bridgeprofile -c boot.autostart=true
incus launch images:ubuntu/24.04 Test2 -p default -p bridgeprofile -c boot.autostart=true
incus launch images:ubuntu/24.04 Test3 -p default -p bridgeprofile -c boot.autostart=true
Connect to the first container:
incus shell Test1
Take the updates:
apt update && apt upgrade -y
Install some dependencies.
apt install net-tools openssh-server nano rsync keepalived -y
Edit the configuration for for VRRP:
sudo nano /etc/keepalived/keepalived.conf
Paste the following into the editor.
vrrp_instance Test {
        state MASTER
        interface eth0
        virtual_router_id 5
        priority 255
        advert_int 1
        authentication {
              auth_type PASS
              auth_pass 54321
        }
        virtual_ipaddress {
              172.16.0.55/16
        }
}
Save the file with CTRL O and enter and then CTRL X to exit the editor.
We are calling this the “Test” application. The first VRRP system is always the “MASTER”. We are using eth0 because that is the network device name inside of an incus container. We are using VRID 5 because it is a unique number that nothing is using. The priority of the MASTER is always 255. I choose to advertise this address once each second. I add a password for security. The VRRP virtual IP address should be the same for all servers presenting the Test application and it should be an address that is unused on your network. Your VRRP would most likely have a 24 bit subnet mask and an example might be 192.168.1.200/24.
To enable the configuration we just created:
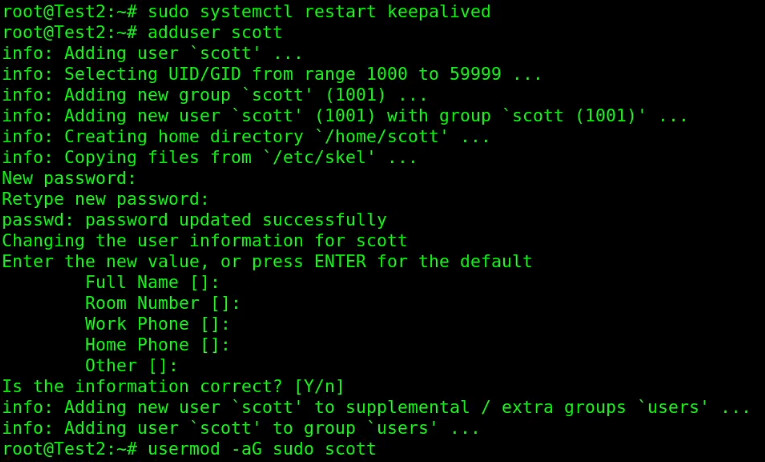
sudo systemctl restart keepalived
For a part of my demonstration, I also added a user account and I put it in the sudo group.
adduser scott
usermod -aG sudo scott

Exit the Test1 container and move into the Test2 container:
exit
incus shell Test2
Take the updates.
apt update && apt upgrade -y
Install the dependencies (I accidentally skipped this in the video just to see if you would read the notes):
apt install net-tools openssh-server nano rsync keepalived -y
Edit the keepalived configuration file:
sudo nano /etc/keepalived/keepalived.conf
Paste in the following:
vrrp_instance test {

        state BACKUP
        interface eth0
        virtual_router_id 5
        priority 254
        advert_int 1
        authentication {
              auth_type PASS
              auth_pass 54321
        }
        virtual_ipaddress {
              172.16.0.55/16
        }
}
Do a CTRL O and enter to write the file out and a CTRL X to exit the nano editor.
The difference is that Test2 is a “BACKUP” node because only one master is allowed. Everything else is the same except that that priority is 254.
Reload the keepalived (VRRP) service to make the new configuration take effect:
sudo systemctl restart keepalived
Add a user account on Test2 and add it to the sudo group:
adduser scott
usermod -aG sudo scott
Exit the Test2 container and move to the Test3 container.
exit
incus shell Test3
Take the updates:
apt update && apt upgrade -y
Install the dependencies (this time I remembered in the video):
apt install net-tools openssh-server nano rsync keepalived -y
Edit the keepalived configuration file.
sudo nano /etc/keepalived/keepalived.conf
Paste in the following data:
vrrp_instance test {

        state BACKUP
        interface eth0
        virtual_router_id 5
        priority 253
        advert_int 1
        authentication {
              auth_type PASS
              auth_pass 54321
        }
        virtual_ipaddress {
              172.16.0.55/16
        }
}
Save the file with a CTRL O and enter and a CTRL X to exit the nano editor.
The configuration for Test3 is also as a BACKUP. The only difference is that the priority is set to 253 this time.
Enable the new configuration.
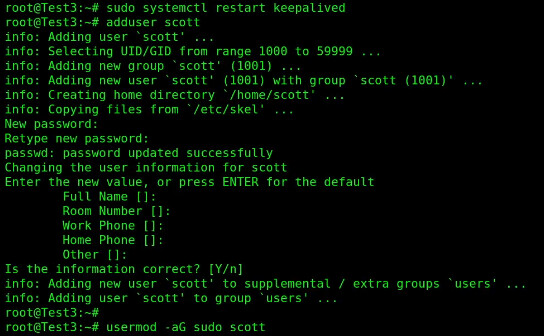
sudo systemctl restart keepalived
Add a new user for Test3 and add that user to the sudo group.
adduser scott
usermod -aG sudo scott
Exit the Test3 container.
exit
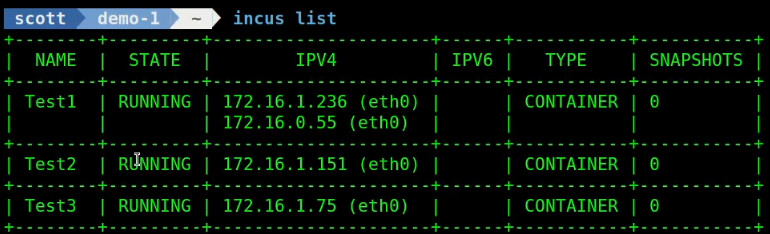
At this point, you can list the incus containers as I did in the video and you will note that the MASTER has the VRRP Virtual address of 172.16.0.55 (or whatever you chose) in addition to its normal address.
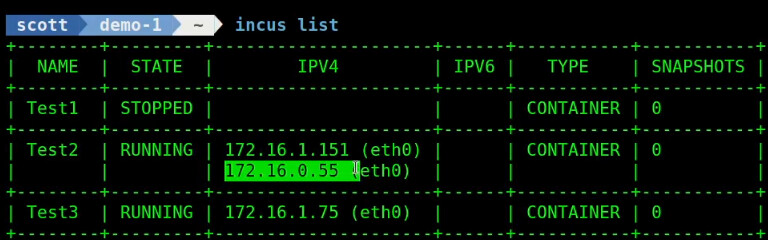
In the video, I show stopping the Test1 MASTER container and seeing Test2 take over and subsequently stopping Test2 and seeing Test3 take over.
I showed where the VRRP address is assumed by Test2 below:
Once I restart the Test1 container, it will reclaim the VRRP Virtual address since it is the master. If I run my script again.
./vrrp_scan.sh
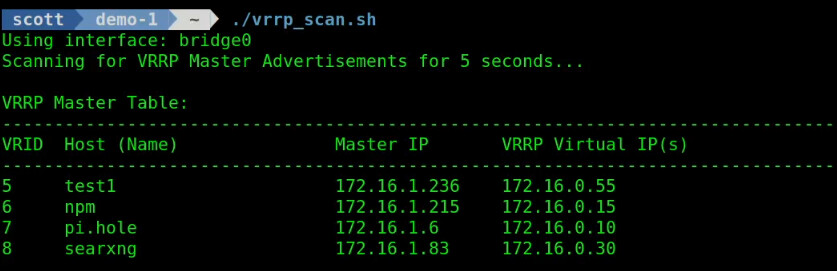
The host “test1” is listed by name above because I put it in my local DNS.