In this tutorial, I will show how to customize an Ubuntu desktop with some of my favorite options.
Linux is all about making the experience fit the requirements of the end user. Just about everything in any Linux desktop can be customized to meet your needs. Distro hopping is popular for users that come from Windows because they do not realize that you can customize any distro to any degree.
For the purposes of this tutorial, I am using an Ubuntu 24.04 desktop installation. My Ubuntu instance is actually an Incus Virtual Machine. I created this Incus VM with this command:
incus launch images:ubuntu/24.04/desktop --vm Ubuntu -c limits.memory=4GiB -c limits.cpu=2
Incus VM’s are created with a default 10GB disk. To change that you could:
incus config device override Ubuntu root size=50GiB
Ubuntu 24.04 has a minimum memory requirement of 4GB and a minimum of 2 CPU cores.
The rest of this tutorial assumes that your Ubuntu is a desktop or laptop computer and I show how to make many modifications to the default installation. All of the options I show are personal choices and there is no “right” configuration. I show options that I like.
After logging into my Ubuntu desktop, I do a CTRL ALT T to bring up a terminal window.
The first thing you should do with a new Ubuntu installation is to update the repositories and the installed applications.
sudo apt update && sudo apt upgrade -y
Install the restricted extras package which includes some proprietary components not included in the stock OS, including some truetype fonts and codecs.
sudo apt install ubuntu-restricted-extras
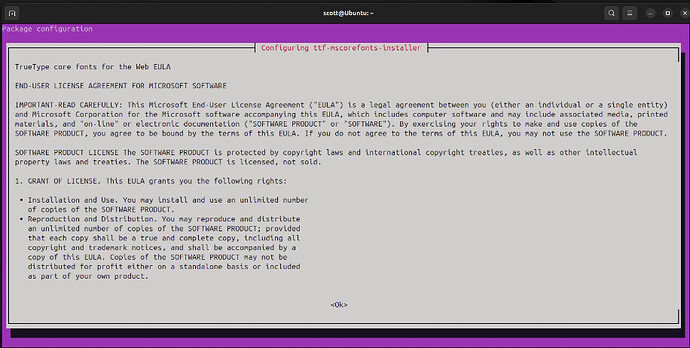
During this installation, you will have to agree to the EULA for the fonts.
Although it is possible to perform nearly all Ubuntu desktop management functions from the GUI, one of the best ways to learn Linux is to learn the command line. A better terminal interface goes a long way to making the terminal more comfortable. Install the “terminator” terminal and a couple dependencies we will use later.
sudo apt install terminator fonts-powerline nano -y
To ensure that the “terminator” terminal is the default, execute the following command and be sure the new terminal is selected (Option 0):
sudo update-alternatives --config x-terminal-emulator

Go edit the login script to add customizations to the terminal prompt:
nano .bashrc
Copy the following code:
################################################################################
##  FUNCTIONS                                                                 ##
################################################################################

##
##	ARRANGE $PWD AND STORE IT IN $NEW_PWD
##	* The home directory (HOME) is replaced with a ~
##	* The last pwdmaxlen characters of the PWD are displayed
##	* Leading partial directory names are striped off
##		/home/me/stuff -> ~/stuff (if USER=me)
##		/usr/share/big_dir_name -> ../share/big_dir_name (if pwdmaxlen=20)
##
##	Original source: WOLFMAN'S color bash promt
##	https://wiki.chakralinux.org/index.php?title=Color_Bash_Prompt#Wolfman.27s
##
bash_prompt_command() {
	# How many characters of the $PWD should be kept
	local pwdmaxlen=25

	# Indicate that there has been dir truncation
	local trunc_symbol=".."

	# Store local dir
	local dir=${PWD##*/}

	# Which length to use
	pwdmaxlen=$(( ( pwdmaxlen < ${#dir} ) ? ${#dir} : pwdmaxlen ))

	NEW_PWD=${PWD/#$HOME/\~}

	local pwdoffset=$(( ${#NEW_PWD} - pwdmaxlen ))

	# Generate name
	if [ ${pwdoffset} -gt "0" ]
	then
		NEW_PWD=${NEW_PWD:$pwdoffset:$pwdmaxlen}
		NEW_PWD=${trunc_symbol}/${NEW_PWD#*/}
	fi
}


##
##	GENERATE A FORMAT SEQUENCE
##
format_font()
{
	## FIRST ARGUMENT TO RETURN FORMAT STRING
	local output=$1


	case $# in
	2)
		eval $output="'\[\033[0;${2}m\]'"
		;;
	3)
		eval $output="'\[\033[0;${2};${3}m\]'"
		;;
	4)
		eval $output="'\[\033[0;${2};${3};${4}m\]'"
		;;
	*)
		eval $output="'\[\033[0m\]'"
		;;
	esac
}


##
## COLORIZE BASH PROMT
##
bash_prompt() {

	############################################################################
	## COLOR CODES                                                            ##
	## These can be used in the configuration below                           ##
	############################################################################

	## FONT EFFECT
	local      NONE='0'
	local      BOLD='1'
	local       DIM='2'
	local UNDERLINE='4'
	local     BLINK='5'
	local    INVERT='7'
	local    HIDDEN='8'


	## COLORS
	local   DEFAULT='9'
	local     BLACK='0'
	local       RED='1'
	local     GREEN='2'
	local    YELLOW='3'
	local      BLUE='4'
	local   MAGENTA='5'
	local      CYAN='6'
	local    L_GRAY='7'
	local    D_GRAY='60'
	local     L_RED='61'
	local   L_GREEN='62'
	local  L_YELLOW='63'
	local    L_BLUE='64'
	local L_MAGENTA='65'
	local    L_CYAN='66'
	local     WHITE='67'


	## TYPE
	local     RESET='0'
	local    EFFECT='0'
	local     COLOR='30'
	local        BG='40'


	## 256 COLOR CODES
	local NO_FORMAT="\[\033[0m\]"
	local ORANGE_BOLD="\[\033[1;38;5;208m\]"
	local TOXIC_GREEN_BOLD="\[\033[1;38;5;118m\]"
	local RED_BOLD="\[\033[1;38;5;1m\]"
	local CYAN_BOLD="\[\033[1;38;5;87m\]"
	local BLACK_BOLD="\[\033[1;38;5;0m\]"
	local WHITE_BOLD="\[\033[1;38;5;15m\]"
	local GRAY_BOLD="\[\033[1;90m\]"
	local BLUE_BOLD="\[\033[1;38;5;74m\]"


	##  ##  ##  ##  ##  ##  ##  ##  ##  ##  ##  ##  ##  ##  ##  ##  ##  ##  ##
	  ##  ##  ##  ##  ##  ##  ##  ##  ##  ##  ##  ##  ##  ##  ##  ##  ##  ##  ##
	##  ##  ##  ##  ##  ##  ##  ##  ##  ##  ##  ##  ##  ##  ##  ##  ##  ##  ##


	##                          CONFIGURE HERE                                ##


	############################################################################
	## CONFIGURATION                                                          ##
	## Choose your color combination here                                     ##
	############################################################################
	local FONT_COLOR_1=$WHITE
	local BACKGROUND_1=$BLUE
	local TEXTEFFECT_1=$BOLD

	local FONT_COLOR_2=$WHITE
	local BACKGROUND_2=$L_BLUE
	local TEXTEFFECT_2=$BOLD

	local FONT_COLOR_3=$D_GRAY
	local BACKGROUND_3=$WHITE
	local TEXTEFFECT_3=$BOLD

	local PROMT_FORMAT=$BLUE_BOLD


	############################################################################
	## EXAMPLE CONFIGURATIONS                                                 ##
	## I use them for different hosts. Test them out ;)                       ##
	############################################################################

	## CONFIGURATION: BLUE-WHITE
	if [ "$HOSTNAME" = dell ]; then
		FONT_COLOR_1=$WHITE; BACKGROUND_1=$BLUE; TEXTEFFECT_1=$BOLD
		FONT_COLOR_2=$WHITE; BACKGROUND_2=$L_BLUE; TEXTEFFECT_2=$BOLD
		FONT_COLOR_3=$D_GRAY; BACKGROUND_3=$WHITE; TEXTEFFECT_3=$BOLD
		PROMT_FORMAT=$CYAN_BOLD
	fi

	## CONFIGURATION: BLACK-RED
	if [ "$HOSTNAME" = giraff6 ]; then
		FONT_COLOR_1=$WHITE; BACKGROUND_1=$BLACK; TEXTEFFECT_1=$BOLD
		FONT_COLOR_2=$WHITE; BACKGROUND_2=$D_GRAY; TEXTEFFECT_2=$BOLD
		FONT_COLOR_3=$WHITE; BACKGROUND_3=$RED; TEXTEFFECT_3=$BOLD
		PROMT_FORMAT=$RED_BOLD
	fi

	## CONFIGURATION: RED-BLACK
	#FONT_COLOR_1=$WHITE; BACKGROUND_1=$RED; TEXTEFFECT_1=$BOLD
	#FONT_COLOR_2=$WHITE; BACKGROUND_2=$D_GRAY; TEXTEFFECT_2=$BOLD
	#FONT_COLOR_3=$WHITE; BACKGROUND_3=$BLACK; TEXTEFFECT_3=$BOLD
	#PROMT_FORMAT=$RED_BOLD

	## CONFIGURATION: CYAN-BLUE
	if [ "$HOSTNAME" = sharkoon ]; then
		FONT_COLOR_1=$BLACK; BACKGROUND_1=$L_CYAN; TEXTEFFECT_1=$BOLD
		FONT_COLOR_2=$WHITE; BACKGROUND_2=$L_BLUE; TEXTEFFECT_2=$BOLD
		FONT_COLOR_3=$WHITE; BACKGROUND_3=$BLUE; TEXTEFFECT_3=$BOLD
		PROMT_FORMAT=$CYAN_BOLD
	fi

	## CONFIGURATION: GRAY-SCALE
	if [ "$HOSTNAME" = giraff ]; then
		FONT_COLOR_1=$WHITE; BACKGROUND_1=$BLACK; TEXTEFFECT_1=$BOLD
		FONT_COLOR_2=$WHITE; BACKGROUND_2=$D_GRAY; TEXTEFFECT_2=$BOLD
		FONT_COLOR_3=$WHITE; BACKGROUND_3=$L_GRAY; TEXTEFFECT_3=$BOLD
		PROMT_FORMAT=$BLACK_BOLD
	fi

	## CONFIGURATION: GRAY-CYAN
	if [ "$HOSTNAME" = light ]; then
		FONT_COLOR_1=$WHITE; BACKGROUND_1=$BLACK; TEXTEFFECT_1=$BOLD
		FONT_COLOR_2=$WHITE; BACKGROUND_2=$D_GRAY; TEXTEFFECT_2=$BOLD
		FONT_COLOR_3=$BLACK; BACKGROUND_3=$L_CYAN; TEXTEFFECT_3=$BOLD
		PROMT_FORMAT=$CYAN_BOLD
	fi


	##  ##  ##  ##  ##  ##  ##  ##  ##  ##  ##  ##  ##  ##  ##  ##  ##  ##  ##
	  ##  ##  ##  ##  ##  ##  ##  ##  ##  ##  ##  ##  ##  ##  ##  ##  ##  ##  ##
	##  ##  ##  ##  ##  ##  ##  ##  ##  ##  ##  ##  ##  ##  ##  ##  ##  ##  ##


	############################################################################
	## TEXT FORMATING                                                         ##
	## Generate the text formating according to configuration                 ##
	############################################################################

	## CONVERT CODES: add offset
	FC1=$(($FONT_COLOR_1+$COLOR))
	BG1=$(($BACKGROUND_1+$BG))
	FE1=$(($TEXTEFFECT_1+$EFFECT))

	FC2=$(($FONT_COLOR_2+$COLOR))
	BG2=$(($BACKGROUND_2+$BG))
	FE2=$(($TEXTEFFECT_2+$EFFECT))

	FC3=$(($FONT_COLOR_3+$COLOR))
	BG3=$(($BACKGROUND_3+$BG))
	FE3=$(($TEXTEFFECT_3+$EFFECT))

	FC4=$(($FONT_COLOR_4+$COLOR))
	BG4=$(($BACKGROUND_4+$BG))
	FE4=$(($TEXTEFFECT_4+$EFFECT))


	## CALL FORMATING HELPER FUNCTION: effect + font color + BG color
	local TEXT_FORMAT_1
	local TEXT_FORMAT_2
	local TEXT_FORMAT_3
	local TEXT_FORMAT_4
	format_font TEXT_FORMAT_1 $FE1 $FC1 $BG1
	format_font TEXT_FORMAT_2 $FE2 $FC2 $BG2
	format_font TEXT_FORMAT_3 $FC3 $FE3 $BG3
	format_font TEXT_FORMAT_4 $FC4 $FE4 $BG4


	# GENERATE PROMT SECTIONS
	local PROMT_USER=$"$TEXT_FORMAT_1 \u "
	local PROMT_HOST=$"$TEXT_FORMAT_2 \h "
	local PROMT_PWD=$"$TEXT_FORMAT_3 \${NEW_PWD} "
	local PROMT_INPUT=$"$PROMT_FORMAT "


	############################################################################
	## SEPARATOR FORMATING                                                    ##
	## Generate the separators between sections                               ##
	## Uses background colors of the sections                                 ##
	############################################################################

	## CONVERT CODES
	TSFC1=$(($BACKGROUND_1+$COLOR))
	TSBG1=$(($BACKGROUND_2+$BG))

	TSFC2=$(($BACKGROUND_2+$COLOR))
	TSBG2=$(($BACKGROUND_3+$BG))

	TSFC3=$(($BACKGROUND_3+$COLOR))
	TSBG3=$(($DEFAULT+$BG))


	## CALL FORMATING HELPER FUNCTION: effect + font color + BG color
	local SEPARATOR_FORMAT_1
	local SEPARATOR_FORMAT_2
	local SEPARATOR_FORMAT_3
	format_font SEPARATOR_FORMAT_1 $TSFC1 $TSBG1
	format_font SEPARATOR_FORMAT_2 $TSFC2 $TSBG2
	format_font SEPARATOR_FORMAT_3 $TSFC3 $TSBG3


	# GENERATE SEPARATORS WITH FANCY TRIANGLE
	local TRIANGLE=$'\uE0B0'
	local SEPARATOR_1=$SEPARATOR_FORMAT_1$TRIANGLE
	local SEPARATOR_2=$SEPARATOR_FORMAT_2$TRIANGLE
	local SEPARATOR_3=$SEPARATOR_FORMAT_3$TRIANGLE


	############################################################################
	## WINDOW TITLE                                                           ##
	## Prevent messed up terminal-window titles                               ##
	############################################################################
	case $TERM in
	xterm*|rxvt*)
		local TITLEBAR='\[\033]0;\u:${NEW_PWD}\007\]'
		;;
	*)
		local TITLEBAR=""
		;;
	esac


	############################################################################
	## BASH PROMT                                                             ##
	## Generate promt and remove format from the rest                         ##
	############################################################################
	PS1="$TITLEBAR\n${PROMT_USER}${SEPARATOR_1}${PROMT_HOST}${SEPARATOR_2}${PROMT_PWD}${SEPARATOR_3}${PROMT_INPUT}"


	## For terminal line coloring, leaving the rest standard
	none="$(tput sgr0)"
	trap 'echo -ne "${none}"' DEBUG
}


################################################################################
##  MAIN                                                                      ##
################################################################################

##	Bash provides an environment variable called PROMPT_COMMAND.
##	The contents of this variable are executed as a regular Bash command
##	just before Bash displays a prompt.
##	We want it to call our own command to truncate PWD and store it in NEW_PWD
PROMPT_COMMAND=bash_prompt_command

##	Call bash_promnt only once, then unset it (not needed any more)
##	It will set $PS1 with colors and relative to $NEW_PWD,
##	which gets updated by $PROMT_COMMAND on behalf of the terminal
bash_prompt
unset bash_prompt

### EOF ###
Perform an “ALT /” in the editor which will move to the end of the file. Then do a CTRL ALT V to paste the code you cut into the editing session. Do a CTRL O and enter to save the file and a CTRL X to exit the nano editor.
Now repeat the above steps, but this time let’s make the same changes to the root bashrc file:
sudo nano /root/.bashrc
By the way, I mentioned above that ALT / moves to the end of the file in the nano editor. Did you know that ALT \ will move to the beginning of the file?
One primary criticism of Ubuntu is that it is increasingly relying on Snaps. Snap packages are a proprietary installation type created by Canonical, the authors of Ubuntu. The use of Snaps and whether the snap daemon is installed in Ubuntu is up to you. I use the apt package manager, snaps, flatpaks, and appimages because they all have use cases.
There are a huge number of applications that are available as snaps. Some apps run better as snaps and others run better natively installed with apt.
In Ubuntu 24.04, the Firefox web browser is installed as a snap. I don’t like this because the integration with the OS is not as good and the Firefox snap runs more slowly. Let’s uninstall the Firefox snap:
sudo snap remove firefox
Add the Mozilla repository to your Ubuntu.
sudo add-apt-repository ppa:mozillateam/ppa
Set the priority higher for the Firefox apt package from the repository than for the snap.
echo '
Package: *
Pin: release o=LP-PPA-mozillateam
Pin-Priority: 1001
' | sudo tee /etc/apt/preferences.d/mozilla-firefox
Update your repository list.
sudo apt update
Install Firefox.
sudo apt install firefox
Next, let’s install the Google Chrome web browser.
Start by adding some dependencies.
sudo apt install curl software-properties-common apt-transport-https ca-certificates -y
Let’s add the signing key for Chrome.
curl -fSsL https://dl.google.com/linux/linux_signing_key.pub | gpg --dearmor | sudo tee /usr/share/keyrings/google-chrome.gpg > /dev/null
Let’s add the repository for the chrome browser using the key we just downloaded. One key reason to add an application via a repository is because it will automatically be updated as a part of “apt update && apt upgrade” when there are new versions.
echo deb [arch=amd64 signed-by=/usr/share/keyrings/google-chrome.gpg] http://dl.google.com/linux/chrome/deb/ stable main | sudo tee /etc/apt/sources.list.d/google-chrome.list
Update the repository list:
sudo apt update
Install the chrome web browser.
sudo apt install google-chrome-stable
Let’s install some more dependencies in order to install the Brave web browser. I consider brave to be a more privacy respecting chrome based browser.
sudo apt install apt-transport-https wget ca-certificates gnupg2 ubuntu-keyring curl -y
Download the signing key for the brave browser.
sudo curl -fsSLo /usr/share/keyrings/brave-browser-archive-keyring.gpg https://brave-browser-apt-release.s3.brave.com/brave-browser-archive-keyring.gpg
Add the repository to your system with the signing key.
echo "deb [signed-by=/usr/share/keyrings/brave-browser-archive-keyring.gpg arch=amd64] https://brave-browser-apt-release.s3.brave.com/ stable main"|sudo tee /etc/apt/sources.list.d/brave-browser-release.list
Update the repository list:
sudo apt update
Install the Brave browser:
sudo apt install brave-browser -y
We want to add functionality to Ubuntu via Gnome extensions. Begin by removing a legacy package if it is installed.
sudo apt remove chrome-gnome-shell
Now install the newer browser connector to allow a “chrome” derived browser to manage gnome extensions.
sudo apt install gnome-browser-connector -y
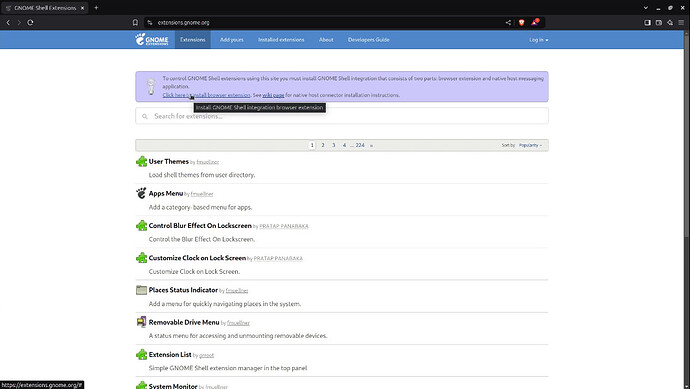
Go into either Chrome or Brave (NOT FIREFOX) and visit this URL:
https://extensions.gnome.org/
Choose the option to “Click here to install browser extension” as shown in the video.
Return to the gnome extensions tab in your browser and click the “reload” icon at the top of the browser and then install the following extensions from this page as shown in the video:
apps menu
places Status Indicator
IP Finder by LinxGem33
LAN IP Address
Extension List
Dash to Dock
Dash to Dock moves the dash menu panel off the left side of your monitor to the bottom of the screen and centers it making it look a bit more like a Windows or MacOS experience.
In the Dash to Dock settings screen which you can access via the Extension list extension (looks like a puzzle piece on your top panel) choose the “Launchers” tab and select move the show application icon to the beginning of the dock. This makes more sense to me.
On the “Appearance” screen, I like to deselect the “Show overview on startup” option which shows sort of a zoomed desktop view on login. There are many other options in dash to dock and you should experiment to see what you like.
Ubuntu supports both the X11 and the Wayland display managers. Upon installation of Ubuntu 24.04, you will have Wayland as the default display manager.
echo $XDG_SESSION_TYPE
You can change this by editing this file:
sudo nano /etc/gdm3/custom.conf
On my Ubuntu Desktop (unlike the demo in the video), I am using the X11 display manager and so I have an entry as follows in this file.
# See /usr/share/gdm/gdm.`Preformatted text`schemas for a list of available options.

[daemon]
# Uncomment the line below to force the login screen to use Xorg
WaylandEnable=false

# Enabling automatic login
#  AutomaticLoginEnable = true
#  AutomaticLogin = user1
Wayland is the newer display manager and I have some older programs that require X11 and so I use X11.
You can see what your current session manager is with the command:
echo $GDMSESSION
The default session manager in Ubuntu is “ubuntu”.
Nala is a front end to the apt package manager and it displays things in a better format. Install nala:
sudo apt install nala
One package manager not installed by default in ubuntu is the Flatpak package manager. Let’s use nala to install Flatpak.
sudo nala install flatpak
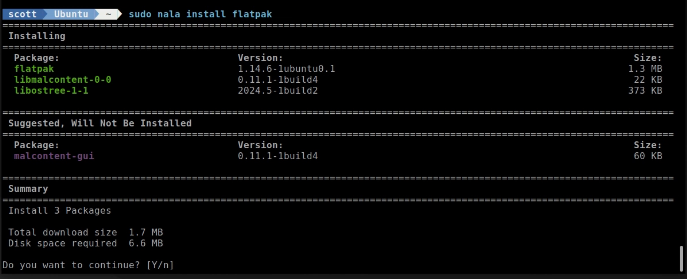
Notice above how clear nala makes in regards to what is being installed.
To use Flatpaks, we must add the Flathub repository.
flatpak remote-add --if-not-exists flathub https://dl.flathub.org/repo/flathub.flatpakrepo
Let’s install OBS Studio using a Flatpak.
flatpak install flathub com.obsproject.Studio
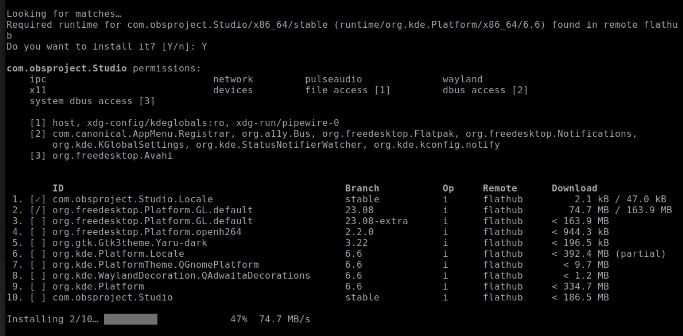
OBS Studio is the recording software that I use to create my videos. I use Openshot as my post recording editor to create the final product.
OBS Required that I reboot my Ubuntu Desktop before it was available.
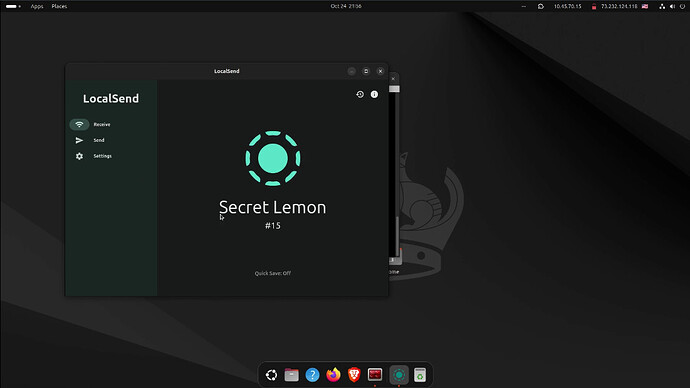
One application that I like to install on my desktops is “localsend”. Localsend allows files to be transferred to and from different systems on your LAN. Localsend only works locally on the LAN. Localsend can be installed on Linux, Windows, MacOS, Android and IoS. To install Localsend on Ubuntu:
sudo snap install localsend
I don’t really appreciate the nautilus file manager which is the default in Ubuntu. I prefer the nemo file manager which is the default in the Linux Mint OS. To install nemo:
sudo apt install nemo -y
Make nemo your default file manager:
xdg-mime default nemo.desktop inode/directory application/x-gnome-saved-search
Make “Cinnamon” your default desktop manager for a more seamless experience with nemo.
gsettings set org.gnome.desktop.background show-desktop-icons false
gsettings set org.nemo.desktop show-desktop-icons true
One of my preferences is I like to click on an icon in the dock to launch an application. However, if the application is already running, I like clicking on its dock icon to toggle displaying and minimizing it. To do that:
gsettings set org.gnome.shell.extensions.dash-to-dock click-action 'minimize-or-previews'
To properly start the nemo desktop we need to add it to our startup applications. Launch “Startup applications” in the app drawer.
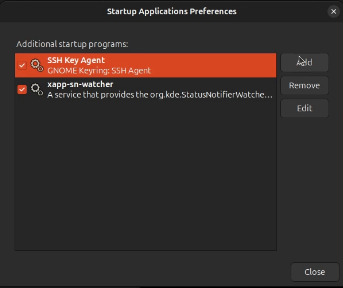
Add an entry for the nemo desktop as follows.
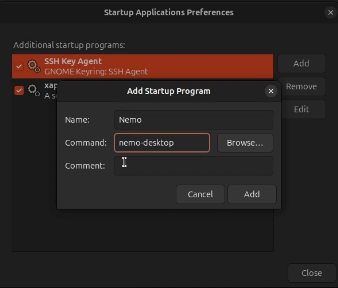
To make these changes take effect, you need to log out and back in.
Since we installed nemo as our file manager, lets remove nautilus from the system.
sudo apt remove --purge nautilus
This will also remove the file manager icon from the menu dock. Simply open the app drawer and click on the “files” icon and it will launch nemo. Note that both nautilus and nemo are named files and that’s one reason I removed nautilus.
Right click nemo in the menu dock and select “pin to dash”.
Nemo has tons of great options that you can explore.
I like vlc as a media player, but smplayer is really excellent and supports just about every codec. To install smplayer:
sudo apt install smplayer
BTOP is a great application to display realtime performance of your Linux system from a terminal.
sudo nala install btop
Btop also has an application shortcut in the app drawer named Btop ++.
Fastfetch is a great application to summarize information about your Linux instance. Install the repository for Fastfetch:
sudo add-apt-repository ppa:zhangsongcui3371/fastfetch
Update the repostory list:
sudo nala update
Install Fastfetch:
sudo nala install fastfetch
To run fastfetch:
fastfetch
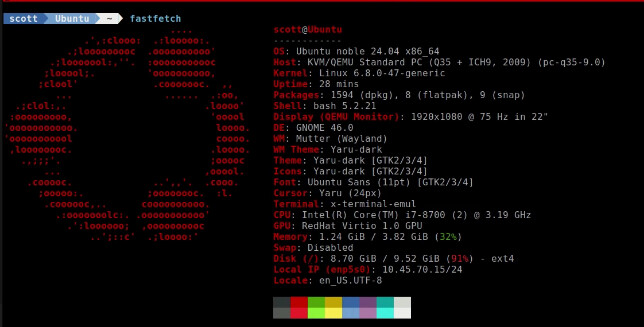
Gnome tweaks is a great application that allows setting things not immediately available in Ubuntu Settings. Gnome tweaks shows up in your app drawer after installation simply as “tweaks”.
sudo nala install gnome-tweaks
You should also have a good screenshot utility. Gnome screenshot is simple and basic. There are many such utilities, but this one is simple.
sudo apt install gnome-screenshot
If you are using X11 as your display manager rather than Wayland, check out the ksnip application for screenshots.
Finally, Stacer is a sort of swiss army knife for basic configuration management of your desktop.
sudo apt install stacer
I showed the Stacer options in the video.
The options I showed in this tutorial are just my personal favorites. There are certainly tons of other applications and configuration choices. The beauty of Linux is that virtually everything can be configured and customized. You are limited only by your imagination.
