If you have a Ubiquiti router and NordVPN, learn how to create a custom Wireguard client connection that can act as a default gateway for an entire VLAN.
Since this procedure doesn’t use the standard NordVPN client, we will have to create what Nord refers to as a manual configuration. Last year NordVPN increased account security by not allowing the use of your NordVPN username/password for manual configurations.
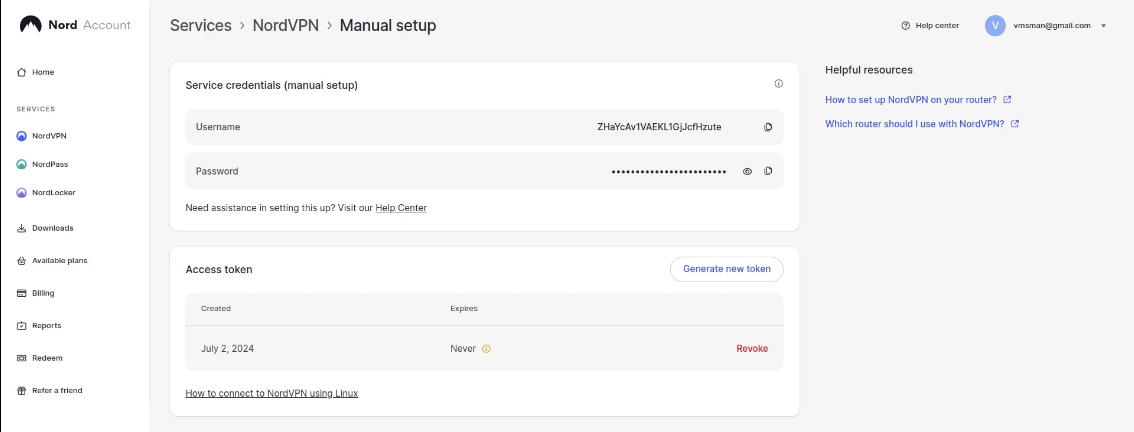
In order to create a manual configuration you have to sign on to your NordVPN account at the following URL in your web browser:
https://my.nordaccount.com/dashboard/nordvpn/manual-configuration/
Once there, you must create an “access token” which is a bit like an API key so we can use it to gain access to our Nord account from the manual configuration connection we are building. Select the “Generate new token” option once you are logged into NordVPN with the URL above.
Ideally, create an access token that won’t expire:
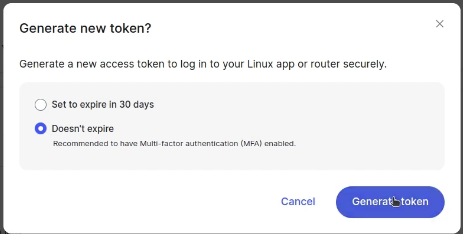
You will want to copy the token you get for later use. My token was a temporary one I deleted after the video.

By default, the NordVPN client program that most people use makes a connection using the “NordLynx” protocol. NordLynx is just Nord’s fancy name for the wrapper they placed around the Wireguard protocol in their client program.
Nord supports both OpenVPN and Wireguard connections with their service. Since Wireguard is faster and more efficient than OpenVPN, we are going to create a manual configuration that will make a connection to a NordVPN server of your choosing using the Wireguard protocol directly from your Ubiquiti router using the built in VPN client capability that Ubiquiti provides.
Although not specifically mentioned in the video, you will want to make a connection to the desired NordVPN server using the standard NordVPN client connection program. Here’s an example:
nordvpn set technology nordlynx
nordvpn -c -n "United States #3710"
Use the NordVPN server locator at this URL to find the server you want.
https://nordvpn.com/servers/
Now that you are connected to the desired NordVPN server, issue the following command to determine your private key:
curl -s -u token:<Your Access Token> https://api.nordvpn.com/v1/users/services/credentials | jq -r .nordlynx_private_key
Copy the resulting private key including the trailing equal (=) sign.
Next, install Wireguard on your Linux computer so we can have the “wg” command:
sudo apt install wireguard
We want to build the template for the configuration file we will use:
gedit nord-example.conf
Copy the following into the editor session.
[Interface]
ListenPort = [wg show nordlynx listen-port]
PublicKey = [wg show nordlynx public-key]
PrivateKey =  [From curl Command]
Address = 10.5.0.2/32 # this IP is always the same
DNS = 1.1.1.1 # your favorite DNS server

[Peer]
PublicKey = [wg show nordlynx preshared-keys]
AllowedIPs = 0.0.0.0/0, ::/0 # route everything
Endpoint = <ENDPOINT>:51820 # endpoint or I
PersistentKeepalive = 60
ForcedHandshake = 5
Replace the private key we got above into the private key parameter as shown in the video.
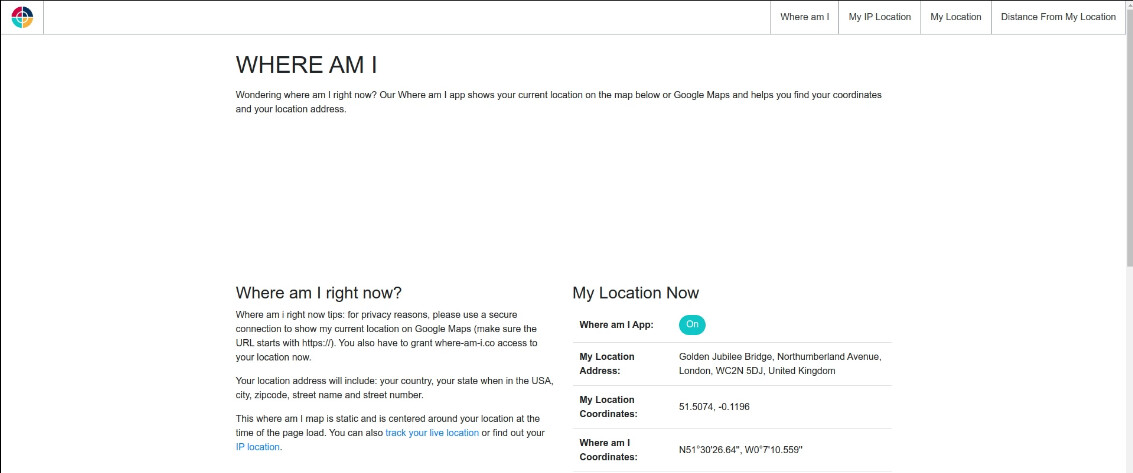
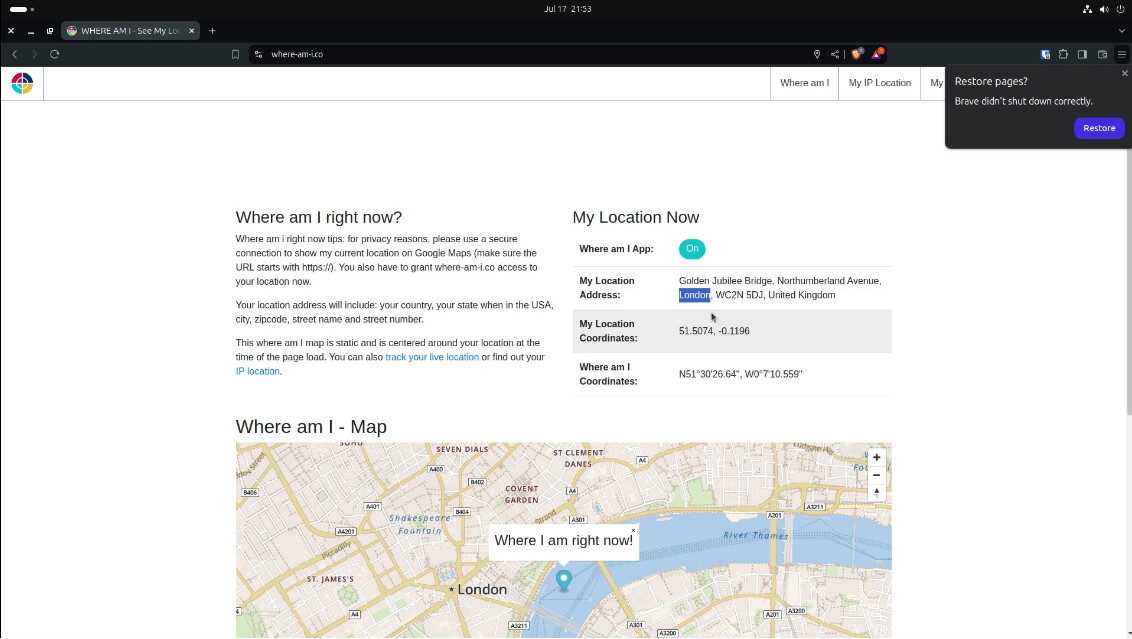
Just to verify that you are connected to a VPN server and you are Geolocated to the location of that server, you can visit this address in your browser:
https://where-am-i.co
In my case I connected to a NordVPN server in the UK and so here’s what i see.
To see the overall information about your current Wireguard connection from the terminal:
sudo wg show
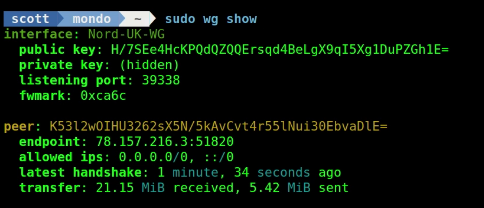
Make a note of the “interface” name in the above printout because it will be used in the following commands and your interface name will differ from mine.
Next, we want to insert the public key value you saw above which you can also get with the command:
sudo wg show Nord-UK-WG public-key
Again your interface name will differ.
Copy the public key and put it in the public key parameter of the “interface” section (not the Peer public key).
Next we want the “listenport” that is listed in the command above or you can get it with this command (remember to change to your interface name):
sudo wg show Nord-UK-WG listen-port
You should not change the “address” value in the template. You can change to your favorite DNS and I used 1.1.1.1 for Cloudflare.
We now want to get the “publickey” value that goes into the “peer” section of the template file with the following command (remember to change your interface name):
sudo wg show Nord-UK-WG preshared-keys
The last piece of information that will go into the template file is the endpoint. The endpoint is the address of the NordVPN server to which we are connecting and you can see it in the original “sudo wg show” command.
At this point, your template should be completed. As an example, mine looks like this:
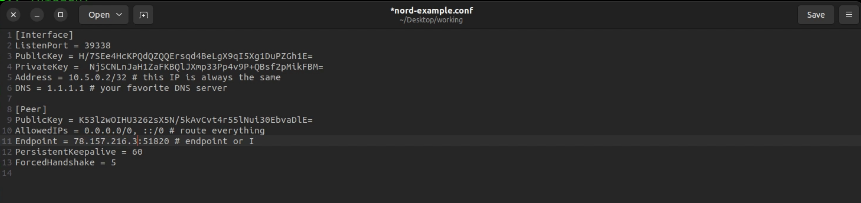
My values have been invalidated following this video since I deleted the token that I created on the NordVPN website for this video.
Save the file and you can disconnect your computer from the NordVPN connection.
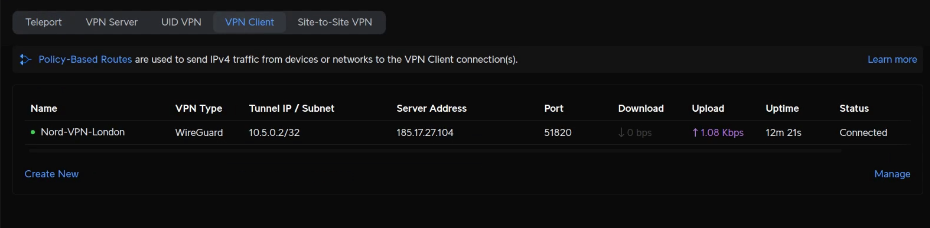
Head over to your Ubiquiti Unifi router network controller program and go to the settings gear icon and then select VPN and then “VPN Client”.

Select “Wireguard” as the type of Client and type in a name for what you want to call your client connection. The name is up to you. Lastly, click “Upload” and navigate to the template file we created.
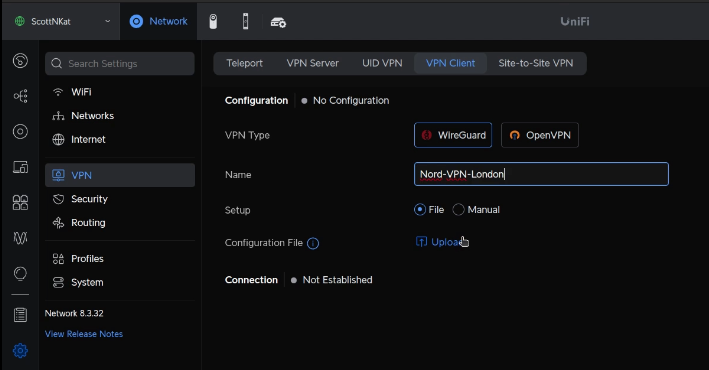
Once you upload, your screen should look something like this:
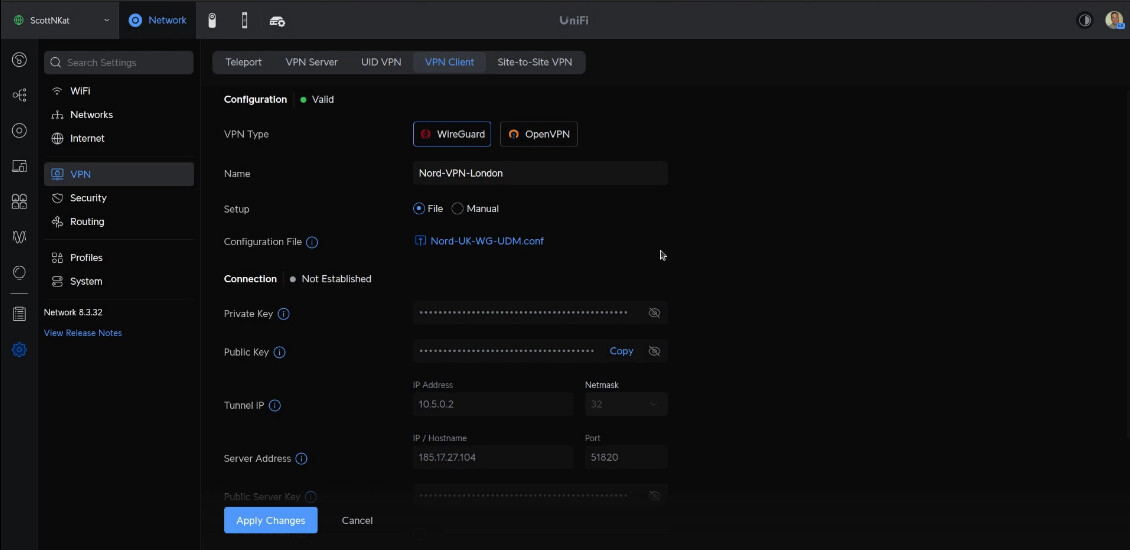
Click “Apply Changes” to save the configuration.
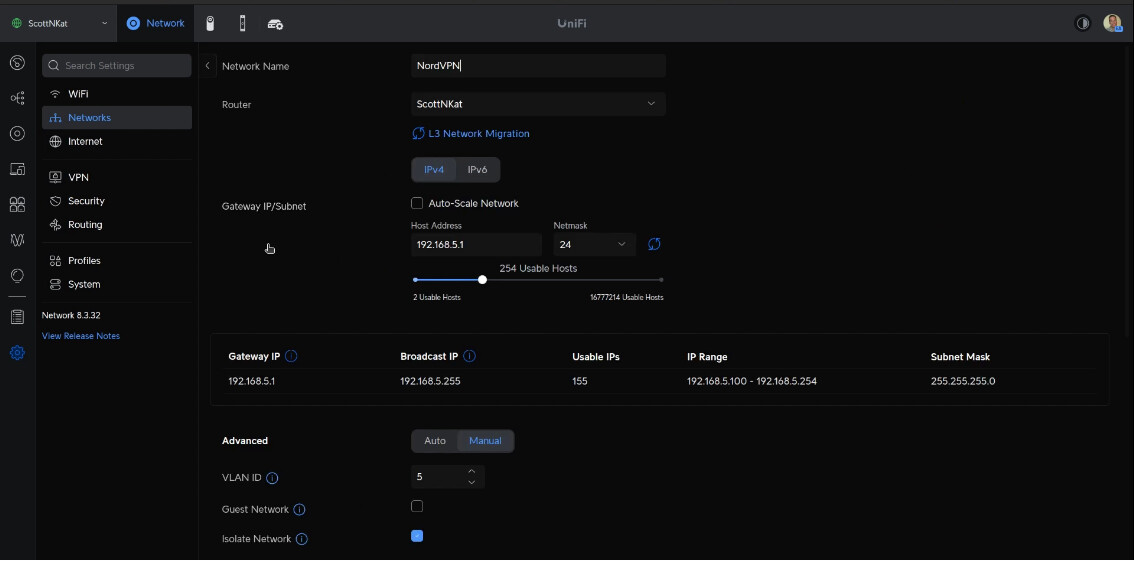
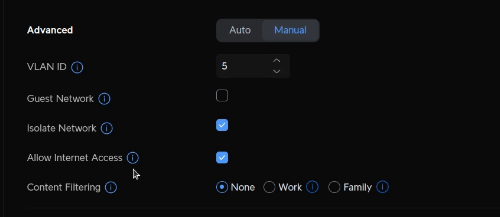
Go over to “Networks” in the settings menu on the left and create a new network. I called my network “NordVPN”, What you are doing is creating a VLAN. I decided to create my VLAN as VLAN 5 with a host address of 192.168.5.1/24. By convention, I like the third octet of the address to match the VLAN number. Select the “isolate network” checkbox and the “allow Internet access” checkbox under the "advanced options.
Here’s the detail on the advanced options.
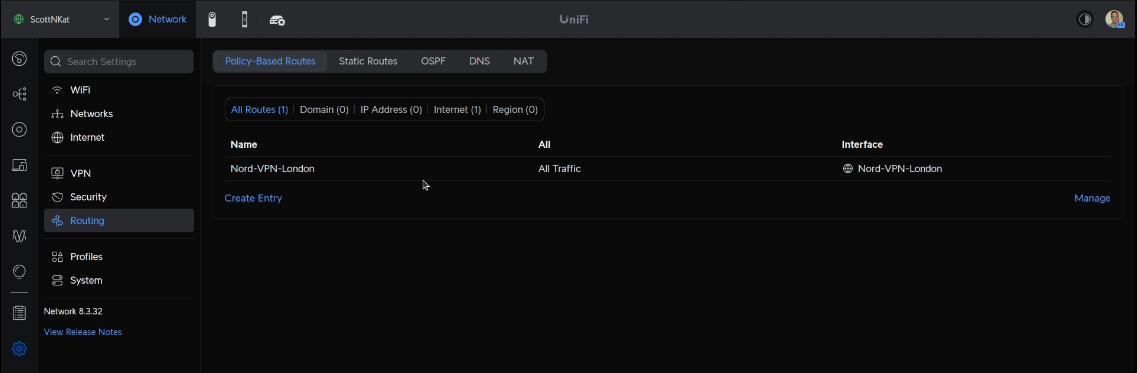
Now go to the “Routing” option on the left settings menu.
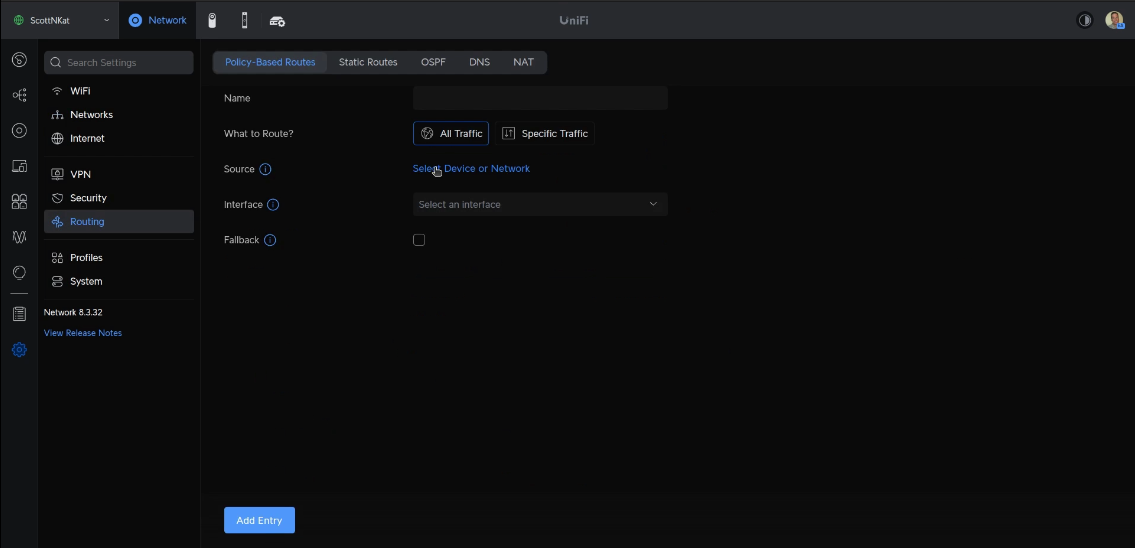
Give your policy based route a name and select to route “All Traffic”.
Select your “NordVPN” network we created in the last step and the Interface will be the NordVPN Client that we created.
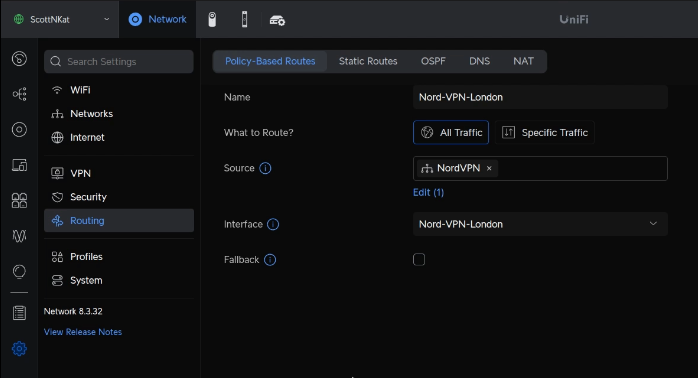
This means that any computer or device that is on this network will be on the NordVPN connection that we defined by default. This is possible because the gateway aka default route for that network is the VPN client that connects to the NordVPN server.
The routing entry will look like this once added.
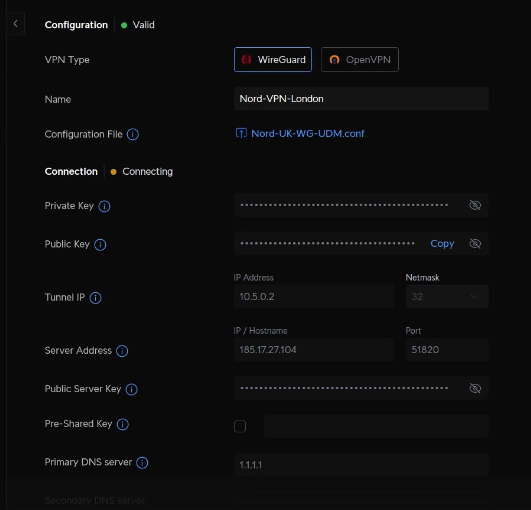
At this point, if you go back to the VPN section you should see that your VPN client has had time to connect. This connection will automatically reconnect after ISP interruptions or reboots of your Unifi router.
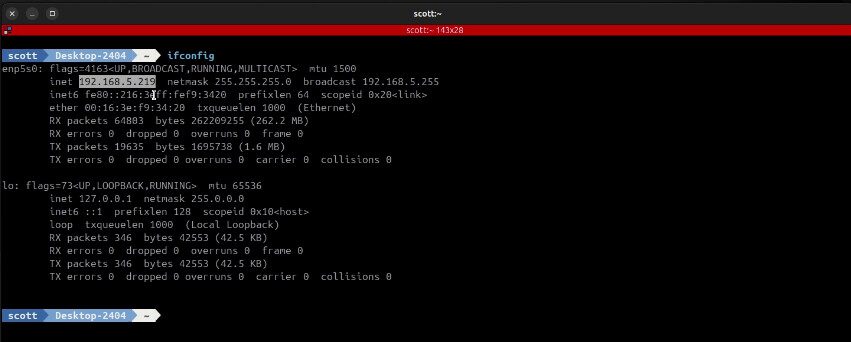
In my example, I had an Ubuntu Incus virtual machine container which I connected to an incus profile on this new NordVPN network. I performed an ifconfig command and this container is on the 192.168.5.x network.
I visited the “where am I” website from a browser on the VM and you can see that I am in London.
Now head over to your Unifi Settings and create a new Wifi SSID. Grant it a password and be sure to put it on the new NordVPN network we created.
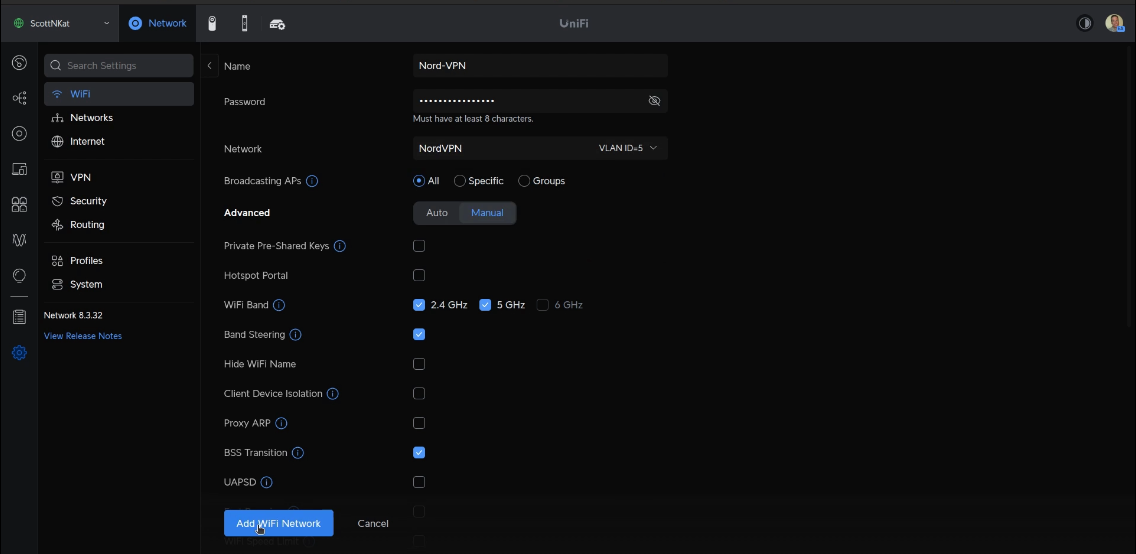
Once you click “Add WiFi Network”, you can connect to that wifi SSID with any device on your network and you will be automatically on that NordVPN connection.
I see the primary use case for this to be Geolocation for devices like your Smart TV’s, Roku, Fire TV sticks and Apple TV. The beauty is that you now have a dedicated VLAN network that can be presented in any part of the world where NordVPN has servers.