Sonarr is a PVR for Usenet/BitTorrent harvesting of TV shows. It does so by monitoring RSS feeds for new episodes of your favorite shows and then using indexers (BitTorrent sites) to scrape for and ultimately download your favorite shows automatically.
This is achieved by:
- A BitTorrent Client embedded in a docker application nested into an OpenVPN public VPN connection to maintain privacy and anonymity. In my instance, this is a docker container called DelugeVPN.
- A docker container for Jackett. Jacket is a proxy server that translates requests from Sonarr to tracker site-specific HTTP queries.
- The Sonarr application installed as an APT package.
For my purposes, I put all of these components into a LXD container that is bridged to my main LAN. As always, watch my “LXD Step by Step” video to set up your bridge and LXD bridge profile. So, I created a single LXD container as follows:
lxc launch ubuntu:22.04 Sonarr --profile default --profile bridgeprofile -c boot.autostart=true -c security.nesting=true
I connected to that LXD container:
lxc shell Sonarr
I updated the container and created myself a username and gave it sudo privilege:
apt update && apt upgrade -y
adduser scott
usermod -aG sudo scott
Next, I installed docker and docker compose:
curl -sSL https://get.docker.com | sh
apt install docker-compose -y
Grant my user account docker:
usermod -aG docker scott
Move over to my account:
su - scott
Install Sonarr directly into Ubuntu using the apt package manager:
sudo gpg --keyserver hkp://keyserver.ubuntu.com:80 --no-default-keyring --keyring /usr/share/keyrings/sonarr.gpg --recv-keys 2009837CBFFD68F45BC180471F4F90DE2A9B4BF8
echo "deb [signed-by=/usr/share/keyrings/sonarr.gpg] https://apt.sonarr.tv/debian buster main" | sudo tee /etc/apt/sources.list.d/sonarr.list
sudo apt update
sudo apt install sonarr
The sonarr web interface is accessed on port 8989 and I went to my domain name service provider and created a subdomain record for it and created an NginX Proxy Manager entry for the service:
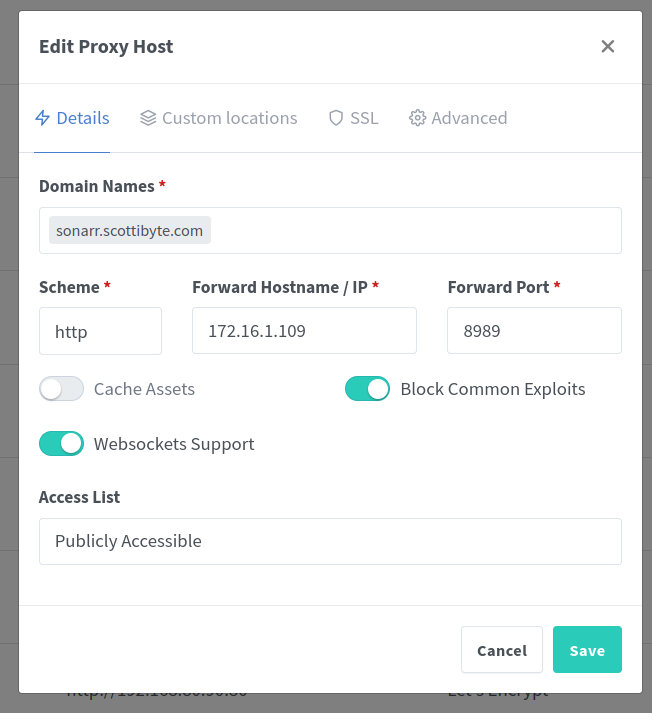
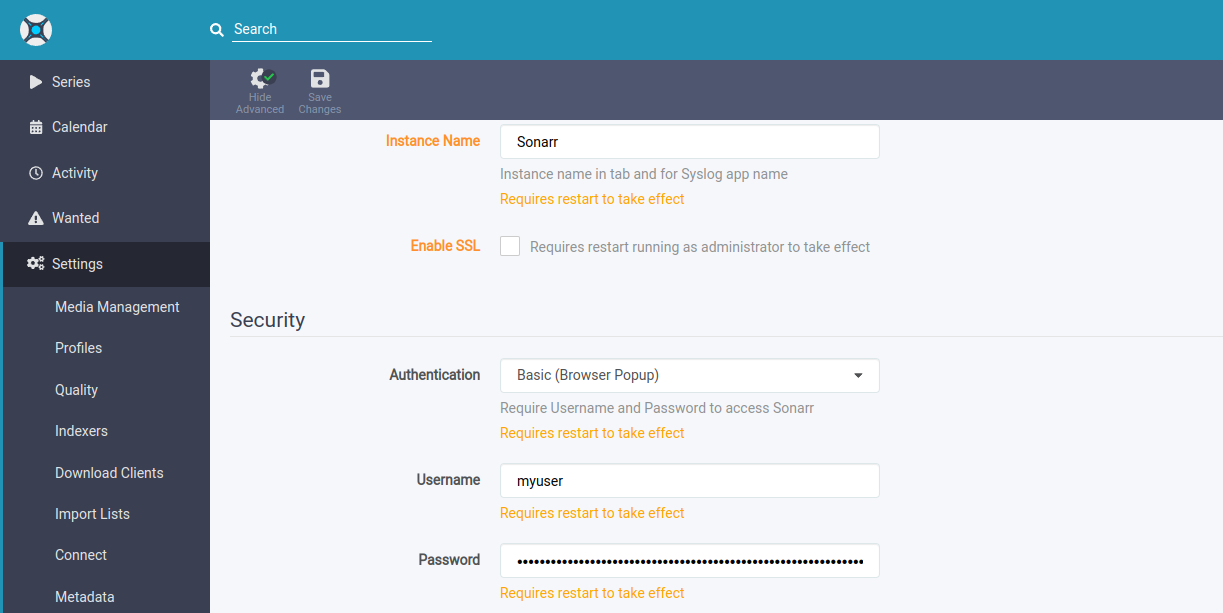
Don’t forget to turn on authentication and set a username and password in the settings – general section of sonarr since your service will be exposed to the public Internet.
Next, you will want to install jackett as a docker container:
mkdir jackett
cd jackett
Edit a docker compose file:
nano docker-compose.yml
Insert the following and adjust your user/group ID and password:
version: "2.1"
services:
  jackett:
    image: lscr.io/linuxserver/jackett:latest
    container_name: jackett
    environment:
      - PUID=1001
      - PGID=1001
      - TZ=america/chicago
      - AUTO_UPDATE=true #optional
      - RUN_OPTS= #optional
    volumes:
      - ./config:/config
      - ./downloads:/downloads
    ports:
      - 81:9117
    restart: unless-stopped
Save the file with CTRL O and Enter and then CTRL X to exit the editor.
Note in the above that I set the web port as 81 only because I knew it would be easier to remember and would be available in a LXD container.
Start the container:
docker compose up -d
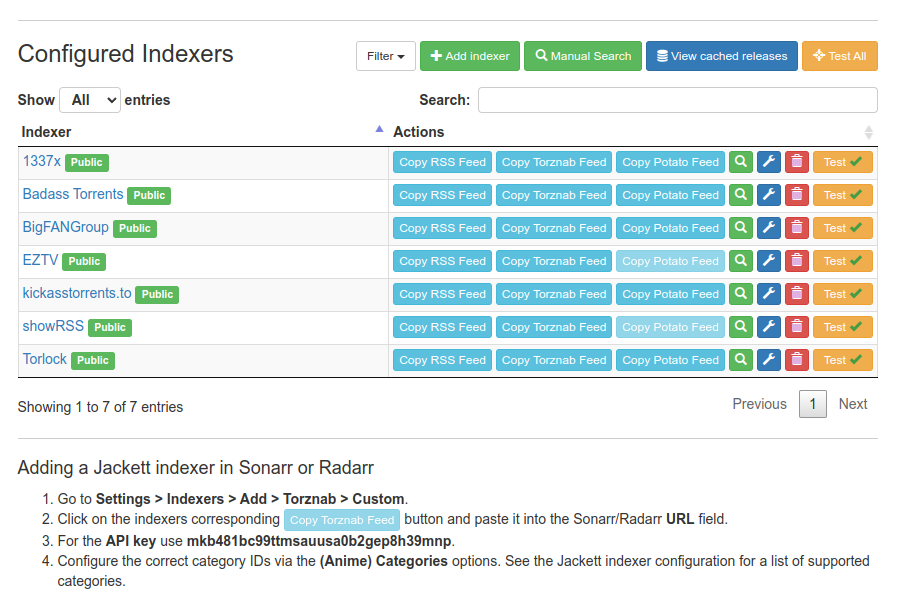
You can navigate to the address of the LXD container with “:81” at the end to set up your indexers.
Basically, jackett provides you the means to configure Sonnar with your desired indexers:
Finally, install DelugeVPN into a docker container by creating a folder for it:
cd
mkdir delugevpn
cd delugevpn
Edit a docker compose file:
nano docker-compose.yml
Insert the following:
version: "3.8"

services:
  deluge:
    container_name: deluge
    image: binhex/arch-delugevpn
    restart: unless-stopped
    devices:
      - /dev/net/tun
    ports:
      - "${IP}:8112:8112"
      - "${IP}:8118:8118"
      - "${IP}:58846:58846"
      - "${IP}:58946:58946"
    volumes:
      - ./config:/config
      - /config/completed:/config/completed
      - /etc/localtime:/etc/localtime:ro
    env_file: .env
    environment:
      VPN_ENABLED: ${VPN_ENABLED}
      VPN_USER: ${VPN_USER}
      VPN_PASS: ${VPN_PASS}
      VPN_PROV: ${VPN_PROV}
      VPN_OPTIONS: ${VPN_OPTIONS}
      STRICT_PORT_FORWARD: ${STRICT_PORT_FORWARD}
      ENABLE_PRIVOXY: ${ENABLE_PRIVOXY}
      LAN_NETWORK: ${LAN_NETWORK}
      NAME_SERVERS: ${NAME_SERVERS}
      DELUGE_DAEMON_LOG_LEVEL: ${DELUGE_DAEMON_LOG_LEVEL}
      DELUGE_WEB_LOG_LEVEL: ${DELUGE_WEB_LOG_LEVEL}
      ADDITIONAL_PORTS: ${ADDITIONAL_PORTS}
      DEBUG: ${DEBUG}
      UMASK: ${UMASK}
      PUID: ${PUID}
      PGID: ${PGID}
    cap_add:
      - NET_ADMIN
Save the file with CTRL O and enter and CTRL X to exit the editor.
Edit an environment variables file:
nano .env
Insert the following:
IP=172.16.1.109
VPN_ENABLED=yes
VPN_USER=The username for your VPN provider
VPN_PASS=Your VPN Password
VPN_PROV=nordvpn
VPN_CLIENT=openvpn
VPN_OPTIONS=
STRICT_PORT_FORWARD=yes
ENABLE_PRIVOXY=yes
LAN_NETWORK=172.16.0.0/16
NAME_SERVERS=84.200.69.80,37.235.1.174,1.1.1.1,37.235.1.177,84.200.70.40,1.0.0.1
DELUGE_DAEMON_LOG_LEVEL=info
DELUGE_WEB_LOG_LEVEL=info
DEBUG=false
UMASK=000
PUID=1001
PGID=1001
ADDITIONAL_PORTS=1234
In this file, change the IP to be the IP address of the LXD container you are in right now. Change your VPN username and password accordingly. I use nordvpn as my VPN provider. I use openvpn as my type of vpn and some VPN providers might prefer wireguard. I left the name servers at the default. Be sure to change your LAN_NETWORK. Yours is probably 192.168.1.0/24.
Save the file with CTRL O and Enter and CTRL X to exit the editor.
Create the completed folder and set its permission to the appropriate user:
sudo mkdir -p /config/completed
sudo chown -R scott:scott /config
Bring up DelugeVPN.
docker compose up -d && docker compose logs -f
Follow the logs. The app should be accessible at your address with “:8112” as the port number on the end. If your VPN credentials are incorrect, the app will not run. So, watch the logs as it boots.
Configure DelugeVPN with the preferences as follows:
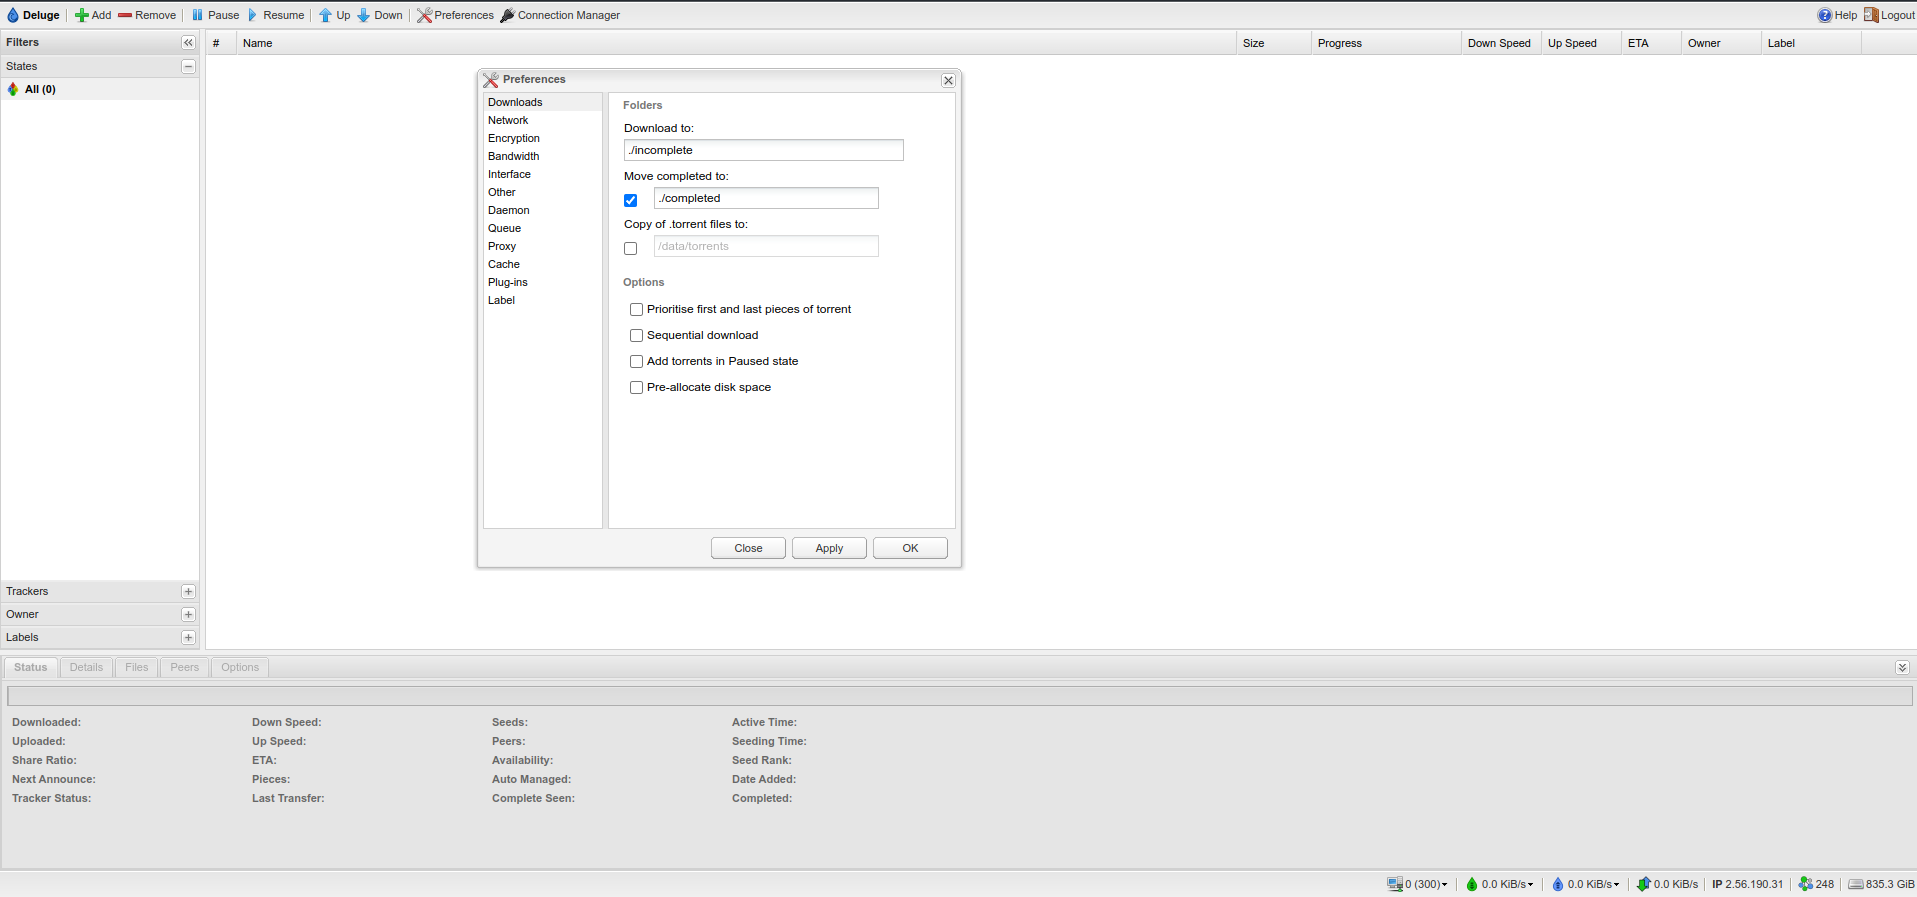
After you do this, you can test downloading a torrent. An easy test is downloading the Ubuntu server ISO from the Ubuntu site. If this works, the file should be inside your “./config/completed” folder which is inside of your delugevpn folder.
There are lots of defaults you may want for the delugevpn client. As an example, I set mine to delete the torrent entry after a successful download and I don’t seed because I have a strict monthly Internet data usage cap imposed by my ISP.
So, now you basically need to create the media folder and go into sonarr and set the root folder for that media folder. I set mine as /media/tv and I set the ownership of that to scott:
sudo mkdir -p /media/tv
sudo chown -R scott:scott /media
Then I was able to add the root folder for sonarr:

The next thing that you want to do is to go into Indexers in the sonarr menu and press the + to add an indexer. Choose Toznab and you will get a screen like this:
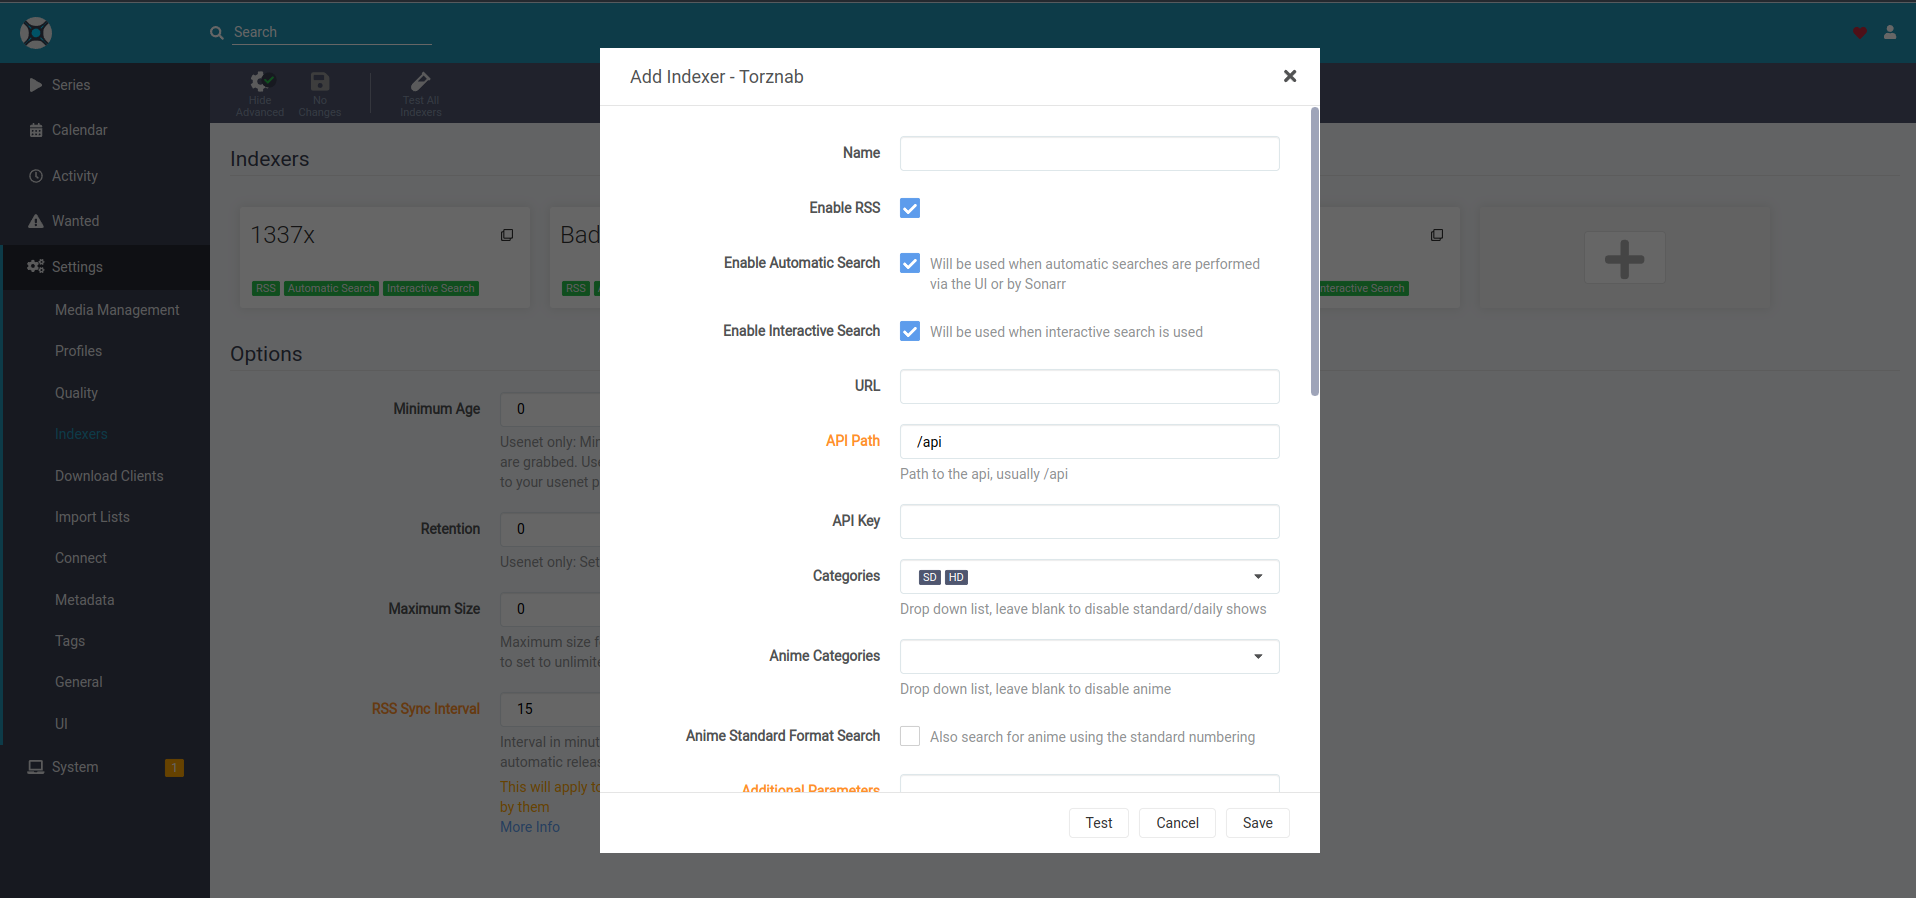
Fill in a name of your choice, and copy the URL from the jackett application we configured above. Also copy the API key from jackett. Click on the categories fields to select the categories of media that you want for the torrent you are defining and click TEST to make sure it works and then SAVE after that.
Repeat this process to add as many torrent indexers as you want.
You may also want to review and edit the quality profiles to specify the files you want to download.
There is lots more to look at and set in sonarr to hone in on your preferences.
So, the magic of getting all this to work was that it helped greatly having sonarr as an apt package installed as opposed to sonar being a docker package. Don’t worry, because…
apt update && apt upgrade
will update it when new versions are released.
Since delugevpn has an “absolute” file mapping to /config/completed, this allowed sonarr correct access to the completed downloads to process them for renaming and place them into my /media/tv folder which was defined in sonarr’s media menagement settings menu as a root folder.
Key in this configuration working was the absolute mapping in deluge that we did earlier, because sonarr absolutely despises relative pathing:
  volumes:
      - ./config:/config
      - /config/completed:/config/completed
Sonarr automatically picks up downloads from /config/completed and processes them to the proper file specifications and folder structure placing the end result in /media/tv.
The idea is that /media/tv would be the folder on your Plex Media Server where all your TV shows are stored. That structure usually has a show name, a season number under it and then the separate episodes inside of that.
So, with all the work we did, the folder /media/tv is actually only a folder inside the LXD container that you installed all of this in and has nothing to do with your PLEX.
Also, LXD containers cannot directly mount host folders. So, we use a capability of LXD to project a folder mapping outside of our Sonarr folder to our LXD Host. This allows our TV shows to be stored outside the folder rather than inside.
The way we do this is from the LXD server command prompt and not from inside of the sonarr container is to perform the following commands making adjusts for your username:
mkdir /home/scott/plex
lxc config device add Sonarr plexmedia disk source=/home/scott/plex path=/media/tv
So, this has the effect of pointing the downloaded and renamed media from sonarr outside of the container and putting it on the LXD Host in /home/scott/plex in my case.
However, we also need a privilege mapping for the user account to make the target writable. So, still on the LXD host where you have sonarr running:
echo "root:1000:1" | sudo tee -a /etc/subuid /etc/subgid
Then I needed to configure the sonarr container to use that mapping:
lxc config set Sonarr raw.idmap "both 1000 1001"
At this point, the TV shows from sonarr should be allowed to store their data in “/home/scott/plex” on the LXD host which is mapped to that location in virtue of the mapping we did above with the "lxc config device add Sonarr plexmedia disk command.
Test this by connecting to your LXD container for sonarr again and moving to your user account:
lxc shell Sonarr
su - scott
Move into the /media/tv folder and create a file:
cd /media/tv
touch test.txt
If you receive a permissions error from the command above, you may need to stop and restart your Sonarr container:
lxc stop Sonarr
lxc start Sonarr
Assuming the touch command worked, exit the sonarr container back to your LXD Host:
exit
Move into your folder we named “plex” and list the files:
cd plex
ls
You should see the file that we created inside of the container.
The final step in all of this is to get the files that you see in this plex folder to really point to your actual plex folder.
This is going to vary depending on where you plex server is hosted and how. In my environment, I simply offer the Plex folder as a Linux NFS exported file system and I mount it from my LXD server using this “plex” folder we created as the mount point.
This is accomplished by editing your files system table on your LXD server and adding a line to the end:
sudo nano /etc/fstab
The line you add should be an NFS mount adusted for what your exported service name is and the address of your Plex machine.
Here’s an example:
172.16.1.58:/plex /home/scott/plex nfs defaults 0 0
Next time you reboot, the volume should be mounted. To see if this works, go into your LXD container:
lxc shell Sonarr
Move into the media folder and list the contents:
cd /media/tv
ls
If everything worked, you should see all of the TV folders on your Plex server.
So, now when Sonarr initiates downloads via delugvpn, once they are completed, they will be named accordingly and moved to /media/tv which is really /home/scott/plex in my case and that is really just an NFS mount point for the TV show data on my Plex server.
This all means that the downloads that Sonarr completes will show up on my Plex server.
This is not meant to be an exhaustive guide on Sonarr, but does describe the infrastructure required to allow the apps to operate correctly.