Jitsi Meet is a Self-Hosted audio/video conferencing system that is private and secure. Jitsi is similar in function to Zoom, WebEx, GoTo Meeting, or Google Workspace. Connection to a Jitsi Meet server requires only a web browser without the installation of any special software. There are Jitsi clients available in the Android Play Store and in the Apple App Store.
Although you don’t need a desktop client for a Jitsi Meet meeting, there are Jitsi Electron clients for Windows, MacOS, and Linux. In addition, there are Flatpaks for Jitsi clients on Flathub.
The Jitsi electron clients are here.
I am installing the Jitsi Meet server in a LXD container which is very fast and efficient. A Jitsi server can also be installed in a virtual machine or on a dedicated server. Watch my LXD 101 video here. I also have 50 plus videos on the channel focusing on LXD and networking.
I start by creating a LXD container for my Jitsi Server which is bridged to my LAN.
lxc launch ubuntu:22.04 Jitsi --profile default --profile bridgeprofile -c limits.memory=4096MB -c limits.cpu.allowance=20% -c boot.autostart=true
Connect to the container.
lxc exec Jitsi bash
Update the repositories and the software components.
apt update && apt upgrade -y
Add a user account.
adduser scott
Grant the user account sudo privilege.
usermod -aG sudo scott
Move over to the account.
su - scott
Install the dependencies.
sudo apt install curl gnupg2 wget -y
Download the key from the Jitsi site.
curl https://download.jitsi.org/jitsi-key.gpg.key -o jitsi-key.gpg.key
Apply the key.
sudo gpg --output /usr/share/keyrings/jitsi-key.gpg --dearmor jitsi-key.gpg.key
Edit the repository file.
sudo nano /etc/apt/sources.list.d/jitsi-stable.list
Insert the following line in the file and then use a CTRL O and Enter to save and a CTRL X to exit.
deb [signed-by=/usr/share/keyrings/jitsi-key.gpg] https://download.jitsi.org stable/
Download the key for the Prosody component of Jitsi.
curl https://prosody.im/files/prosody-debian-packages.key -o prosody-debian-packages.key
Apply the key.
sudo gpg --output /usr/share/keyrings/prosody-keyring.gpg --dearmor prosody-debian-packages.key
Edit the Prosody repository file.
sudo nano /etc/apt/sources.list.d/prosody.list
Insert the following line in the file and then use a CTRL O and Enter to save and a CTRL X to exit.
deb [signed-by=/usr/share/keyrings/prosody-keyring.gpg] http://packages.prosody.im/debian jammy main
Update the repositories and install Jitsi Meet.
sudo apt update
sudo apt install -y jitsi-meet
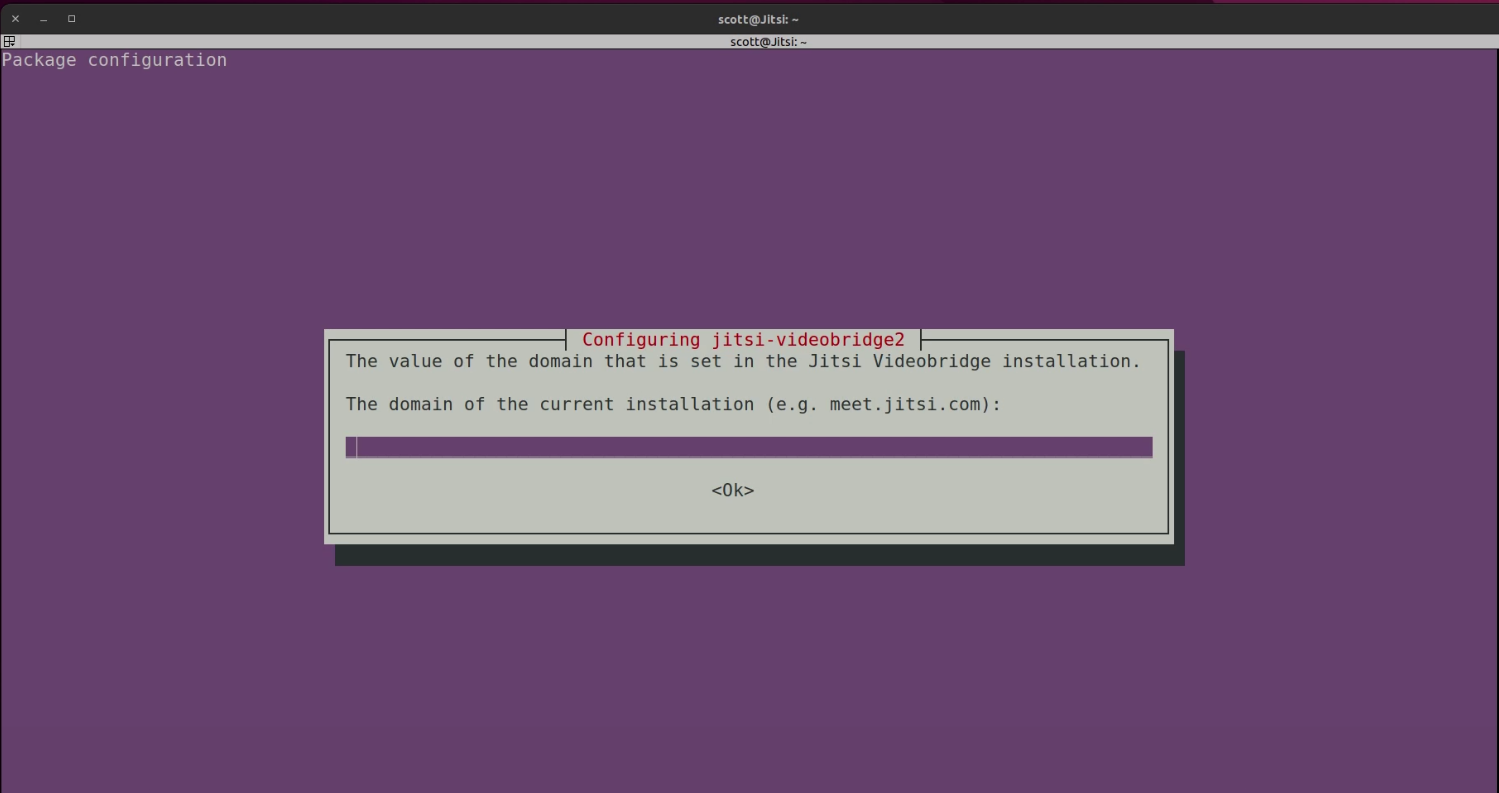
During the installation you will be prompted for your subdomain name for your Jitsi Meet server. You will have to add a record at your domain name service provider for the subdomain that you want to use. Then you will type it into the screen below when prompted and then tab to “OK” and press enter.
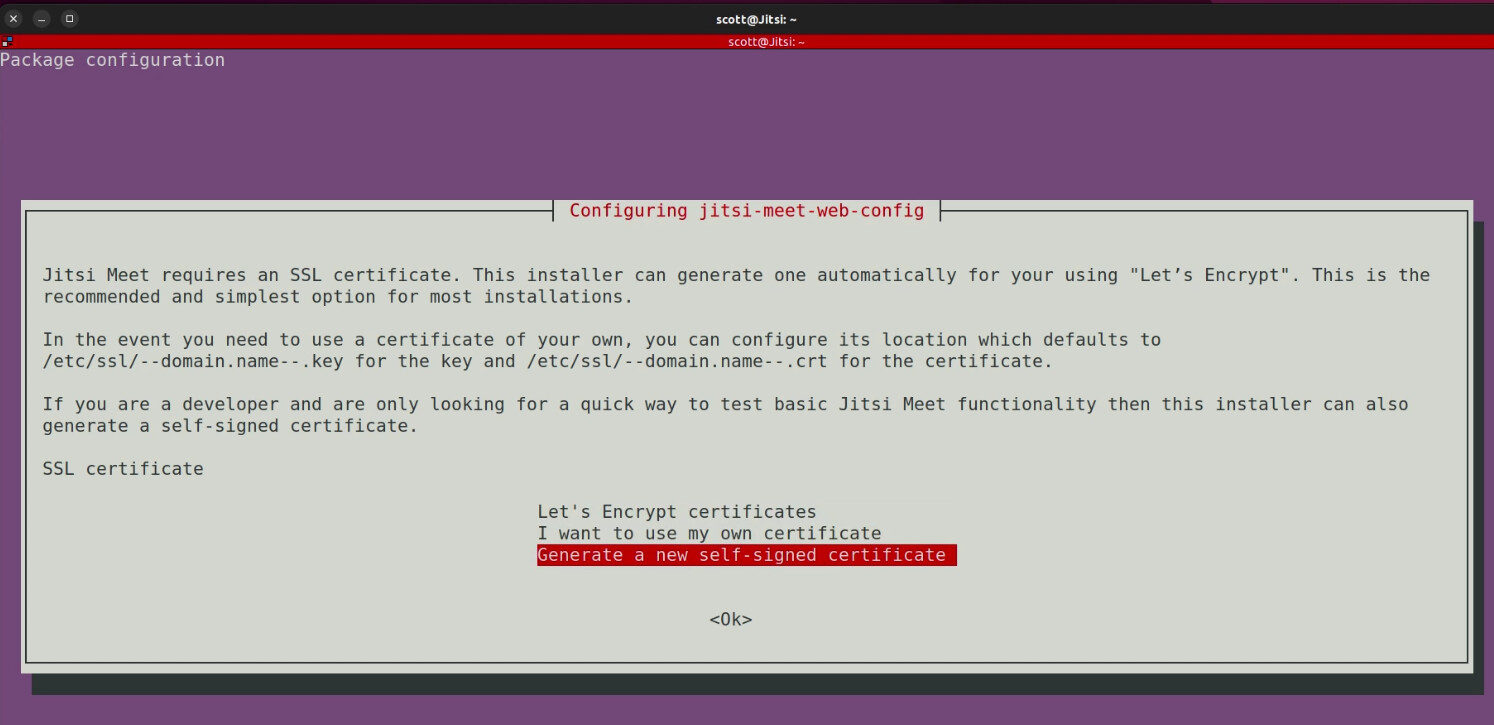
Later in the installation you will be prompted for how to create a certificate for your Jitsi subdomain. In my example, I am using NginX Proxy Manager and so I select the option to generate a self signed certificate. I then tab to “ok” and press enter.
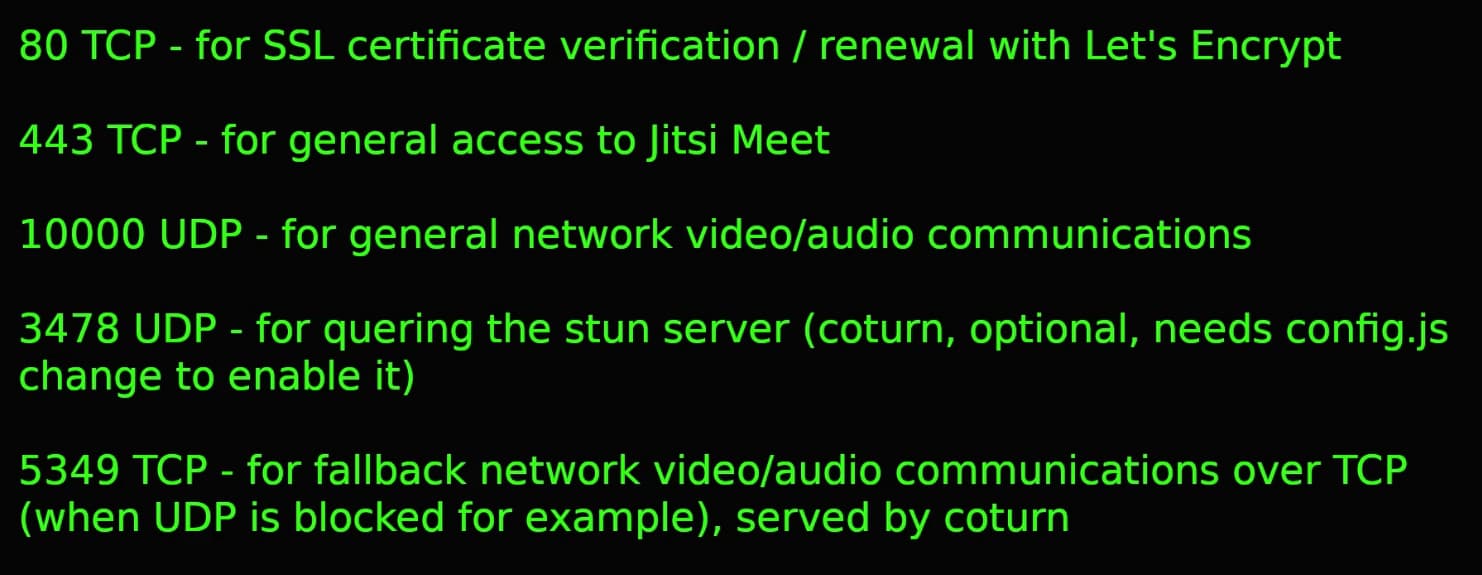
Now you will need to assign port forwarding on your router to point to the address of where you installed the Jitsi Meet server. In my case, that is the IP address of my LXD container. You will need to define port forwards for the following ports on your router.
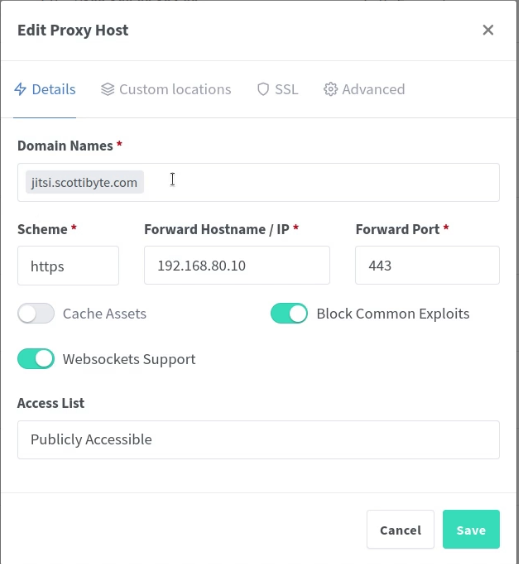
Now go over to your instance of NginX Proxy Manager which I have covered before on the channel. I defined a Proxy host as follows. Be sure to enter your domain name and the local address of your Jitsi Server.
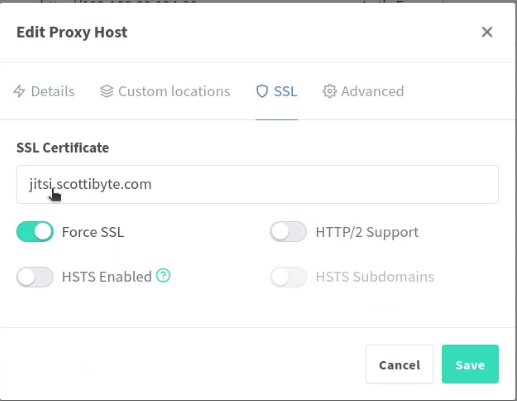
Be sure to go to the SSL tab and request a new certificate for your Jitsi instance at the same time.
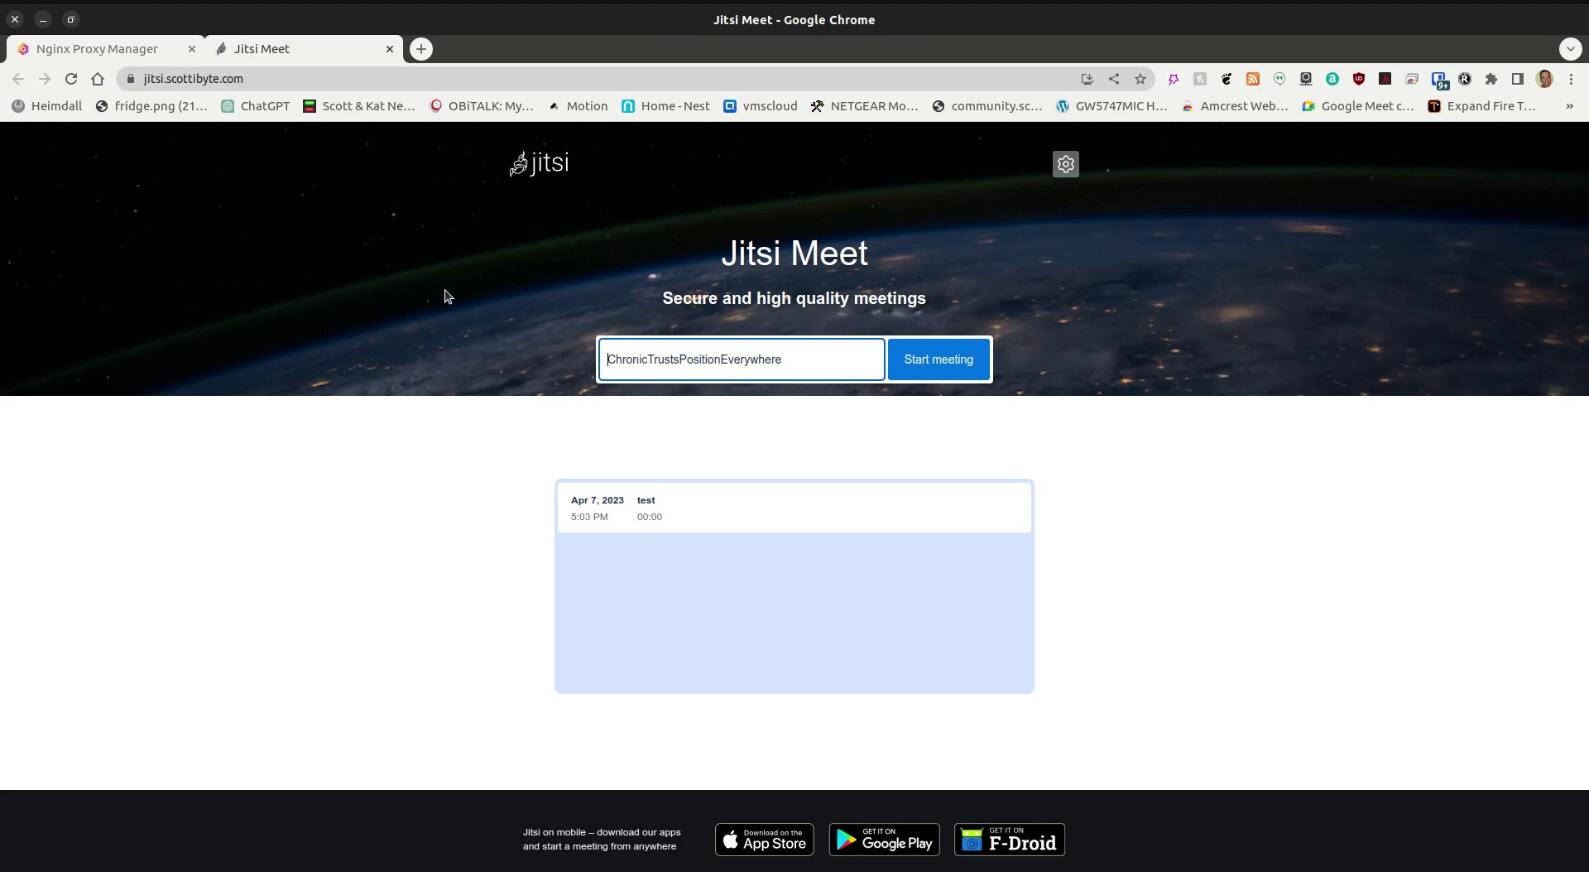
At this point, your Jitsi server is active and reachable both locally and from the WAN and you can go to your domain name to reach it.
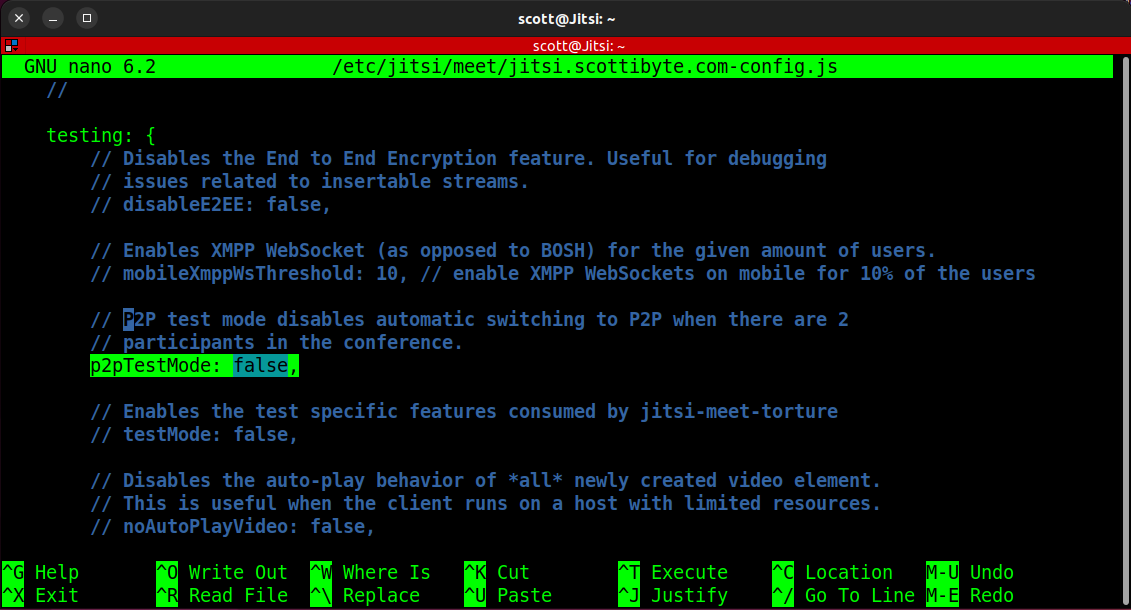
NOTE: Sometimes the Jitsi Meet server will not operate properly in p2p mode behind NginX Reverse Proxy Manager. You will know this if your Jitsi server disconnects repeatedly in meetings with exactly two people. To correct this, you can disable peer to peer mode.
Edit the following file replacing “jitsi.scottibyte.com” with the subdomain of your Jitsi Meet instance:
sudo nano /etc/jitsi/meet/jitsi.scottibyte.com-config.js
Search the file for “p2p” and uncomment the “p2pTestMode” so it appears as follows:
Save the file with CTRL O and Enter and exit the editor with CTRL X.
Your Jitsi server is completely operational at this point, but anyone who knows your URL can create a meeting. The remaining steps show how we can create a configuration where only authorized users are allowed to create meetings. This is optional.
Change to the root user.
sudo su
Move over to the following location.
cd /etc/prosody/conf.avail/
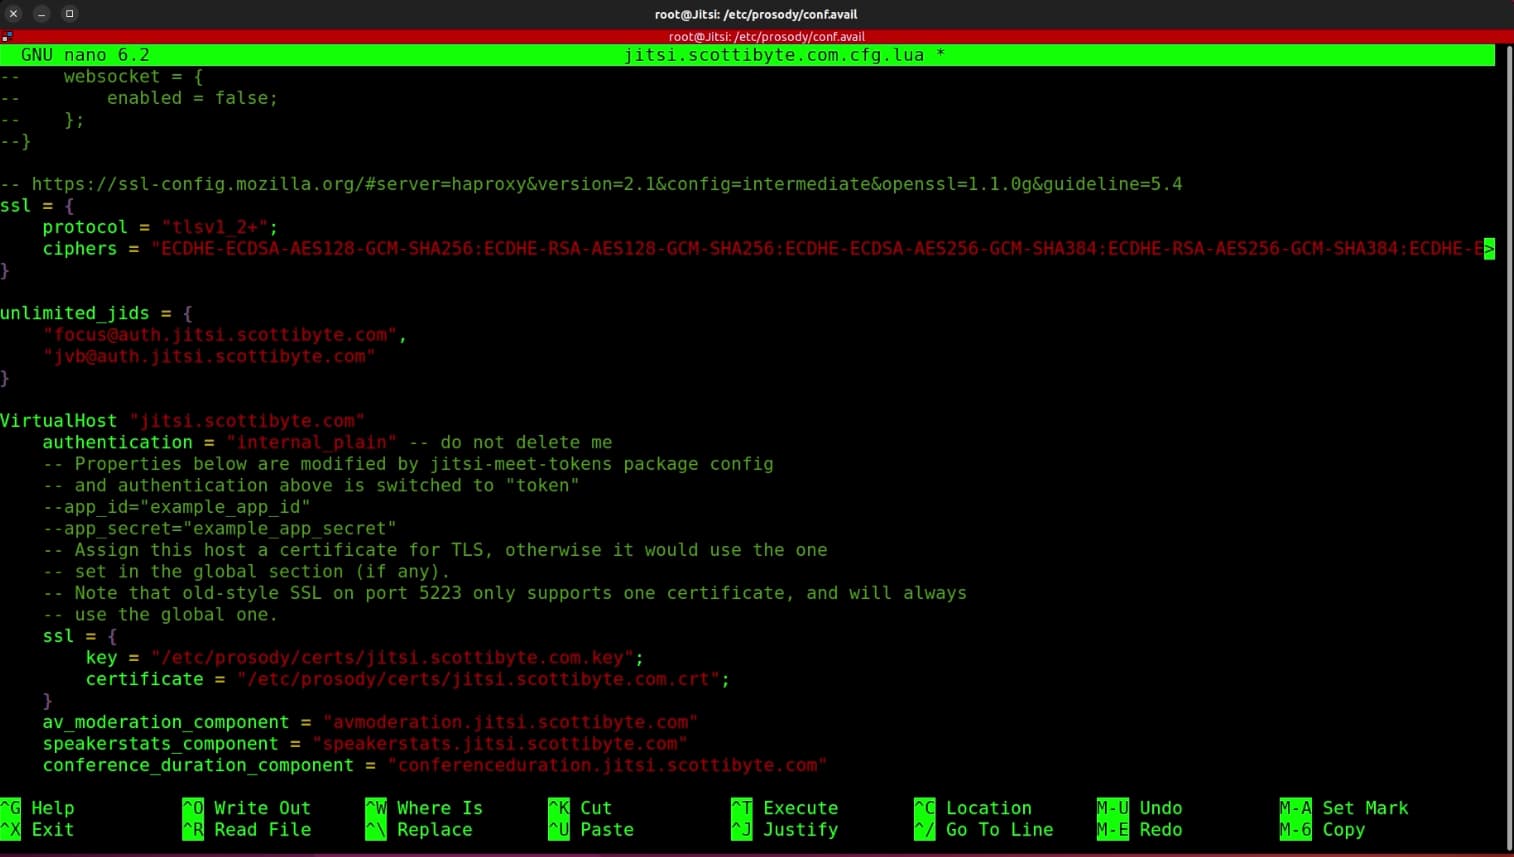
Edit the following configuration file changing the “jitsi.scottibyte.com” portion to your Jitsi subdomain name.
nano jitsi.scottibyte.com.cfg.lua
Search for the “VirtualHost” section with a CTRL W in the editor and change the authentication line from “jitsi-anonymous” to “internal_plain”
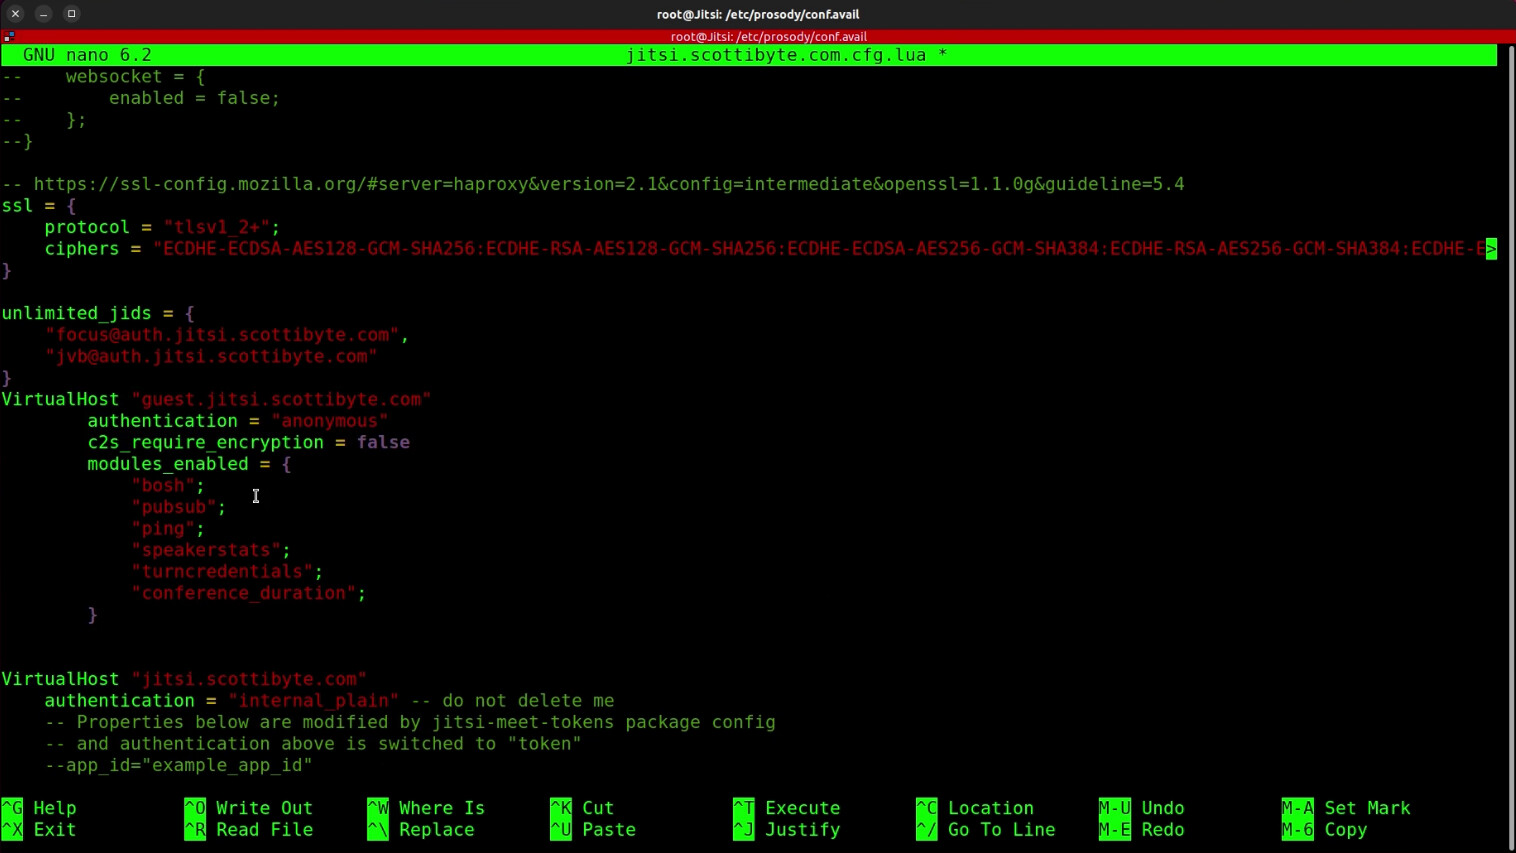
Now we want to add a new VirtualHost section before the one that we just edited. It will include the following, remembering to change to your domain “guest.yourdomain.com”.
NOTE: It has been discovered that SOMETIMES the code segment that follows should be added to the very end of the file. If your Jitsi site forces all users to provide username/password authentication, then consider adding the following virtual host segment to the end of the file.
VirtualHost "guest.jitsi.scottibyte.com"
        authentication = "anonymous"
        c2s_require_encryption = false
        modules_enabled = {
            "bosh";
            "pubsub";
            "ping";
            "speakerstats";
            "turncredentials";
            "conference_duration";
        }
At this point, your screen should look like the following, except with your domain name.
Now Write out the file and exit the editor with CTRL O and ENTER and CTRL X.
An optional Prosody module called storage_memory, enables a temporary memory storage for persistent information, including user session data. The module source code is available from Prosody’s Mercurial repository. We want to install it.
sudo apt install -y mercurial
Make a temporary folder and move into it.
mkdir ~/temp && cd ~/temp
Clone the prosody modules repository to a new directory, prosody_modules.
hg clone 'https://hg.prosody.im/prosody-modules/' prosody-modules
Copy the modules to where they are needed.
sudo cp prosody-modules/mod_storage_lmdb/*.lua /usr/lib/prosody/modules/.
Create a Jitsi anonymous domain and adjust the command to include your domain name
sudo nano /etc/jitsi/meet/jitsi.scottibyte.com-config.js
Look for the config variable in the hosts key add a new key named anonymousdomain, with the value guest.fqdn. Take a look at my editor screen shot below to see this change.
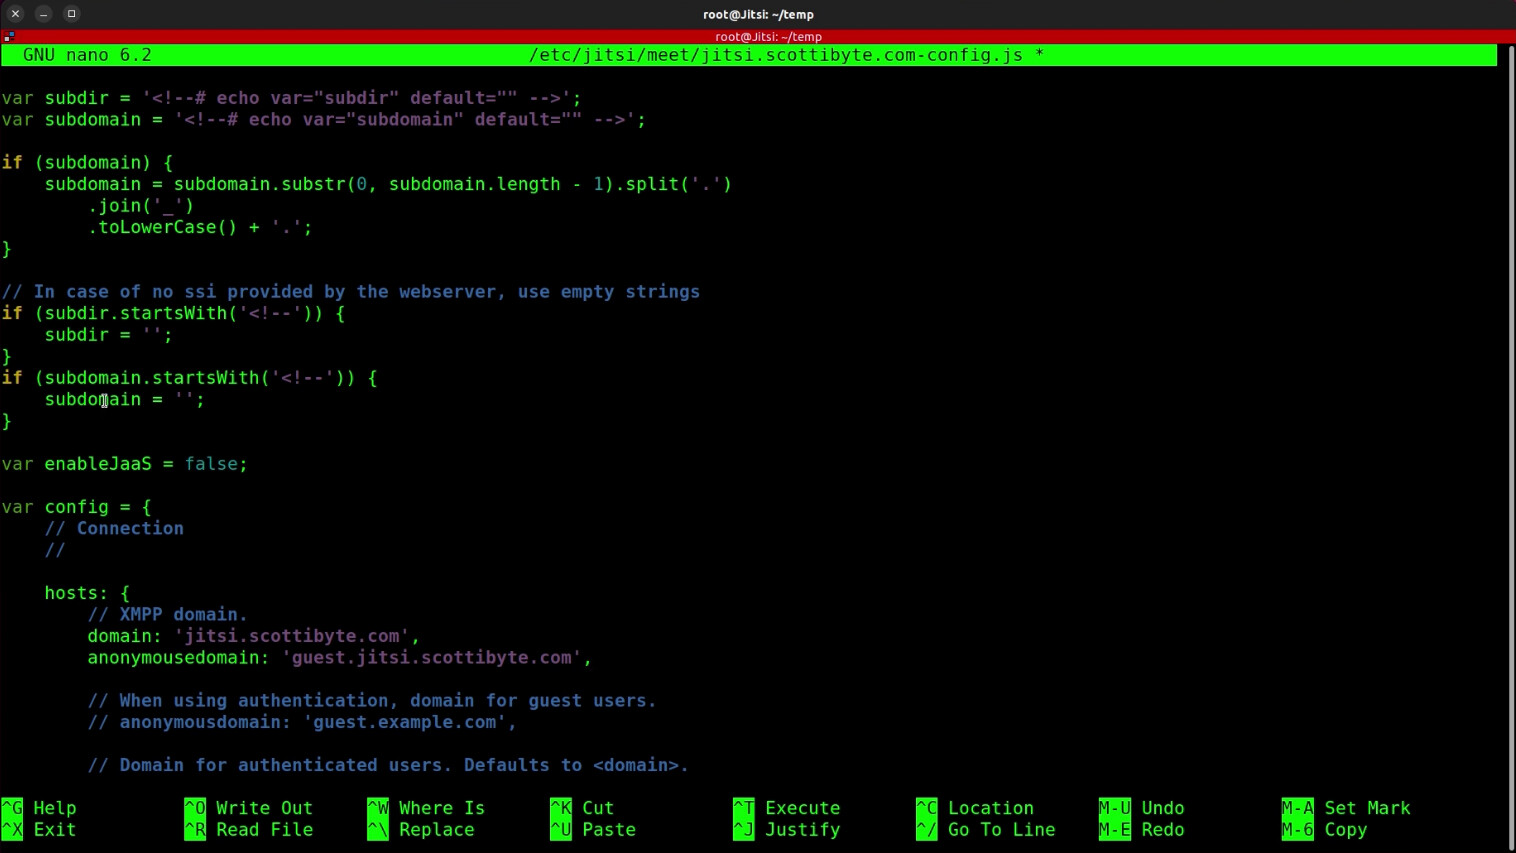
Exit the editor after making the change with a CTRL O and Enter and CTRL X.
Jicofo (Jitsi Conference Focus) is a component of Jitsi Meet that manages user sessions. The following steps are required to configure Jicofo’s SIP (Session Initiation Protocol) to use XMPP authentication.
Edit the following file.
sudo nano /etc/jitsi/jicofo/sip-communicator.properties
Put the following line in it, adjusting for your subdomain again.
org.jitsi.jicofo.auth.URL=XMPP:jitsi.scottibyte.com
Exit the editor after making the change with a CTRL O and Enter and CTRL X.
Now we need to restart all of the Jitsi components in order to be able to start adding user accounts:
sudo systemctl restart {prosody,jicofo,jitsi-videobridge2,nginx}
Now we can create user accounts to be able to create meetings which was the point of all this. The following command is an example where I create a scott account. Remember to change the domain name and the password to what you want. You can execute this command multiple times to create additional users that can create meetings.
sudo prosodyctl register scott jitsi.scottibyte.com pa55word
You may get the following warning, but it is not an issue for now:

To remove a user.
sudo prosodyctl unregister [user] [hostname]
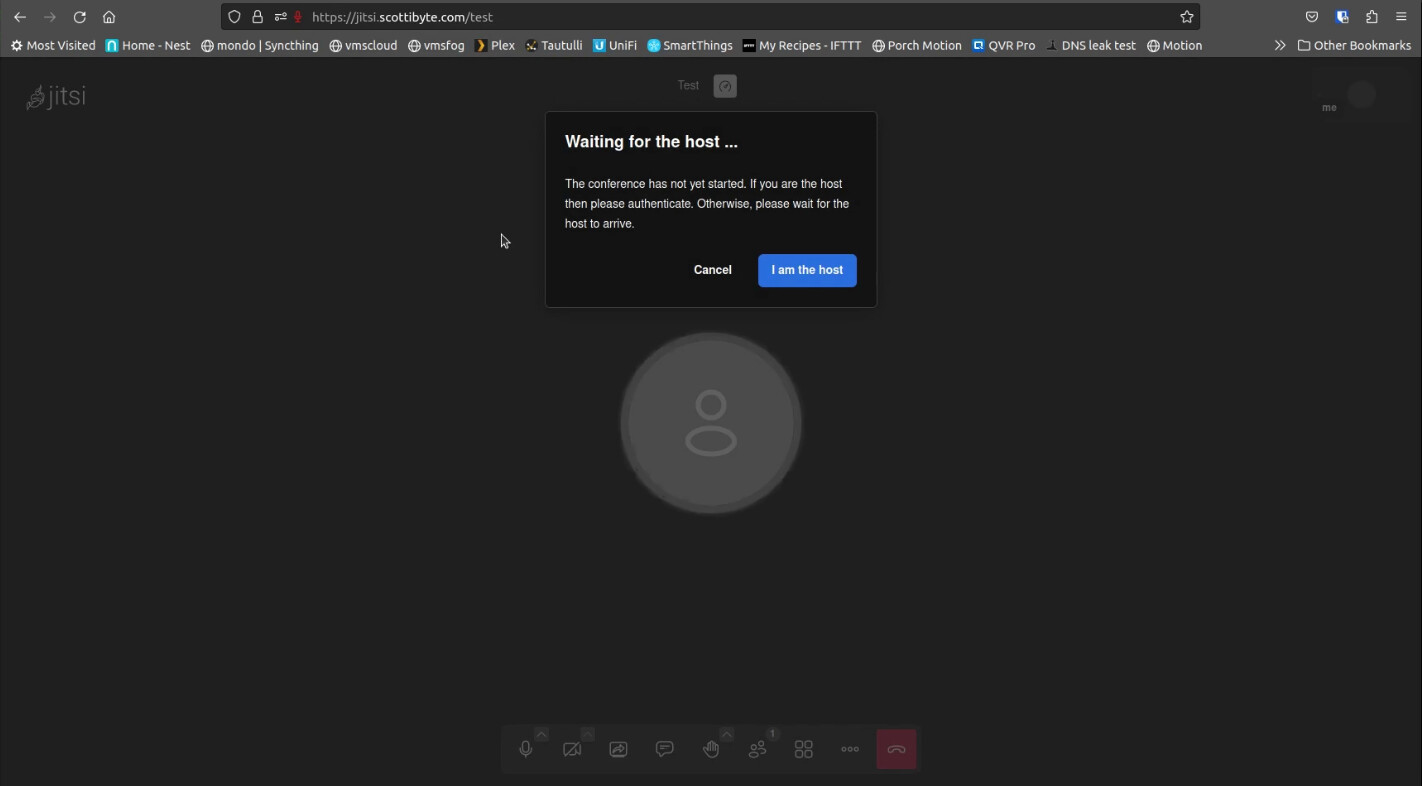
Now only authorized users will be able to create and start Jitsi Meetings. Unprivileged users will will have to wait for the host to join a meeting and will be presented with the following screen.