It’s important to learn a variety of tools while self-hosting. Many of us use security cameras to monitor areas of interest. Amazon has Amazon Alexa skills that can be enabled to view many cameras. Did you know that if you have a 4k camera that is encoded with h.265, these Amazon skills often present your cameras in resolutions as low as VGA? This might be okay if you are viewing them on an Echo Show, but not on a 4k TV.
In this video, I show one possible solution to view a 4k camera in full 3840x2160 4k resolution with a voice command.
Commands as seen on the tutorial are further down the page.
The issue is that you may have either a Fire Stick 4k, Fire Stick 4k Ultra or a Fire TV. In my case, I have a Fire Stick 4k Ultra connected to a Samsung 65" 4k TV. I have a 4k camera that is a Reolink RLC-820A and its full resolution is 3840x2160.
Amazon has a Reolink skill that displays this camera with its substream at a 640x360 resolution.

I would much rather view this camera at its full 4k resolution. Notice the difference in the detail of the fence boards below and yes I know this image is not at the full 4k, but is presented as an example only.

A better solution is to use the Amazon Alexa “Monocle Camera” skill paired with a “Monocle Gateway” on your local LAN to present cameras in higher resolutions. I use https://portal.monoclecam.com/ for my highly recommended Reolink RLC-520A cameras which are 2k at a resolution of 2560x1920. Monocle is a great solution for supporting unsupported cameras on Echo Shows and Fire TV devices.
The problem is that Monocle cannot transcode cameras using an h.265 codec. This is really an Amazon problem because Amazon only accepts h.264 encoded video streams. As far as I have seen, most 4k cameras use the newer and much higher efficiency h.265 codec. Unfortunately, many web browsers and display programs do not support h.265. Just about all IP cameras have 10/100mbps NICs and I have never seen a camera with a 1gbps NIC. So, in order to handle all of the data required for a 4k stream, camera manufacturers use the h.265 codec.
So, what’s the problem? Even an Amazon Echo Show 10 only has a resolution of 1280x800, so it would seem that displaying higher resolutions is a moot point. The reason is that Amazon Fire Stick 4k and 4k Ultra devices operate in 4k and they are generally connected to TV’s that are 4k capable. Wouldn’t you rather see your 4k camera in actual 4k on your 4k TV?
Try as you might, the security camera stream to the Amazon devices is limited to h.264 encoded streams. So, I use the Monocle skill to voice command my Reolink RLC-520A cameras which use h.264 through my Fire Stick 4k Ultra to my Samsung 4k TV and they display at their 2k resolution of 2560x1920. That’s great, but what about my 4k cameras that are h.265 only???
Realizing this limitation, I also have a Google Chromecast 4k device connected to the same Samsung 65" 4k TV. So, this tutorial is about using tools in the Homelab to create a voice command to display my 4k Reolink RLC-820A camera in full resolution and I use the Chromecast 4k to do this. Here is the basic illustration.
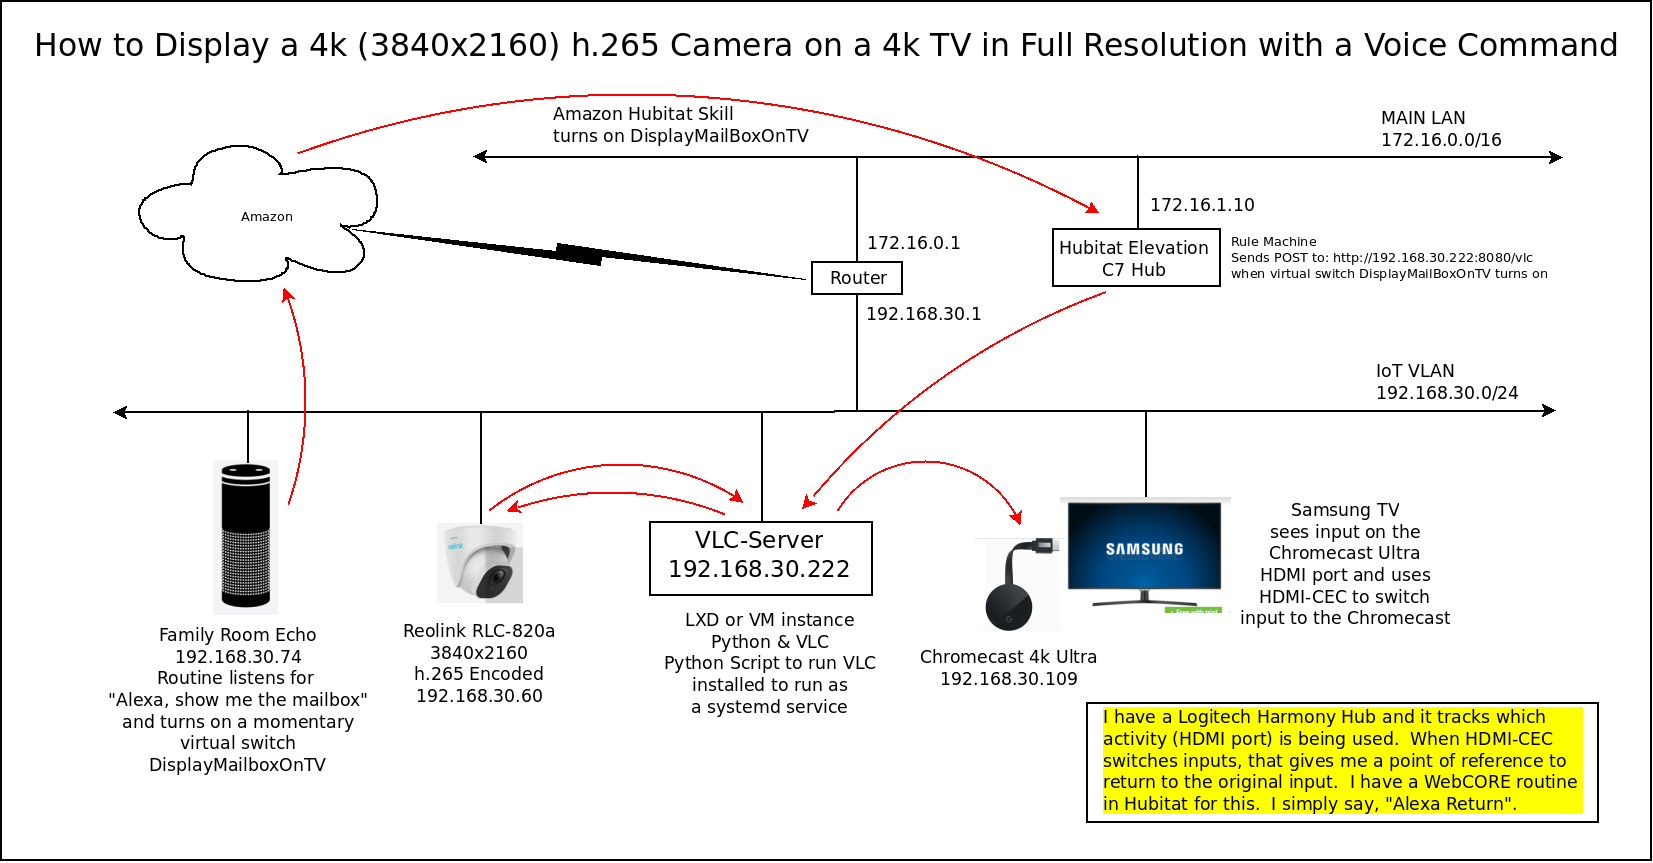
You may not have all of the components required to complete this design. View the video and this tutorial as a realization of what is possible.
As in my other tutorials, I begin by creating a LXD container to host the application. In my case, I have a dedicated IoT VLAN on which I host devices like my cameras, Amazon devices, TV’s, Chromecast, and other 3rd party devices for security isolation and traffic management.
The LXD container (or VM, or Raspberry Pi) needs to have an address on the network where your camera and Chromecast device are located. Modify the following LXD container accordingly.
lxc launch ubuntu:22.04 VLC --profile default --profile IoT -c limits.memory=2048MB -c limits.cpu.allowance=10% -c boot.autostart=true
I connect to the console which gives me root access.
lxc exec VLC bash
As with all new systems, be sure to update the repositories and accept any pending updates.
apt update && apt upgrade -y
I add a user account for easy future access and grant it sudo.
adduser scott
usermod -aG sudo scott
We will be accessing the RTSP camera stream and redirecting it to the Chromecast 4k using the built-in capability of VideoLAN’s VLC video player. We are using an Ubuntu server which has no GUI and so we code a command line for VLC which we embed in a Python script.
So here we install VLC and Python PIP. VLC is installed as a snap because the apt version did not have the proper functionality.
sudo snap install vlc
sudo apt install python3-pip
Now we add an unprivileged user named “vlc”. The name is important because it is used in the systemd service definition to make the app run unattended. The fact that the account is unprivileged is for security reasons since it is offering a web service.
adduser vlc
Move over to the vlc account.
su - vlc
Next we install the Flask library which offers a web framework for Python.
pip3 install Flask
Now we are going to create the Python script.
nano vlc_control.py
Insert the following in the file.
from flask import Flask, request
import os

app = Flask(__name__)

@app.route("/vlc", methods=["POST"])
def vlc():
    vlc_cmd = 'vlc --run-time 60 --intf dummy rtsp://user:pass@192.168.30.60:554/h265Preview_01_main --sout "#chromecast" --sout-chromecast-ip=192.168.30.109'
    os.system(vlc_cmd)
    return "VLC command executed"

if __name__ == "__main__":
    app.run(host="0.0.0.0", port=8080)
Save the file.
In the example script above, 192.168.30.60 is the address of your 4k h.265 camera. The “/h265Preview_01_main” is the web root for the RTSP server on a Reolink RLC-820A camera. This string will differ for other camera brands/models.
Also notice in the example, that I set the run time for the VLC command to be 60 seconds. You can adjust that accordingly, but we need to have the vlc terminate at some point or future connects cannot be made when we automate the script.
The username and the password should be adjusted to those for your camera. The 192.168.30.109 address would be the address of your Chromecast 4k device. We are not actually using your Amazon Firestick 4k device because it will not accept an h.265 encoded RTSP camera stream.
If you want to manually display a 4k camera with an app, you can download and configure the Android application TinyCam Pro on the Firestick 4k. i do that also, but the goal here is to be able to voice command a 4k h.265 camera and so we are using the Chromecast 4k as the target device.
Now make your script executable and set permissions on it.
chmod +x vlc_control.py
chmod 755 vlc_control.py
If you want to test to see if it works from the command line at this point:
python3 vlc_control.py
Next, install “http”.
sudo snap install http
In my example, my LXD container was located at 192.168.30.222 and I presented the application on port 8080 as you will notice on the last line of the script. You will want the port number to be a user port so it needs to be above 1024.
Assuming that your server is at 192.168.30.145, execute the following command from another system to test it. This should display your camera on the Chromecast 4k.
http --json POST http://192.168.30.145:8080/vlc
In order for the Chromecast to become the current HDMI input on your TV, you need to have your TV set with HDMI-CEC enabled which will automatically switch your TV to the Chomecast when it sees data if you are on another HDMI input other than the Chromcast 4k.
After the test, you can CTRL C both the http command and the python script to end the test.
Next we want to create a systemd service to automate the script. You will need to log out of your “vlc” account and on to your user account with sudo privilege that you created earlier.
Edit the service definition file.
sudo nano /etc/systemd/system/vlc_control.service
Insert the following code. Notice how this uses the “vlc” account to run the service.
[Unit]
Description=VLC Control Service

[Service]
User=vlc
ExecStart=/usr/bin/python3 /home/vlc/vlc_control.py
Restart=always

[Install]
WantedBy=multi-user.target
SAVE THE FIILE
Define the service to start automatically when the system boots.
sudo systemctl enable vlc_control
Start the service.
sudo systemctl start vlc_control
You can check to see that the service is correctly started with this command.
sudo systemctl status vlc_control
Your service should now be operational. You can log out of your server.
You can test the service as before by initiating an HTTP POST command.
http --json POST http://192.168.30.145:8080/vlc
Your address above will be the address of the server we created and you will need the “http” snap installed to issue the command. Web browser URLs are HTTP GET requests by default and our command is an HTTP POST.
So, here’s where the voice implementation takes somewhat of a fork. In my case, I have a Hubitat Elevation Home automation hub that controls my lights, watches my sensors and performs countless automations.
On my Hubitat I created a virtual momentary switch named “DisplayMailBoxOnTV” since this is a camera pointed towards the neighborhood group mailbox. I then created a “Rules Machine” rule to execute the http post request when the switch is turned on.

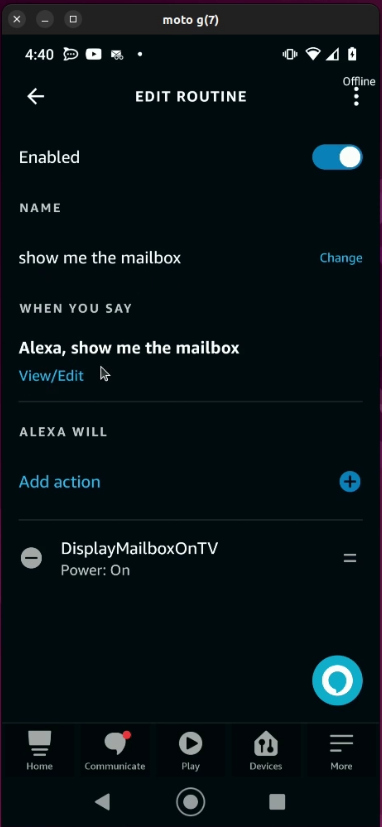
In addition, I have the “Amazon Echo” skill enabled on the Hubitat and I have the DisplayMailBoxOnTV switch defined in that skill so that an Alexa routine can turn on the switch when Alexa hears me say “show me the mailbox”.
On the Alexa Mobile app, here is the routine I defined.
So, this tutorial teaches one possible way to display a 4k camera which uses an h.265 codec in full 4k resolution. This is a valuable exercise showing how to use tools like a LXD container, the VideoLAN VLC application, a Chromecast for a target, a simple Python script, defining a systemd service, and how to run an HTTP POST command from the command line.
There are certainly changes and additions that can be made to this procedure. In my environment, I also have a Logitech Harmony Hub controlling my AV components. I run my Harmony Hub in developer mode and in conjunction with a docker instance, I have API access to the device level commands of my components. I use the Hubitat-Harmony SmartApp on the Hubitat to enable a voice command “Alexa Return” that changes the HDMI input back from the Chomecast 4k to whichever HDMI input source I was watching prior to the “Alexa, show me the mailbox” command. This part of the process is out of scope for this video, but it is what completes the puzzle.