Uninterruptible Power Systems (UPS) are very valuable to ride through small power outages. UPS are particularly critical with Network Attached Storage (NAS) servers which may have many open files and multiple file systems that do not take kindly to a sudden loss of power. This presentation focuses on how to use the Network UPS Utility (NUT) to manage and control systems connected to a UPS.
The NUT Project considers the system directly connected to an UPS to be a Master (Server) and systems that are on the network without a direct UPS connection are considered to be Slaves (Clients). In this video, we explore the configuration of a QNAP NAS UPS attachment and also we show how to configure and monitor other Linux systems that can be both Master and Slave NUT devices.
On your QNAP NAS, here is where to find the UPS settings.
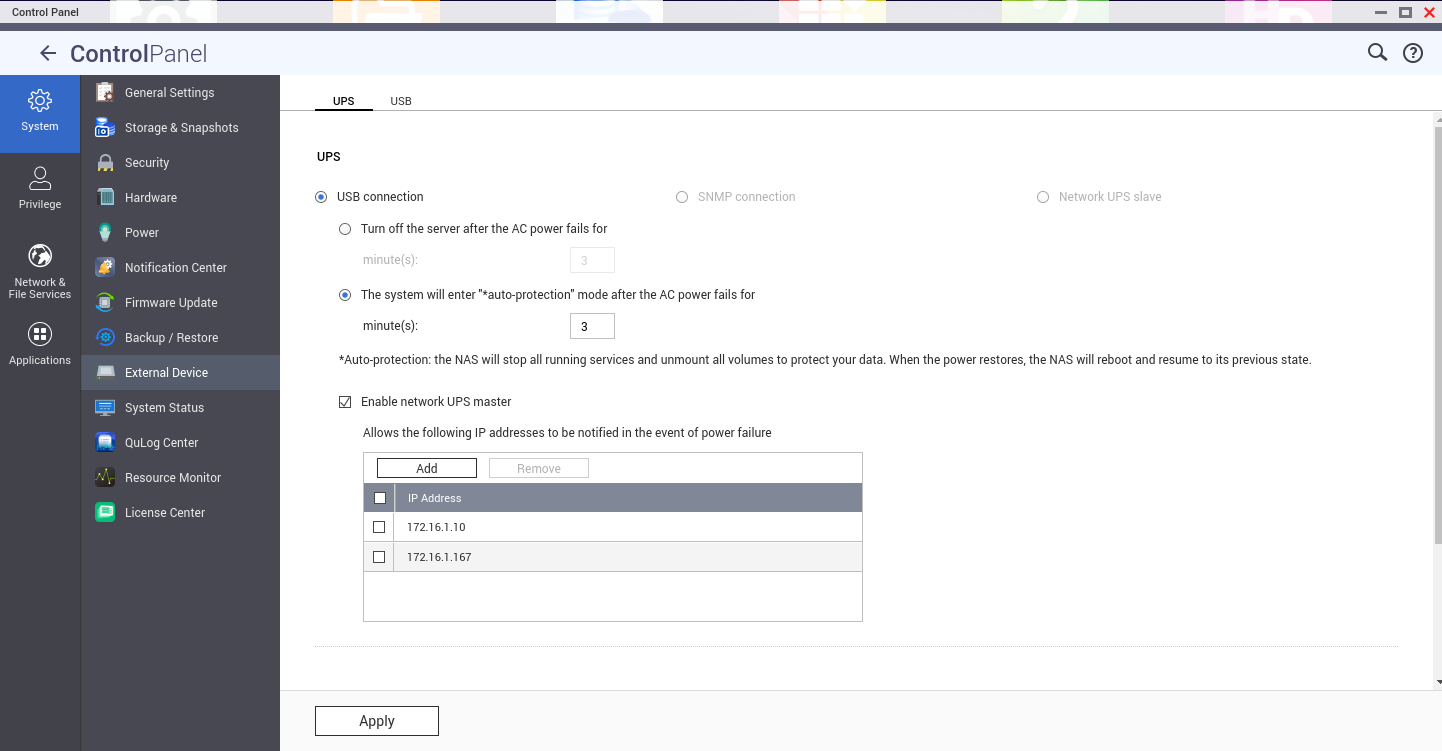
In my example above, the system enters auto protection mode and reboots after power is restored.
First let’s install some dependencies:
sudo apt install libusb-1.0-0-dev libsnmp-dev libneon27-dev libavahi-client-dev libfreeipmi-dev libupsclient-dev
In the first example of configuring a server other than a QNAP, we configured a Raspberry Pi 3B as a NUT Server and connected its USB port to a CyberPower UPS. First, to establish that our UPS is connected to the system, execute the following command at a terminal prompt.
lsusb
You should be able to see the UPS unit in the listing. Next, we install all of the NUT Project components:
sudo apt install nut nut-client nut-server
Use the following command to list information on your UPS.
sudo nut-scanner -U
Select the output from the above command and edit this file:
sudo nano /etc/nut/ups.conf
Clear the contents of the file and paste in your data along with the pollinterval and maxretry lines. Rename the UPS name within the brackets to suit you.
pollinterval = 1
maxretry = 3

[testpi]
        driver = "usbhid-ups"
        port = "auto"
        desc = "Office UPS"
        pollinterval = 15
        vendorid = "0764"
        productid = "0501"
        product = "UPS CP1000AVRLCD"
        vendor = "CPS"
        bus = "005"
Edit the user file and add user accounts as needed.
sudo nano /etc/nut/upsd.users
Place input in the file. An example follows:
[admin]
  password = 123456
  admin master
Edit the monitor file.
sudo nano /etc/nut/upsmon.conf
An example of the contents follows:
RUN_AS_USER root
MONIITOR testpi@localhost 1 admin 123456 master
DEADTIME 25
MAXAGE 25
Edit the daemon listener file:
sudo nano /etc/nut/upsd.conf
Put the following contents in the daemon file so that anyone on the network is allowed to connect to this NUT server.
LISTEN 0.0.0.0 3493
LISTEN ::0 3493
Edit the NUT configuration file:
sudo nano /etc/nut/nut.conf
Enter the following into it.
MODE=netserver
Change all of the NUT files to be owned by the NUT user and restart the server.
sudo chown nut /etc/nut/*
/etc/init.d/nut-server restart
Test your configuration with the UPS name you used in the ups.conf file:
upsc testpi@localhost
NUT Web Server
The next thing we want to is configure a Web Server to run nut-cgi (upsstats) to monitor one or more UPS units. In the video, I created a LXD container that I bridged to the main network using QNAP Container Station. You can create a LXD container or a Virtual Machine on any system as your NUT Web Server.
On this server install the packages.
sudo apt install apache2 nut-cgi
Edit the following file:
sudo nano /etc/nut/hosts.conf
Insert a line for each UPS that you want to monitor. NOTE: You would have had to install the NUT server for each system attached to each UPS. You need to use the correct UPS name you set on the server and the address of the server. As an example:
MONITOR testpi@172.16.1.130 "TestPi"
My file looks like this:

Enable the cgi module in the apache webserver and restart apache:
sudo a2enmod cgi
sudo systemctl restart apache2
Edit this file:
sudo nano /etc/nut/upsset.conf
Uncomment the following line in the file:
I_HAVE_SECURED_MY_CGI_DIRECTORY
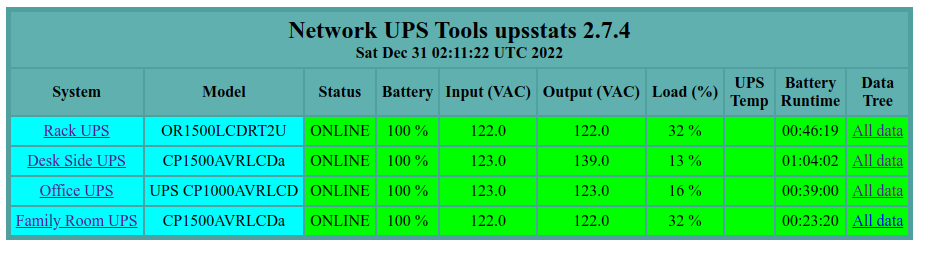
Go to a web browser and visit the following URL (with your IP address):
http://172.16.1.97/cgi-bin/nut/upsstats.cgi
If everything worked, you should have a screen listing your UPS units. Note that I configured four servers because I have four UPS units.
NUT Client
A NUT Slave (client) follows the status of a NUT Master (server). So, a NUT client can shutdown a system not connected to the UPS USB port just by following the status of the NUT Master.
In my example, I installed the NUT Client on a virtual machine.
sudo apt install nut-client
Edit the monitor file.
nano /etc/nut/upsmon.conf
Insert the following and change the MONITOR line to point to your Master.
RUN_AS_ROOT root

MONITOR testpi@172.16.1.130 1 admin 123456 slave

MINSUPPLIES 1
SHUTDOWNCMD "/sbin/shutdown -h"
NOTIFYCMD /usr/sbin/upssched
POLLFREQ 2
POLLFREQALERT 1
HOSTSYNC 15
DEADTIME 15
POWERDOWNFLAG /etc/killpower

NOTIFYMSG ONLINE   "UPS %s is on utility power"
NOTIFYMSG ONBATT   "UPS %s is on battery power"
NOTIFYMSG LOWBATT  "UPS %s remaining battery is low"
NOTIFYMSG FSD      "UPS %s forced shutdown is in progress"
NOTIFYMSG COMMOK   "Communications with UPS %s established"
NOTIFYMSG COMMBAD  "Communications with UPS %s lost"
NOTIFYMSG SHUTDOWN "Auto logout and shutdown is proceeding"
NOTIFYMSG REPLBATT "UPS %s battery needs to be replaced"
NOTIFYMSG NOCOMM   "UPS %s is unavailable"
NOTIFYMSG NOPARENT "upsmon parent process not running - shutdown not possible"

NOTIFYFLAG ONLINE   SYSLOG+WALL+EXEC
NOTIFYFLAG ONBATT   SYSLOG+WALL+EXEC
NOTIFYFLAG FSD      SYSLOG+WALL+EXEC
NOTIFYFLAG COMMOK   SYSLOG+WALL+EXEC
NOTIFYFLAG COMMBAD  SYSLOG+WALL+EXEC
NOTIFYFLAG SHUTDOWN SYSLOG+WALL+EXEC
NOTIFYFLAG NOCOMM   SYSLOG+WALL+EXEC
NOTIFYFLAG NOPARENT SYSLOG+WALL+EXEC
NOTIFYFLAG LOWBATT  SYSLOG+WALL
NOTIFYFLAG REPLBATT SYSLOG+WALL

RBWARNTIME 43200
NOCOMMWARNTIME 600
FINALDELAY 5
Edit the config file:
sudo nano /etc/nut/nut.conf
Insert the following to set it as a client.
MODE=netclient
Create the scheduling configuration file.
sudo nano /etc/nut/upssched.conf
Insert the following data:
CMDSCRIPT /etc/nut/upssched-cmd
PIPEFN /etc/nut/upssched.pipe
LOCKFN /etc/nut/upssched.lock

AT ONBATT * START-TIMER onbatt 30
AT ONLINE * CANCEL-TIMER onbatt online
AT ONBATT * START-TIMER earlyshutdown 30
AT LOWBATT * EXECUTE onbatt
AT COMMBAD * START-TIMER commbad 30
AT COMMOK * CANCEL-TIMER commbad commok
AT NOCOMM * EXECUTE commbad
AT SHUTDOWN * EXECUTE powerdown
Create the scheduling script:
sudo nano /etc/nut/upssched-cmd
Insert the following into it:
#!/bin/sh
 case $1 in
      onbatt)
         logger -t upssched-cmd "The UPS is on battery"
         ;;
      earlyshutdown)
         logger -t upssched-cmd "UPS on battery for too long, forcing shutdown"
         /usr/sbin/upsmon -c fsd
         ;;
      shutdowncritical)
         logger -t upssched-cmd "UPS on battery critical, forcing shutdown"
         /usr/sbin/upsmon -c fsd
         ;;
      upsgone)
         logger -t upssched-cmd "The UPS has been gone for awhile, no communication"
         ;;
      *)
         logger -t upssched-cmd "Unrecognized command: $1"
         ;;
 esac
Finally, change the permission to execute on the script and restart the client.
sudo chmod +x /etc/nut/upssched-cmd
sudo systemctl restart nut-client
To test to make sure that the slave (client) can reach the master (server) use the following command with the name of your UPS you created and its IP address.
upsc testpi@172.16.1.130
The ultimate test is to unplug the UPS from the wall socket and then see if your client initiates a shutdown on low battery on the UPS connected to the server.
I have this working, but in the video, the invertor on my test UPS died just as I was about to demo this. After you unplug the UPS, the client should almost immediately see a console message saying the the Master UPS is on battery.
For detailed documentation about the Open Source NUT Project, visit: https://networkupstools.org/