I recently purchased a MItsubishi Minisplit Heat Pump HVAC unit to keep my Home Lab cool. Mitsubishi sells a Wifi adapter for around $200 that is designed to connect to the CN105 connector inside of the unit. The problem with this interface is that it is designed only to connect to the Mitsubishi Comfort Cloud which is a public cloud service.
I wanted to opt for local control and I wanted access to the outside temperature sensor which the Mitsubishi cloud app does not provide. After quite a bit of research, I purchased a three pack of Esp32 S3 Development Boards for $20US. I also bought a pack of CN105 pigtail connectors for only $7US.
An Esp32 is a micro-processor board used by both hobbyists and embedded systems developers to enable all kinds of Smart Home integrations. They are neat little devices that usually run small Python scripts and communicate over Wi-fi as well as bluetooth if needed.
This is my first foray into the Espressif (ESP32) micro processor ecosystem. There are many interesting projects and since I featured a Home Assistant OS installation in an Incus Virtual Machine recently, I started looking at what I could do with these inexpensive little micro-processors that we are finding increasingly in all sorts of IoT embedded systems.
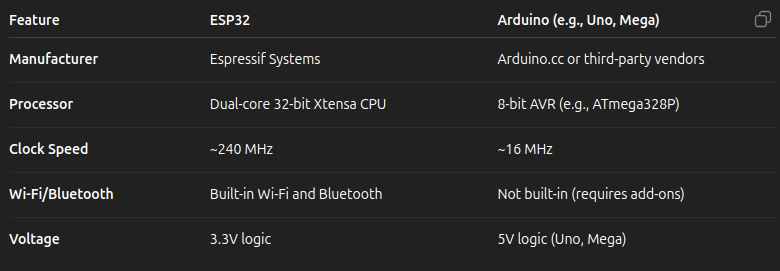
For those of you that have heard about ESP32 boards, you might wonder what makes them and Arduino micro-processor kits different.
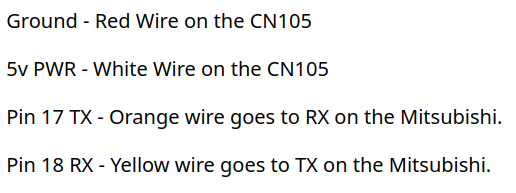
The only hardware work required for this HVAC local control project is to solder four of the five pins to the CM105 connector as follows.
I opted to create a build environment for my ESP32 module in an incus container. Start by creating the container. Like most of my tutorials, you will find that we are learning some essential skills for other ESPHome based applications. Start by creating an incus container:
incus init images:ubuntu/24.04 ESP32
Plug the ESP32 module into a USB port on the incus server. The ESP32 offers two USB C ports. I connected to the one on the right side of the component side of the board oriented with the ports facing me. That port provides both power and a serial connection to the device.
When connected to a computer for programming purposes, the ESP32 is regarded as a modem or just a plain serial terminal device. Start by putting your user account on your incus server in the dialout group.
usermod -aG dialout scott
newgrp dialout
Check to see what the name of your device is:
ls -l /dev/tty*

Open permissions on the device for the container to have access.
sudo chgrp dialout /dev/ttyACM0
sudo chmod 666 /dev/ttyACM0
Connect the ESP32 device to the container we created.
incus config device add ESP32 ttyUSB0 unix-char source=/dev/ttyACM0 path=/dev/ttyACM0
Boot up the container.
incus start ESP32
Connect to the container shell.
incus shell ESP32
Accept the updates.
apt update && apt upgrade -y
Install Python and other dependencies for the Python virtual environment.
apt install python3 python3-pip python3-venv openssh-server git net-tools nano -y
Create a user account and put the account into the sudo and dialout groups.
adduser scott
usermod -aG sudo scott
usermod -aG dialout scott
Move to the new user account.
su - scott
Create the Python virtual environment.
python3 -m venv esphome_venv
Activate the Python Virtual Environment
source esphome_venv/bin/activate
Install the ESPHome Github project which allows for programming ESP32 microcontrollers for home automation projects through simple YAML code configuration files.
pip install esphome
Create the four configuration files we will need.
touch main.yaml
touch climate.yaml
touch secrets.yaml
touch connection.yaml
Edit the main.yaml file.
nano main.yaml
Insert the following code.
##########################
######### Main ###########
##########################

substitutions:
  device_name: computer-room-mitsubishi
  friendly_name: Computer Room Mitsubishi
  log_level: INFO

esphome:
  name: ${device_name}
  friendly_name: "${friendly_name}"

esp32:
  board: esp32-s3-devkitc-1
  framework:
    type: esp-idf

# Default logging level
logger:
  level: ${log_level}

# Enable Home Assistant API
api:
  encryption:
    key: !secret homeassistant_api_encryption

# Include external files
<<: !include climate.yaml
<<: !include connection.yaml

# `secrets.yaml` will be included automatically
Edit the device name and friendly name in the file accordingly and then save the file with a CTRL O and enter and then a CTRL X to exit the editor.
Edit the climate configuration file.
nano climate.yaml
Insert the following data.
###############################
###### Mitsubishi CN105 #######
###############################

external_components:
  - source: github://echavet/MitsubishiCN105ESPHome

uart:
  id: HP_UART
  baud_rate: 2400

  tx_pin: GPIO17 # TX goes to RX on Mitsubishi
  rx_pin: GPIO18 # RX goes to TX on Mitsubishi

# Required for the CN105 Configuration, due to compilation on
# latest ESPHome
sensor:
  - platform: uptime
    name: "${friendly_name} Uptime"
    internal: true # Hides from Homeassistant

# Climate entity configuration
climate:
  - platform: cn105
    id: hp
    name: "${friendly_name}"
    icon: mdi:heat-pump

    visual:
      min_temperature: 50     # 10°C = 50°F
      max_temperature: 88     # 31°C = 88°F
      temperature_step:
        target_temperature: 1
        current_temperature: 0.5

    # Timeout and communication settings
    remote_temperature_timeout: 30min
    update_interval: 2s
    debounce_delay : 100ms

    # Various optional sensors, not all sensors are supported by all heatpumps
    vertical_vane_select:
      name: Vertical Vane
      disabled_by_default: false
    outside_air_temperature_sensor:
      name: Outside Air Temp
      disabled_by_default: false
    stage_sensor:
      name: Stage
      entity_category: diagnostic
      disabled_by_default: false
    sub_mode_sensor:
      name: Sub Mode
      entity_category: diagnostic
      disabled_by_default: false
    kwh_sensor:
      name: Energy Usage
      disabled_by_default: false
    compressor_frequency_sensor:
      name: Compressor Frequency
      entity_category: diagnostic
      disabled_by_default: true
    runtime_hours_sensor:
      name: Runtime Hours
      entity_category: diagnostic
      disabled_by_default: false
    horizontal_vane_select:
      name: Horizontal Vane
      disabled_by_default: true
    isee_sensor:
      name: ISEE Sensor
      disabled_by_default: true
    auto_sub_mode_sensor:
      name: Auto Sub Mode
      entity_category: diagnostic
      disabled_by_default: true
    input_power_sensor:
      name: Input Power
      disabled_by_default: true
Save the file with a CTRL O and enter and then CTRL X to exit the nano editor.
Edit the secrets file.
nano secrets.yaml
Insert the following data.
###############################
########## Secrets ############
###############################

wifi_ssid: "YOURSSID"
wifi_password: "YOURPASSWORD"
ota_password: "OTA-PASSWORD"
ap_password: "DIRECT-WIFI-PASSWORD"
homeassistant_api_encryption: "ENCRYPTION-KEY-GOES-HERE"
Set your wi-fi SSID, your wi-fi password, and then a fallback AP Password which works as a direct connect if you have no wi-fi. The ota_password is an over the air password and it is used to update the configuration of an esp over wifi after it has been configured with ESPHome. For now, save the file with a CTRL O and enter and then CTRL X to exit the nano editor.
Execute the following command to generate a Home Assistant Encryption key:
python3 -c "import base64, os; print(base64.b64encode(os.urandom(32)).decode())"
Edit the secrets.yaml file again and put the encryption key you just created in place of ENCRYPTION-KEY-GOES-HERE and save the file again. Keep a copy of this key because you will need it again when you configure the device in Home Assistant.
Edit the connection file.
nano connection.yaml
Insert the following data:
#######################
###### Connection #####
#######################

ota:
  - platform: esphome
    password: !secret ota_password

wifi:
  ssid: !secret wifi_ssid
  password: !secret wifi_password

  # Reboot ESP32 if Wi-Fi is disconnected for more than 5 minutes
  reboot_timeout: 5min

  # Enable fallback hotspot (captive portal) in case wifi connection fails
  ap:
    ssid: ${device_name}
    password: !secret ap_password

captive_portal:
This will reboot the esp32 if the wifi connection breaks for more than five minutes. Save the file out with a CTRL O and enter and then a CTRL X to exit the nano editor.
Initialize and build the ESPHome environment with the following command.
esphome clean main.yaml && esphome compile main.yaml
The “esphome compile” command is used to build a binary containing all of the configuration files that we create so far.
list your terminal/modem devices:
ls -la /dev/tt*

Open permissions on the device:
sudo chgrp dialout /dev/ttyACM0
sudo chmod 666 /dev/ttyACM0
Program the esp32 device connected to your USB Port that you configured:
esphome upload main.yaml --device /dev/ttyACM0
At this point, you should be able to see the device on your wifi. If so, then you can disconnect the esp32 device from your USB port and connect it to the CN105 connector on your Minisplit. Also, make sure and set a DHCP address reservation for the IP address of the device.
The upload will “flash” the esp32 device with the ESPHome binary with the configuration that we set up. Once this has been performed once, it is possible to make future updates to the device using a command like this:
esphome upload main.yaml --device 192.168.1.123
The command above expects to find your esp32 device with ESPHome loaded on it at the address you specify. This will prompt for the aforementioned OTA (over the air) password that you set in your secrets file for additional security.
To summarize:
- The “esphome upload” command resolves and includes all referenced files like secrets.yaml and connection.yaml.
- esphome compiles a single binary file with a .bin extension.
- The .bin file is uploaded to the esp32 either via USB or OTA.
ESPHome does receive updates from time to time. To upgrade it from inside your incus container and inside the Python virtual environment:
pip install --upgrade esphome
So, once your binary has been uploaded with “esphome upload” it should be available on your wi-fi network.
Home Assistant should discover your esp32 device in Devices & Services using the ESPHome integration and you will be asked for the Home Assistant Encryption key we acquired earlier when you add the device.
If you ever need to reconfigure the device, connect it to the USB port on the incus server again, start the container, move inside it and activate the Python environment:
source esphome_venv/bin/activate
Reset the environment.
esphome clean main.yaml && esphome compile main.yaml
Make changes to the four yaml files and then upload them again.
esphome upload main.yaml --device /dev/ttyACM0
If all you want to do is make a simple change to one of the configuration files, you can run this command also from the Python environment in the container and you will be presented a menu asking if you want the update to occur via USB or Wi-fi.
esphome run main.yaml