Collaborative tools are some of the most valuable assets in the Home Lab. Neko is a collaborative app that uses WebRTC to stream a web browser, a desktop or any Linux app in a group session with a text chat.
The getting started page for Neko shows the various Docker tags available for Neko which are predominantly choice of browser and can be found here:
https://neko.m1k1o.net/#/getting-started/
The Github page is where the project is based:
https://github.com/m1k1o/neko
Docker is the preferred way to install Neko and here is the Docker page for the Neko project:
https://hub.docker.com/r/m1k1o/neko
I used a LXD Container in which I nested my Neko Docker application. I presented my LXD container on my main LAN using my “bridgeprofile” that I covered in my “LXD Step by Step” tutorial.
I created my LXD container with this command:
lxc launch ubuntu:22.04 Neko --profile default --profile bridgeprofile -c boot.autostart=true -c security.nesting=true -c limits.memory=2048MB -c limits.cpu.allowance=20%
I moved inside of the LXD container to manage it:
lxc shell Neko
I updated the LXD container and installed Docker:
apt update && apt upgrade -y
curl -sSL https://get.docker.com | sh
I created an account for myself and granted it sudo and docker:
adduser scott
usermod -aG sudo scott
usermod -aG sudo docker
I moved over to the “scott” account:
su - scott
Create a Neko folder and move into it:
mkdir neko
cd neko
I created a docker compose file for Neko using the “brave” tag for the Brave browser as my preference. Be sure to set your user and admin passwords in this file:
nano docker-compose.yml
Put the following in the file and make adjustments for the ports as needed and the passwords:
version: "3.4"
services:
  neko:
    image: "m1k1o/neko:brave"
    restart: "unless-stopped"
    shm_size: "2gb"
    ports:
      - "80:8080"
      - "52000-52100:52000-52100/udp"
    cap_add:
      - SYS_ADMIN
    environment:
      NEKO_SCREEN: 1920x1080@30
      NEKO_PASSWORD: user123
      NEKO_PASSWORD_ADMIN: admin123
      NEKO_EPR: 52000-52100
      NEKO_ICELITE: 1
SAVE the File with a CTRL O and Enter to save it and a CTRL X to exit the nano editor.
Launch the docker container:
docker compose up -d
To make Neko accessible from the web, you need to go to your domain service provider and define a subdomain for your Neko service. Once you have done this, you will need to define a reverse proxy record with a Let’s Encrypt SSL Certificate using your NginX Proxy Manager being sure to adjust your IP address accordingly for your Neko instance.
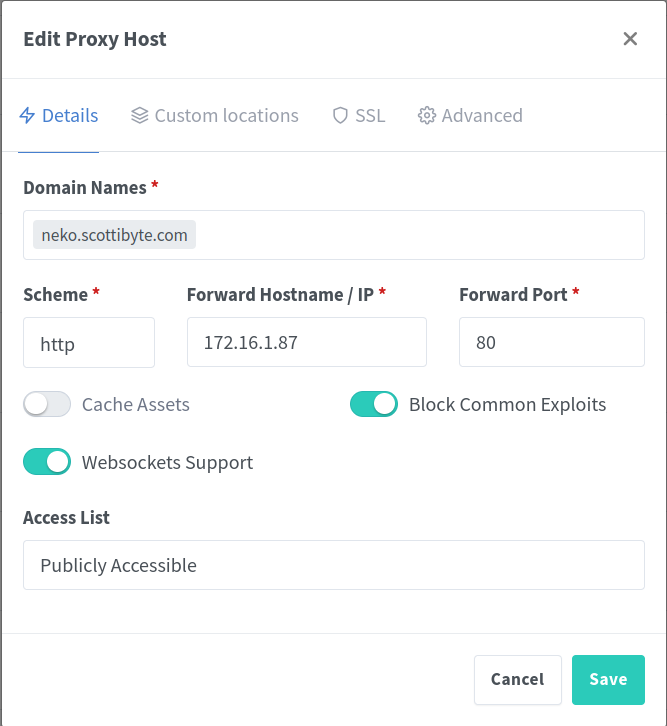
You also want to go to your router and define port forwards for UDP ports 52000-52100 to your Neko server to support WebRTC sessions.
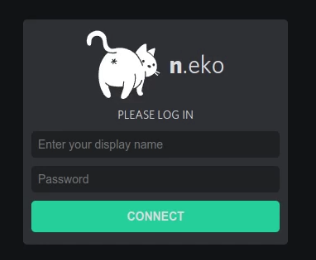
Now when you go to your subdomain for your Neko instance, you should see the logon screen. Again, the display name is arbitrary just for identification in the chat. Privilege is determined by whether you enter the user password or the admin password.
In my example in the tutorial, I showed a second configuration example for Neko where I used the Remmina emulator to connect to a Windows 11 virtual machine. To do this, you will need to specify the username, password and address of your Windows machine that has RDP enabled. Here is an example of my docker-compose.yml file for this configuration of Neko:
version: "3.4"
services:
  neko:
    image: "m1k1o/neko:remmina"
    restart: "unless-stopped"
    shm_size: "2gb"
    ports:
      - "80:8080"
      - "52000-52100:52000-52100/udp"
#    cap_add:
#      - SYS_ADMIN
    environment:
      NEKO_SCREEN: 1920x1080@30
      NEKO_PASSWORD: user123
      NEKO_PASSWORD_ADMIN: admin123
      NEKO_EPR: 52000-52100
      NEKO_ICELITE: 1
      REMMINA_URL: rdp://username:password@172.16.1.106:3389
Anytime you change your docker-compose file, you will need to launch it again to activate the changes:
docker compose up -d
Neko is a great collaborative tool for teams of folks and teachers.