Netboot.XYZ is a Preboot Execution Environment for booting OS’s and utilities from the network. This tutorial is really about how to leverage Netboot.XYZ with a LXD Virtual Machine. Although the installation of Netboot.XYZ that I feature here will boot from a bare metal machine, I am featuring how to get a LXD VM to boot from Netboot.XYZ.
That being said, here is the Netboot.XYZ Project page if you want to read about it.
To achieve a LXD VM that will boot from Netboot.XYZ we need:
- The Netboot.XYZ Docker container installed on your network.
- Your router configured to define the Netboot.XYZ address as a Boot Server.
- A LXD VM configured to boot from the Network.
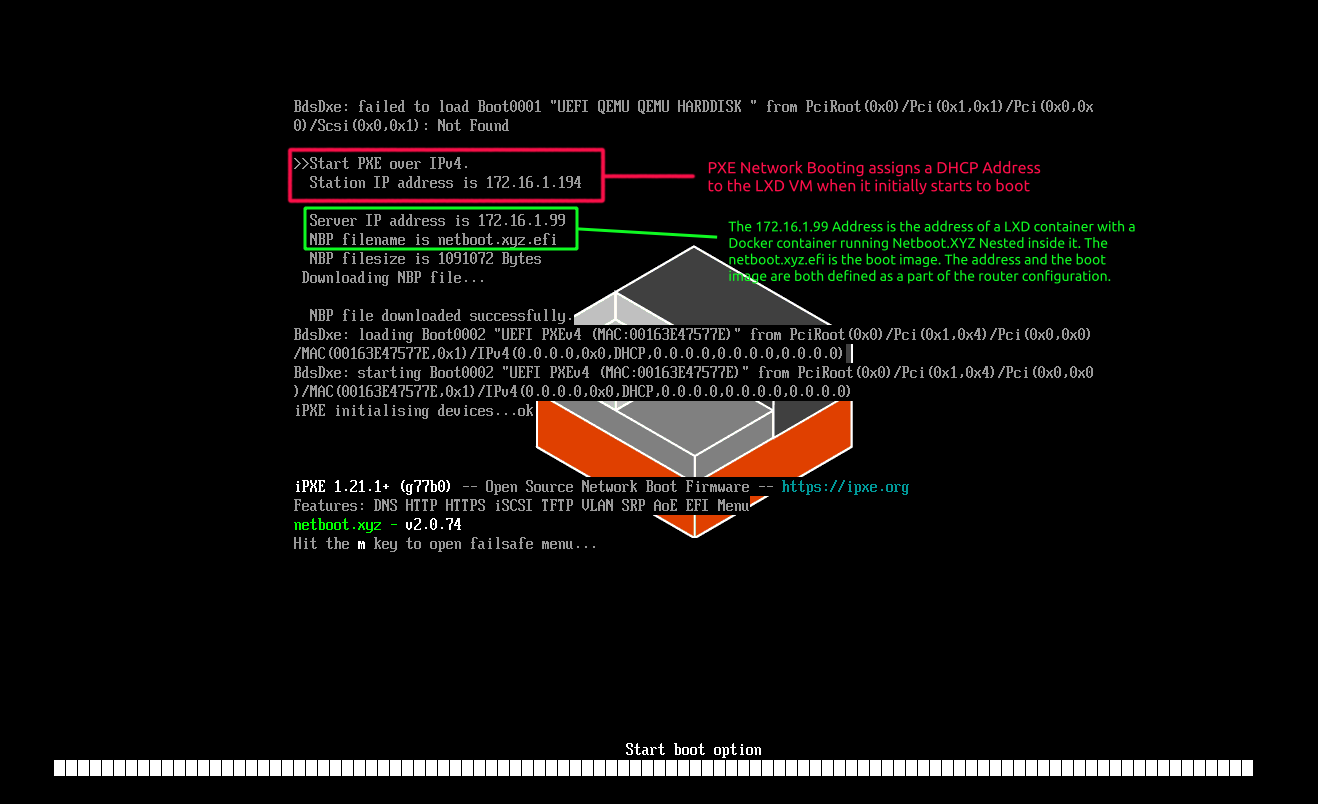
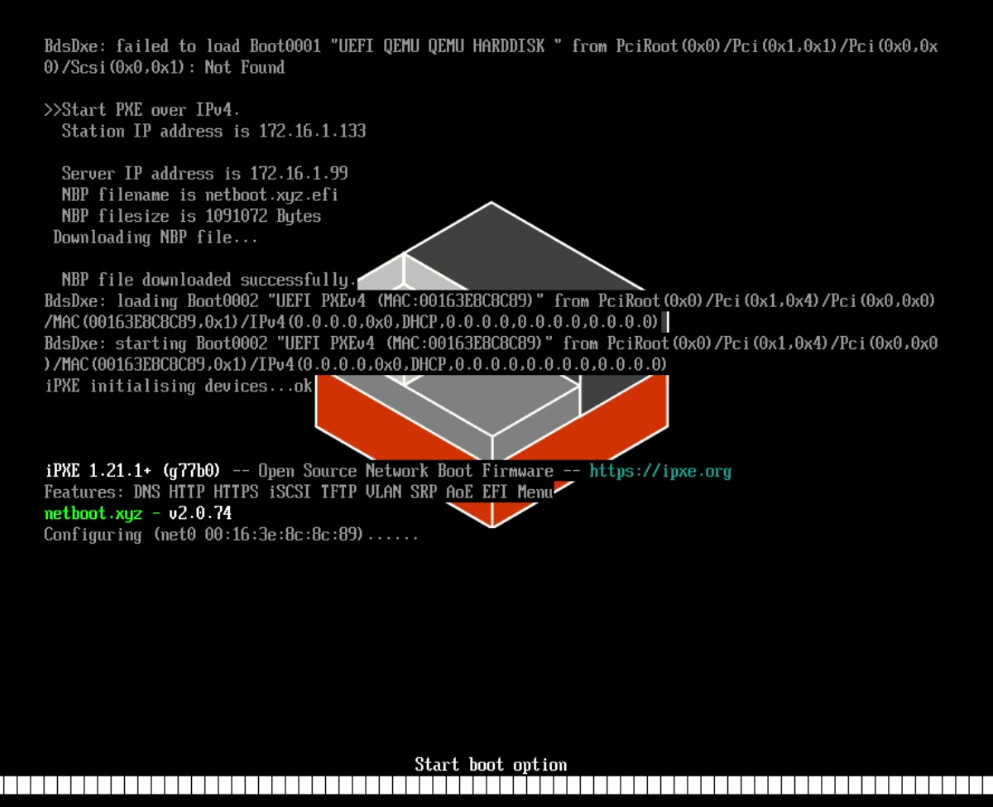
Here is an image of the LXD VM screen as the PXE Boot process begins.
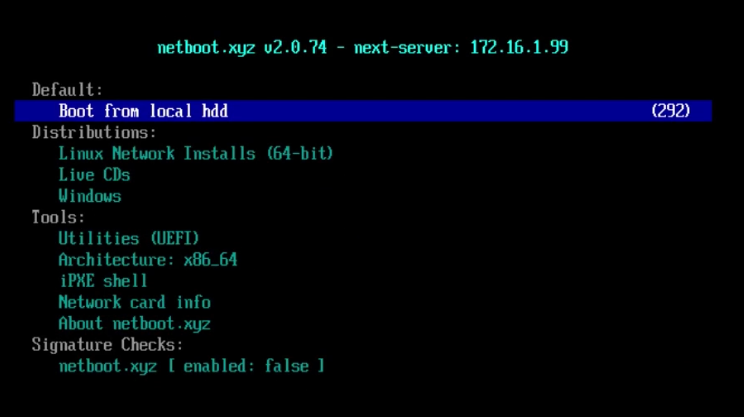
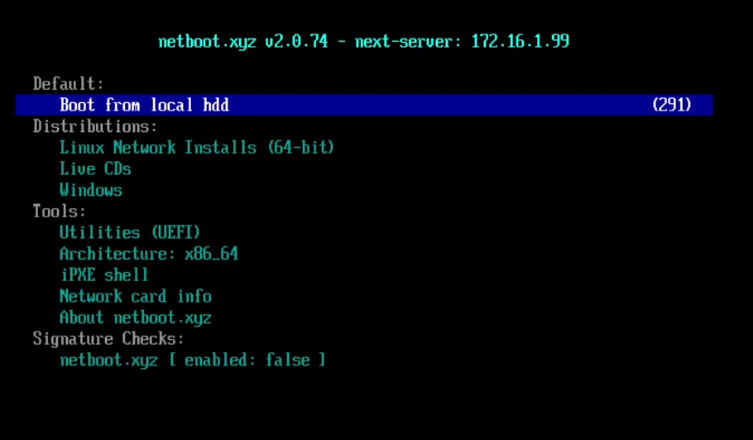
Once the PXE boot completes, the Netboot.XYZ menu is displayed.
After the menu is display, a wide range of Live CDs and utilities can be booted to either test or install.
We start by creating the LXD container to host the Netboot.XYZ application. The following command relies upon the use of the “bridgeprofile” and if you are unfamiliar with it you should go watch my “LXD Step by Step” tutorial now and then come back here. On your LXD Server, execute the following command:
lxc launch ubuntu:22.04 Netboot --profile default --profile bridgeprofile -c boot.autostart=true -c security.nesting=true
Connect to the LXD container we just created:
lxc shell Netboot
Perform the updates on the container OS:
apt update && apt upgrade -y
Next, I add a username and put it in the sudo group:
adduser scott
usermod -aG sudo scott
Install docker and docker compose:
curl -sSL https://get.docker.com | sh
apt install docker-compose.yml
Add my user scott into the docker group so I can use docker without sudo:
usermod -aG docker scott
Remove and reinstall openssh-server to refresh the ssh keys so I can use ssh in the future:
apt remove --purge openssh-server
apt install openssh-server
Move to the scott account (The dash means move into my home folder as well):
su - scott
Create a folder for the application and move into it:
mkdir netboot
cd netboot
Edit a docker compose file:
sudo nano docker-compose.yml
Insert the following text into the file:
version: "2.1"
services:
  netbootxyz:
    image: lscr.io/linuxserver/netbootxyz:latest
    container_name: netbootxyz
    environment:
      - PUID=1001 #current user
      - PGID=1001 #current group
      - TZ=Etc/UTC
    volumes:
      - ./config:/config
      - ./assets:/assets #optional
    ports:
      - 3000:3000 # web interface
      - 69:69/udp # TFTP POrt
      - 80:80     # NGINX hosted assets
    restart: unless-stopped
Save the file with CTRL O and enter and then CTRL X to exit the nano editor.
Start the application:
docker compose up -d
We are done with creating and starting the Netboot.XYZ application. Exit the container:
exit   # Exit the scott account
exit   # Exit the root account in the container shell
Find the address of your Netboot container:
lxc list
You can visit the Netboot.XYZ at the address of the Netboot LXD container we created at port 3000. In my case:
http://172.16.1.99:3000
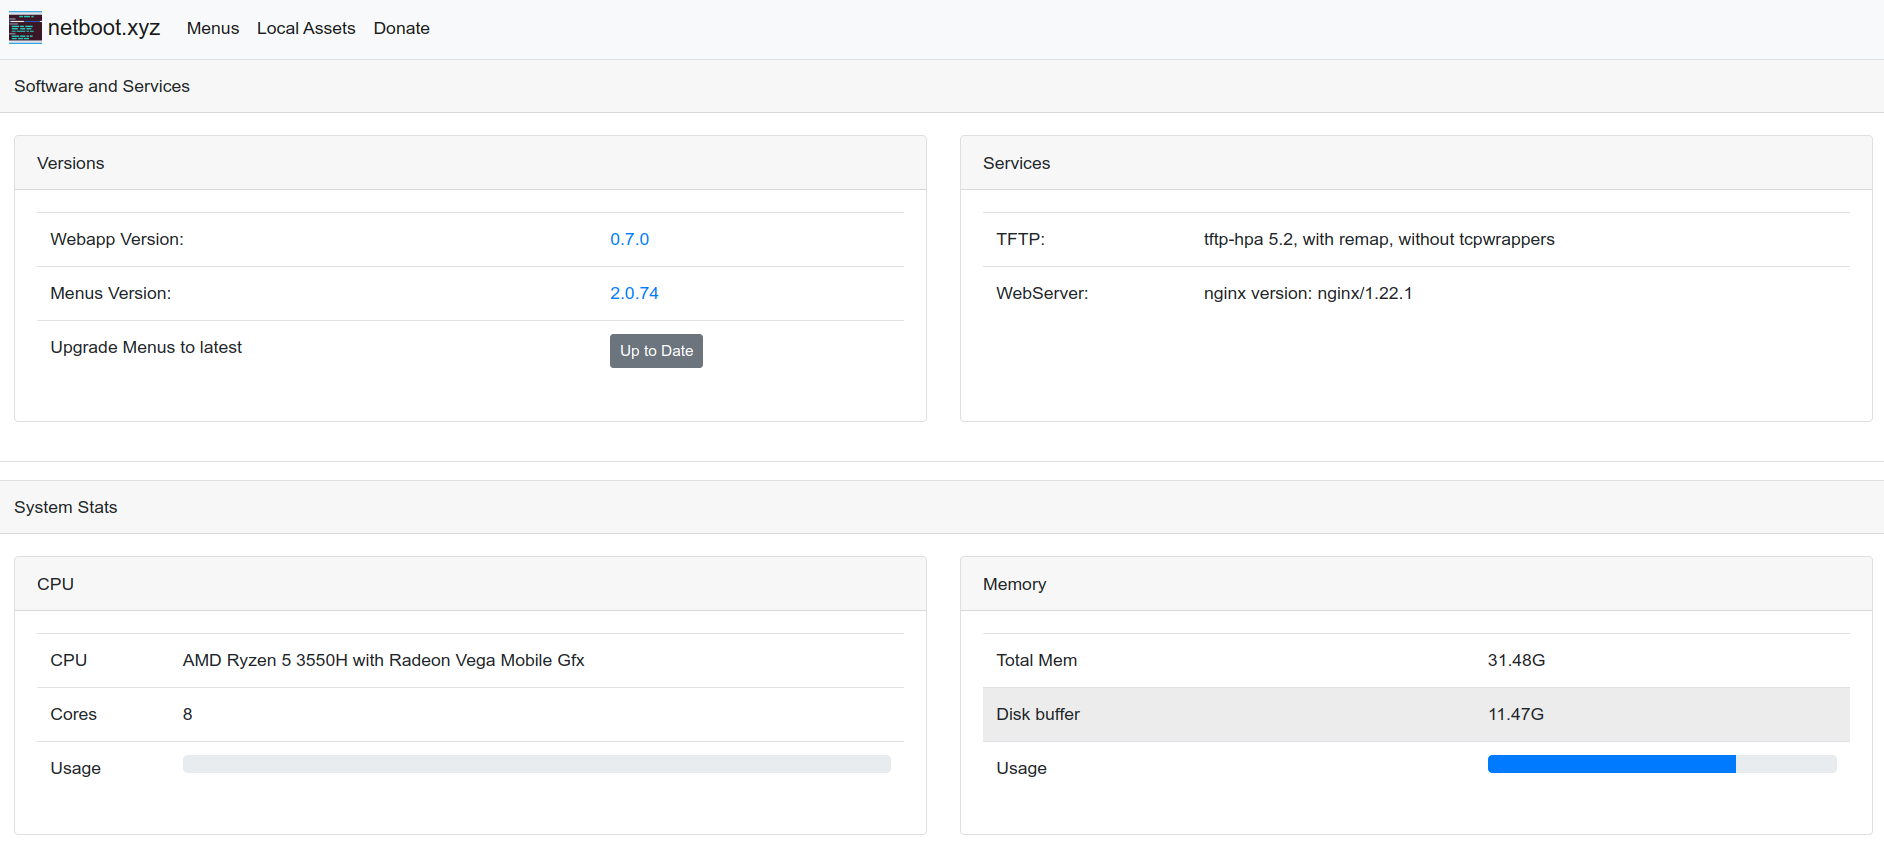
More on the interface is covered in the video. Next we want to configure your router to allow for PXE Network booting. This will be different for every brand of router. Here’s a link for popular router configurations for Netboot.XYZ.
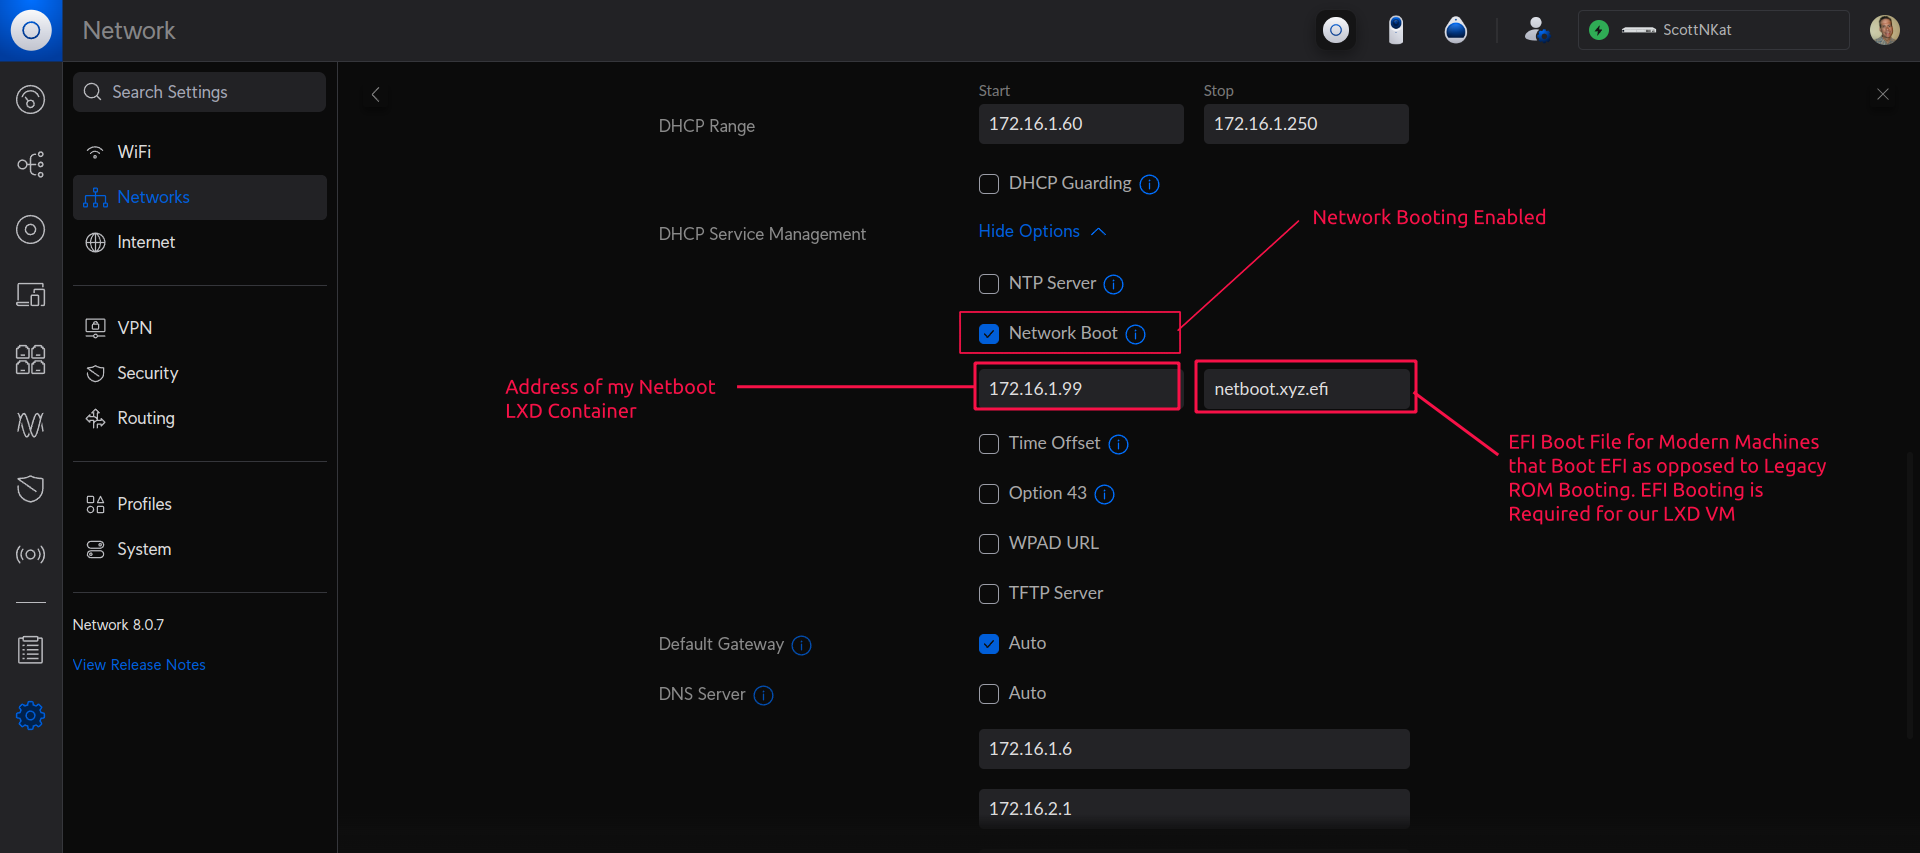
This video is not meant as an exhaustive guide to configuring Netboot.XYZ. Instead, I am focusing on its use with booting a LXD VM. Below you can see how I defined my Ubiquiti UDM Pro router for booting Netboot.XYZ on my main LAN:
Now we want to create a LXD VM which will boot over the network. We use a LXD VM and not a LXD Container because containers do not support the boot process.
Before we can create the LXD VM, we have to define a network that will be available before any OS boots. This cannot be achieved with LXD Profiles. If you watched my “LXD Step by Step” tutorial we created a software switch named “bridge0”. We are going to use it now to create a network for PXE booting with the following command:
lxc network create bootpxe --type=macvlan parent=bridge0
Now we can create an “empty” LXD Virtual Machine that can PXE Boot. An empty LXD VM is one that has an uninitialized disk with no OS on it. I use the “lxc init” command to create the LXD VM without starting it:
lxc init Netclient --vm --empty --network bootpxe -c limits.cpu=2 -c limits.memory=8GB -c security.secureboot=false
You can change the memory and CPU cores above. However, you must have at least 8GB of RAM to support the memory resident disk drives that live CD’s require. If you choose less than 8GB, live CD versions will fail to boot.
If you are booting a live CD in order to install an OS on the LXD VM virtual disk, be aware that the default disk size of a LXD VM is only 10GB. To enlarge that disk, use this command setting your desired size:
lxc config device override Netclient root size=50GiB
When starting this LXD VM, since it has no OS on its disk, it will default to booting over the network. The network boot operation will load the Netboot.XYZ menu via trivial file transfer protocol (TFTP) which PXE loading supports. The Netboot.XYZ server we built in docker has a built-in TFTP server.
When the boot operating takes place, it will present the Netboot.XYZ menu.
To start the LXD VM, perform the following command which will launch the remote viewer. If you are a Windows user and doing this from a putty session or a simple ssh, you will need to watch my video entitled “Windows LXD Management” that shows how to provide access to the remote viewer from Microsoft Windows.
lxc start Netclient --console=vga
The Remote Viewer window pops up and the boot process starts.
After a few seconds, the Netboot.XYZ menu is displayed:
You can now execute most, but not all options from the menu. Experiment and see what is available to you. The Netboot.XYZ application will also boot from your Ethernet connected computers in your Home Lab if you change the boot up order in your BIOS to Boot PXE.
The Netboot.XYZ menu is not a traditional operating system and so it cannot be shutdown with a “lxc stop” command. To force your LXD VM to shutdown:
lxc stop Netclient -f
Also, if you exited the remote viewer application and want to get back into it in the event that the LXD container is already started:
lxc console Netclient --type=vga
Most OS’s can already be loaded in LXD VM’s via images as discussed on my other LXD VM videos. This tutorial is designed to help you understand how PXE booting can be achieved in a LXD VM.
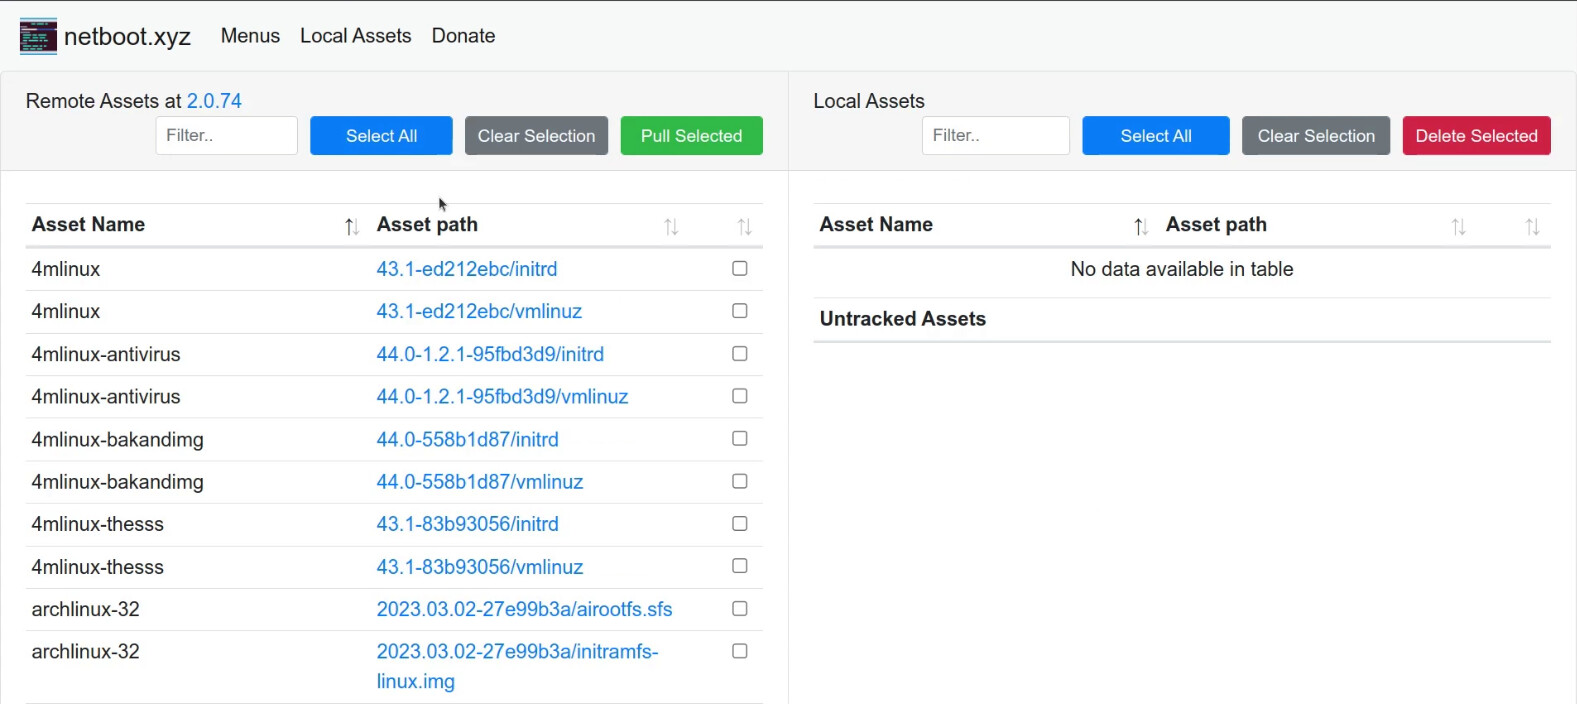
All of the images that you load are accessed over the Internet. Netboot.XYZ also supports local images that you can download on your “Local Assets” screen of the Netboot.XYZ web interface. Local assets boot faster since they are on your network.
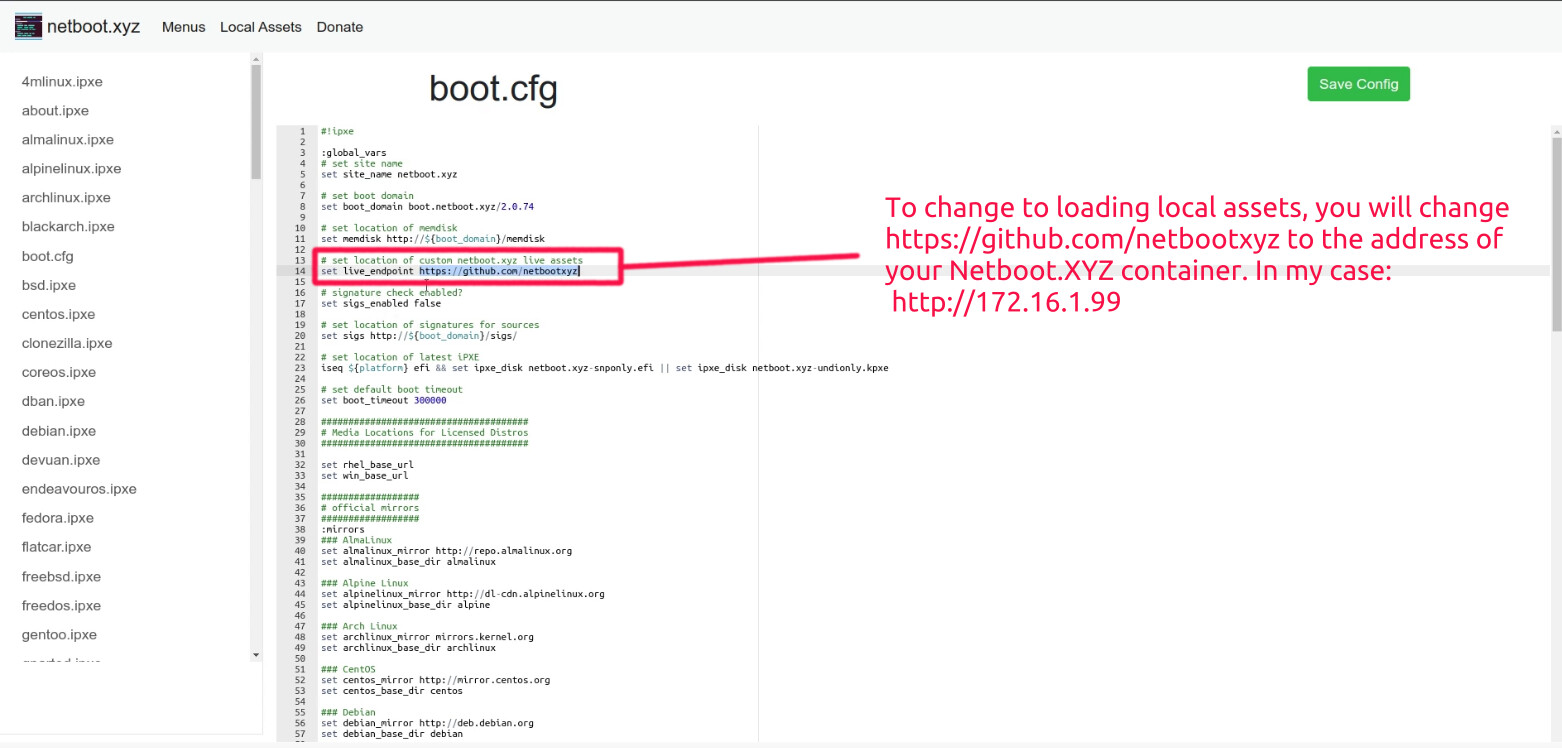
Just be advised that once you turn on local loading by editing boot.cfg in the interface below, that the only options you can boot from are local assets you have downloaded and all other boot options will fail. Local boot is faster, but images get old over time because they are not maintained and updated like the web based images.
You must make this change in the web interface as follows if you want to use local assets:
Once this change is made, any images that you want to boot from must be “pulled” and appear in the right column of the Local Assets listing.
Enjoy your PXE booting with Netboot.XYZ. My advice is to not turn on the local assets capability until you determine that you need it.