This is a follow on to my tutorial “LXD VM with Netboot.XYZ” where I showed booting a LXD VM via PXE boot. This time, I show how to configure Iventoy which is another Network PXE boot utility that is perhaps better.
iVentoy is patterned after “Ventoy” which allows placing several bootable operating system ISO’s on a single thumb drive and booting them from a menu. iVentoy is the network version of Ventoy and allows network booting any bootable ISO for your favorite OS.
In this tutorial, I show how to configure iVentoy in an incus container so that you can network boot any bootable ISO from any computer on your LAN. The advantage of this is that you can boot an operating system or a bootable diagnostic tool on any system on your LAN without any media in hand.
In the tutorial, I start out by demonstrating how an “empty” incus VM can perform a PXE boot. If you are interested in that, you can go watch my “LXD VM with Netboot.XYZ” tutorial and the commands are the same in incus except for the “incus” keyword.
When a system performs a preboot execution environment (PXE) boot on a network with iVentoy configured, you will get a menu of ISO’s that you have downloaded as boot options.
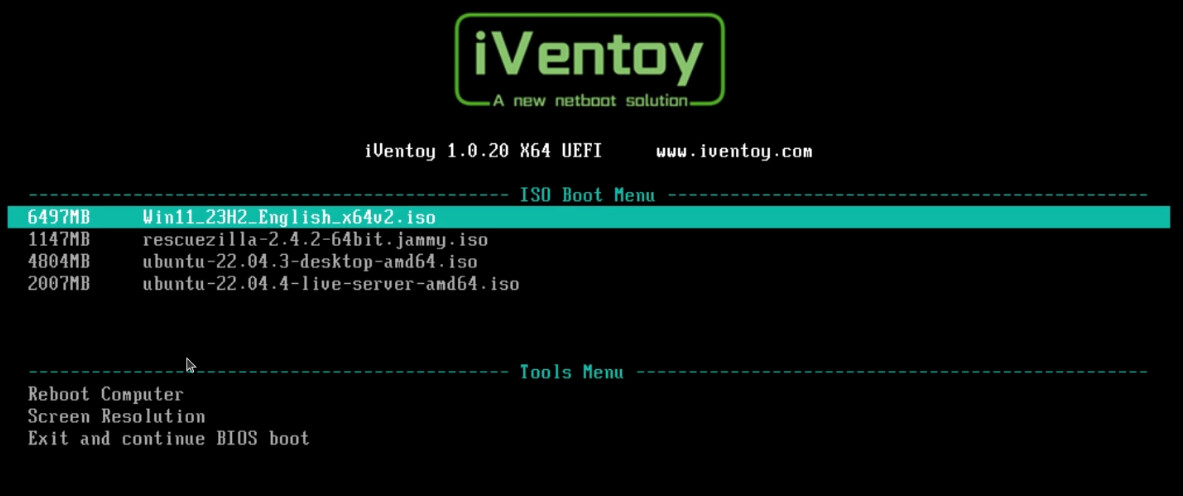
In my demos, when I select the option to boot the “Ubuntu 22.04 Desktop” image, it proceeds just as though we had media on a bootable USB drive.
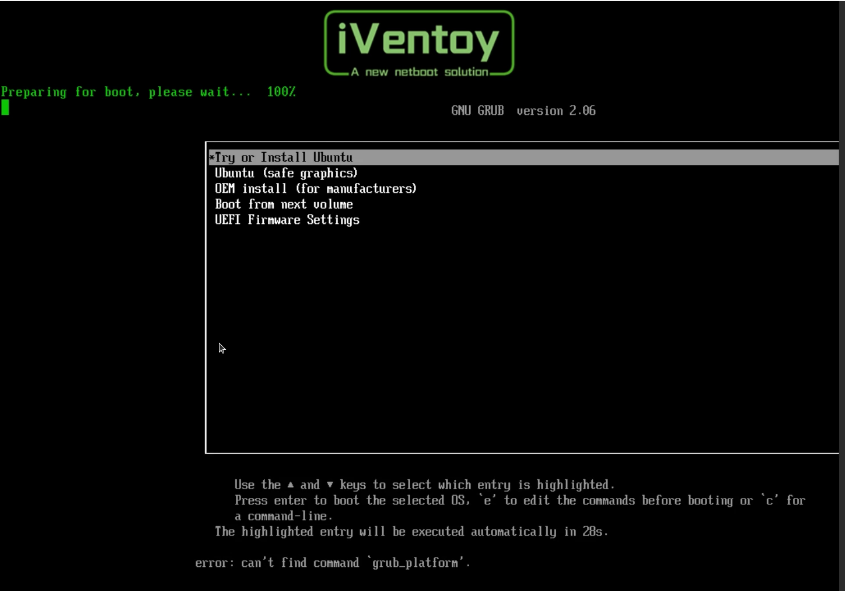
The boot process continues and then we have the ability to either “Try Ubuntu” (the live CD option) or install Ubuntu.

That’s a pretty neat option, because even on a completely “diskless” computer you can boot the Live version of Ubuntu using “Try Ubuntu”.
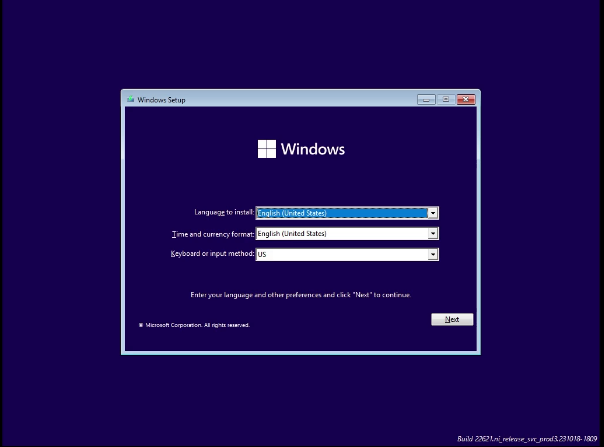
In the tutorial I show booting the Windows 11 installation media from iVentoy. This doesn’t work in an “incus vm” because the incus remote viewer relies on and requires “spice” drivers which are not a part of the Windows installation ISO media.
If you want to know how to build an Windows 11 Incus Virtual Machine, watch my “Windows 11 Incus Virtual Machine” tutorial. In reality, the only reason I demonstrate PXE booting from a VM is to show how iVentoy works. The real use case for PXE booting would be either to install an operating system on a bare metal machine on your network or to boot a live or diagnostic CD on a machine.
BIG GLARING NOTE: PXE Network booting only works on wired connections and not on Wireless Wi-fi connections.
Here’s the Windows 11 ISO booted from iVentoy. I did this from VirtualBox only because it was convenient for recording the video. Realize that installing any ISO from a VM is done much easier by connecting the ISO through a virtual CD Rom drive.
Also, with the exception of a Windows install, there are pre-built images to start any “incus vm” that don’t require going through the installation setup process. That makes incus & LXD VMs way faster to provision.
I show off the iVentoy interface in the video, but in these notes I am just going to cut to the actual installation and configuration.
Log into your incus server. I will assume that you configured your incus server per my tutorial “Incus Containers Step by Step” where I show how to create bridge0 and the bridgeprofile which are required for what follows.
Create an incus container for iVentoy with the following command:
incus launch images:ubuntu/22.04 Iventoy -p default -p bridgeprofile -c security.privileged=true -c raw.lxc="lxc.apparmor.profile=unconfined" -c boot.autostart=true
Connect to the shell of your new container:
incus shell Iventoy
Apply the latest updates:
apt update && apt upgrade -y
Create a user account and grant it sudo privilege:
adduser scott
usermod -aG sudo scott
Install the dependencies that we will need.
apt install wget openssh-server net-tools nano -y
Move over to the account you created.
su - scott
Download iVentoy (as of 19 April 2024 this was v1.0.20) and create a folder for it.
wget https://github.com/ventoy/PXE/releases/download/v1.0.20/iventoy-1.0.20-linux-free.tar.gz
mkdir iventoy
Extract the tar archive into the “iventoy” folder.
tar xf iventoy-1.0.20-linux-free.tar.gz --strip 2 -C iventoy
Move into the folder.
cd iventoy
At this point, iVentoy is completely installed and you can run the program with the command:
sudo ./iventoy.sh -A start
Unfortunately, if you restart your iVentoy incus container, you will need to execute the command above to start the application every time.
To avoid this, I have crafted a system service to do this for you. Create the service definition by editing the file:
sudo nano /etc/systemd/system/iventoy.service
Paste the following data into the nano editor session and adjust the “/home/scott” path everywhere in the file to reflect your location for the iventoy folder.
[Unit]
Description=iVentoy
Documentation=https://www.iventoy.com
After=network-online.target

[Service]
Type=forking
Environment=IVENTOY_API_ALL=1
Environment=IVENTOY_AUTO_RUN=1
Environment=LIBRARY_PATH=/home/scott/iventoy/lib/lin64
Environment=LD_LIBRARY_PATH=/home/scott/iventoy/lib/lin64
ExecStart=/home/scott/iventoy/lib/iventoy
ExecStartPre=-/bin/sleep 40
WorkingDirectory=/home/scott/iventoy
Restart=on-failure

[Install]
WantedBy=multi-user.target
Save the file with CTRL O and Enter and then CTRL X to exit the nano editor.
Reload the systemd server daemon.
sudo systemctl daemon-reload
Enable the new service.
sudo systemctl enable iventoy.service
You can start the service immediately to test it via the service with the following command. Realize that there will be a 40 second delay before your prompt comes back.
sudo systemctl start iventoy.service
You can tell if your service is working with this command:
sudo systemctl status iventoy.service
You can also check to see if iVentoy is working with the following command and look to see if port 26000 is listed.
netstat -plant
Next visit the iVentoy web interface in your web browser which will be at the address of your iVentoy incus container “ifconfig” and at port 26000:
http://n.n.n.n:26000/
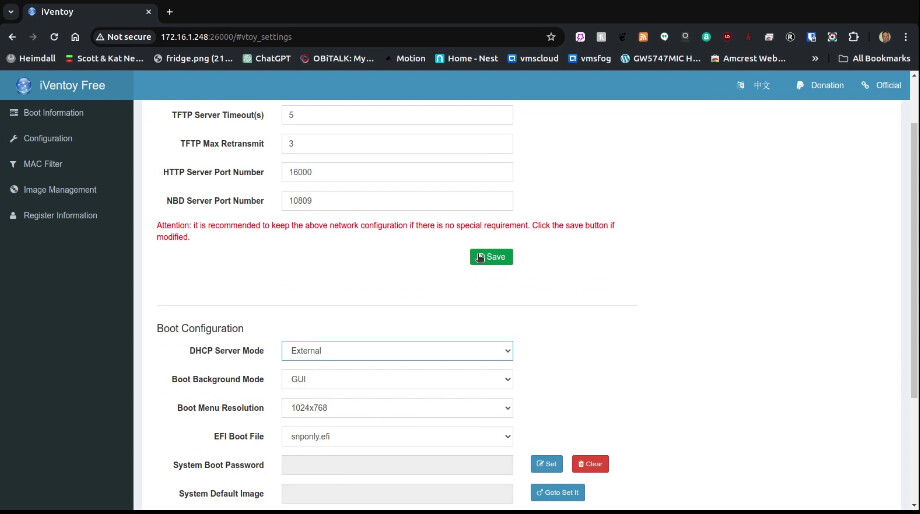
Go the the configuration page and change the “DHCP Server Mode” from “Internal” to “External”.
To make iVentoy PXE booting actually work on your network, you need to configure your router. This is different on every router. In my case, I have a Ubiquiti UDM Pro.
You need to enable “Network Boot” however you do that on your router. No guarantees here if you are running your ISP provided router which probably lacks this functionality.
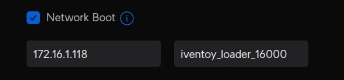
In any case, you need to set the boot server which will be the address of your incus container for iVentoy and you need to define the boot file as “iventoy_loader_16000” which supports PXE booting from both MBR and UEFI booting systems. My address below is different and that address should be the same address that you use for the web interface for iVentoy without the port number.
The next step is we need some ISO’s to boot from. You can download any bootable ISO image online.
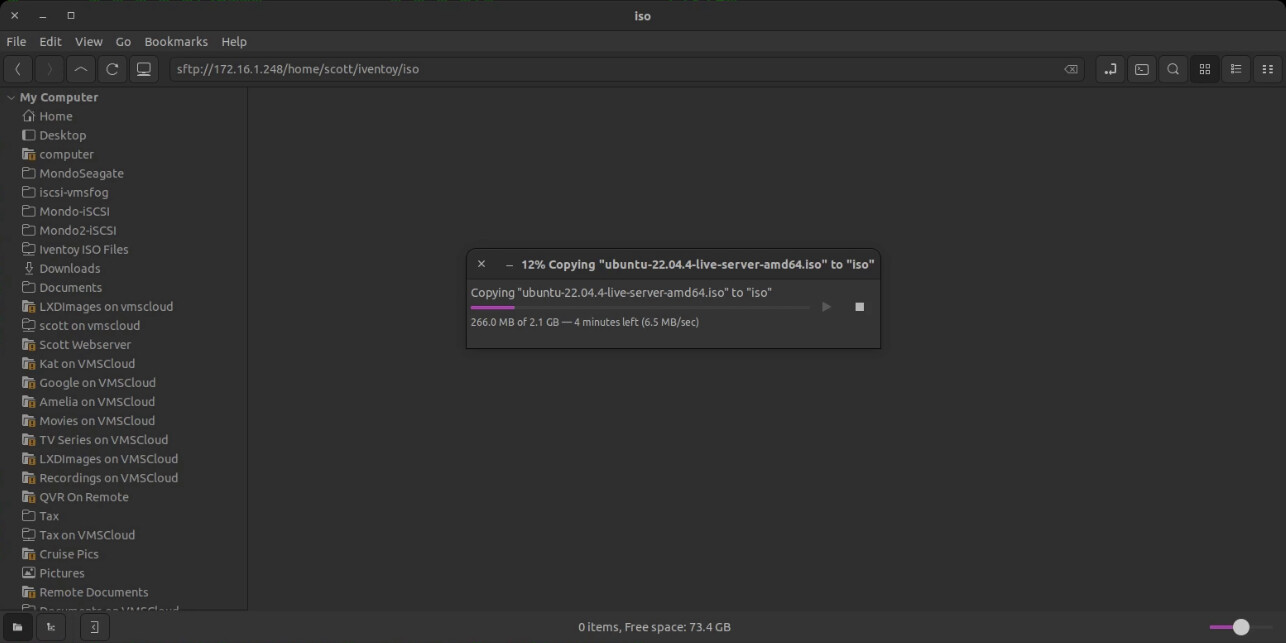
The ISO images that you want iVentoy to be able to use will be in the “iso” folder that is inside the iventoy folder where we installed the program.
Since we installed openssh-server as one of the dependencies earlier, we can use secure file transfer protocol (SFTP) to access this folder using the SSHFS file system. If your desktop is a Linux system, you can just drag and drop your images to this location.
Here’s a drag and drop copy of the Ubuntu 22.04 server image to the demo test server I installed during the tutorial.
Once one or more ISO files are in that folder, you should be able to see them listed.
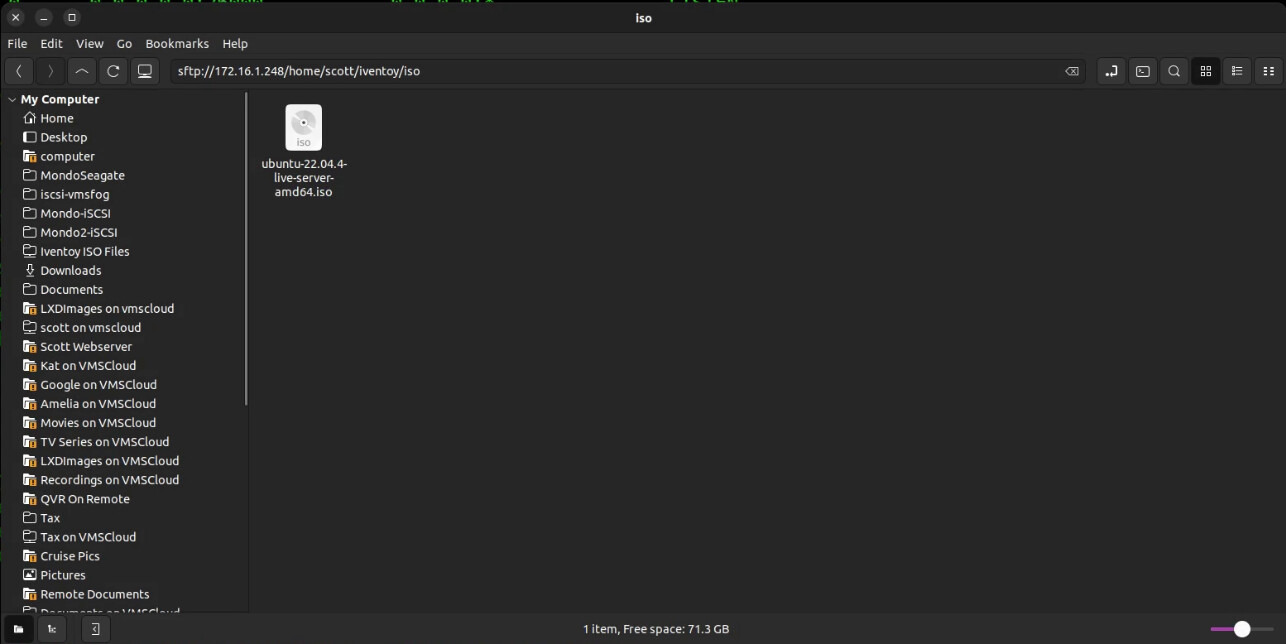
At this point, go back to the iVentoy web interface and select the “Image Management” section and click the “Refresh” option. You should now see your ISO image(s) listed.

The final step is to move back to the “Boot Information” screen and click the:

to start the iVentoy server.
If your server is working, the Boot Information screen looks like this (your server IP address will differ):
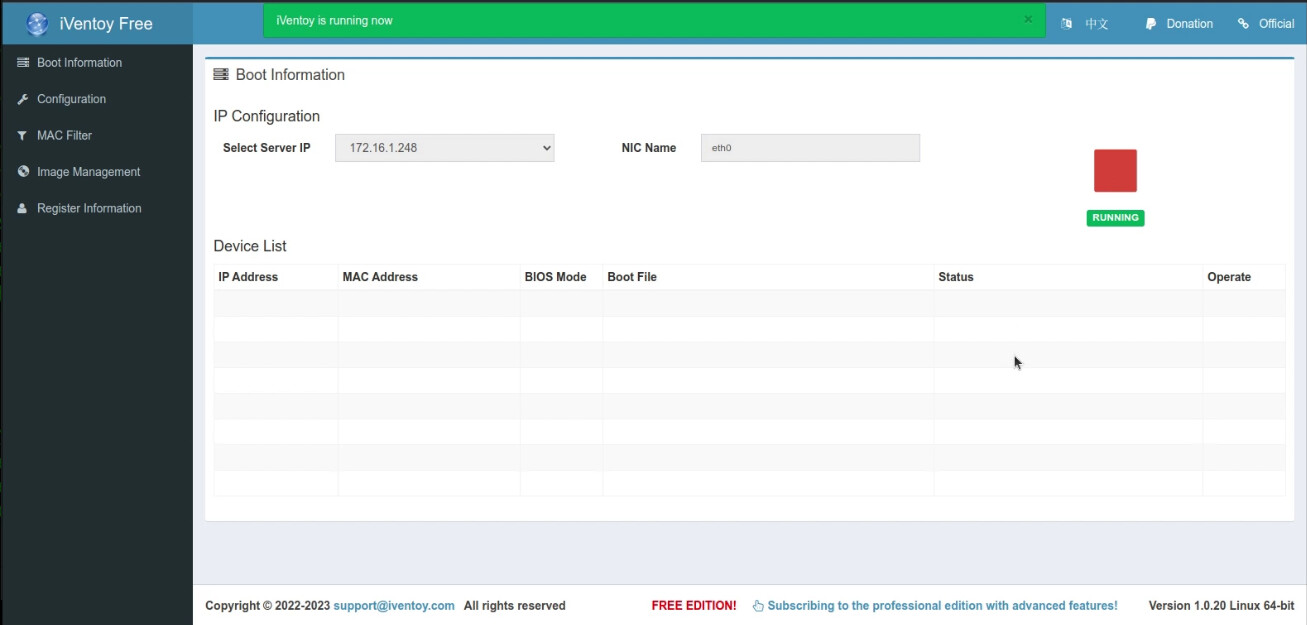
At this point, the iVentoy application will start anytime your incus server is booted in virtue of both the “boot.autostart=true” and the systemd service we defined. As long as there is at least one ISO file in the ISO folder, the system will also be “running”.
Now you can PXE Boot the iVentoy menu from any wired connected machine on your network by setting or changing the boot priority of that machine to perform a network boot before the internal hard drive boots.
NOTE: If you want to point your ISO images to a location outside of your iVentoy incus container to a server on your LAN, perform the following.
Log into your Incus server and create a folder named ISO and then map that folder path to point to the iso folder inside of the iVentoy Incus folder with the following commands. Change the “scott” folder name accordingly:
mkdir ISO
incus config device add Iventoy ISO disk source=/home/scott/ISO path=/home/scott/iventoy/iso
You can also re-point the ISO folder outside of your Incus server to another server where you have an NFS export for the location of your ISOs that points to the ISO folder we just created on your Incus server.
To mount this location on your Incus server, I would create an entry in your “fstab” by editing the fstab file:
sudo nano /etc/fstab
Add a line similar to the following to the end of the fstab file adjusting the path and your NFS share name accordingly:
172.16.1.58:/ISO /home/scott/ISO nfs defaults 0 0
Do a CTRL O and Enter to SAVE the file and a CTRL X to exit the editor.
Move your ISO files to the location of the NFS share.
Reboot your Incus server to make sure the mount works.