In this tutorial, when learn how to configure iSCSI storage on your network for Ubuntu and access it from Ubuntu. In the video after this one we learn how to access iSCSI storage targets from Windows.
Although I present a lot of information on LXD Containers on the channel, it is important to understand that you cannot host iSCSI connections in a LXD Container because the container has no direct control over the host server hardware because of the shared kernel design of LXD.
That being said, you can configure iSCSI on both a bare metal physical computer and a virtual machine. For purposes of this tutorial, I configured my iSCSI test machines in LXD Virtual Machines (VM) which are not the same as LXD Containers. LXD Virtual Machines virtualize all of the hardware.
iSCSI consists of a server that is referred to as the iSCSI Target and a client referred to as the iSCSI initiator. So, an iSCSI Initiator connects to an iSCSI target. At that point the iSCSI storage is available as a block storage device like any other hard drive even though it is network connected.
That means that you can write an MSDOS or GPT partition table on an iSCSI device and you can create partitions on an iSCSI device and format them.
This is very different from “files” oriented storage more commonly used over a network like Microsoft SMB/CIFS or Linux NFS. Files oriented storage access and replace whole files. Block oriented storage supports record oriented access and random I/O for applications like databases.
iSCSI storage is usually never shared. Although it is possible to connect more than one iSCSI Initiator to a single iSCSI target, this is not recommended. This capability only exists for the support of clustered operating systems because there is no indigenous file locking for multi-client access.
So, the really great part about iSCSI storage is that it looks like SATA or NVMe storage because it is block based with a partition table and formatted partitions.
iSCSI has mostly been used by business, but there are several use cases that make iSCSI attractive in the Home Lab.
Although not a part of this tutorial, I created my iSCSI target server as a LXD VM Ubuntu Desktop and I used the following commands (the bridgeprofile is covered in my LXD Step by Step tutorial).
Skip to the “Configuration Starts HERE” below to pass over the LXD part if you already have a server or VM.
lxc init images:ubuntu/23.10/desktop target --vm --profile default --profile bridgeprofile -c limits.memory=4096MB -c limits.cpu=2 -c boot.autostart=true
lxc config device override target root size=50GiB
LXD Virtual Machines allow you to create additional storage devices in your LXD pool. For the purposes of the video, I created and connected a 10GB block storage devicein my LXD Pool called “backingstore” and connected it to the container above with the following commands:
lxc storage volume create default backingstore size=10GB --type=block
lxc config device add target backingstore disk pool=default source=backingstore
“Configuration Starts HERE”
CONFIGURE YOUR ISCSI TARGET (SERVER)
Sign on to your machine which will be your iSCSI server which we call the iSCSI target. On my machine, I have a completely free and available block storage device called “sdb” and that will be my iSCSI storage. You can use a virtual disk also if you watched my video entitled “Virtual Disk Images Windows & Ubuntu”.
Just be aware that in my example, we will be formatting the “sdb” device for use as our iSCSI target.
We need to install the iSCSI Target server daemon:
sudo apt install tgt -y
To see that “tgt” is running:
sudo systemctl status tgt
Configure your target:
sudo nano /etc/tgt/conf.d/iscsi.conf
In my case, I created an Internet Qualified Name (IQN) of iqn.2023-11.my.server:my10g. Adjust your name accordingly. Paste the following into the nano session and adjust your naming accordingly. Also, specify the address of the system that you will want to connect to this storage by changing the initiator address. Pick a username/password that you like. Note that the storage is going to come from /dev/sdb because that is my empty/free block storage device. Verify your device with a lsblk command.
<target iqn.2023-11.my.server:my10g>
     backing-store /dev/sdb
     initiator-address 172.16.1.219
     incominguser iscsi-user pa55w0rd
</target>
Save the edit session with a CTRL O and enter and CTRL X to exit the editor.
Restart the tgt service in order to have the new configuration take effect.
sudo systemctl restart tgt
Verify your target with the following command:
sudo tgtadm --mode target --op show
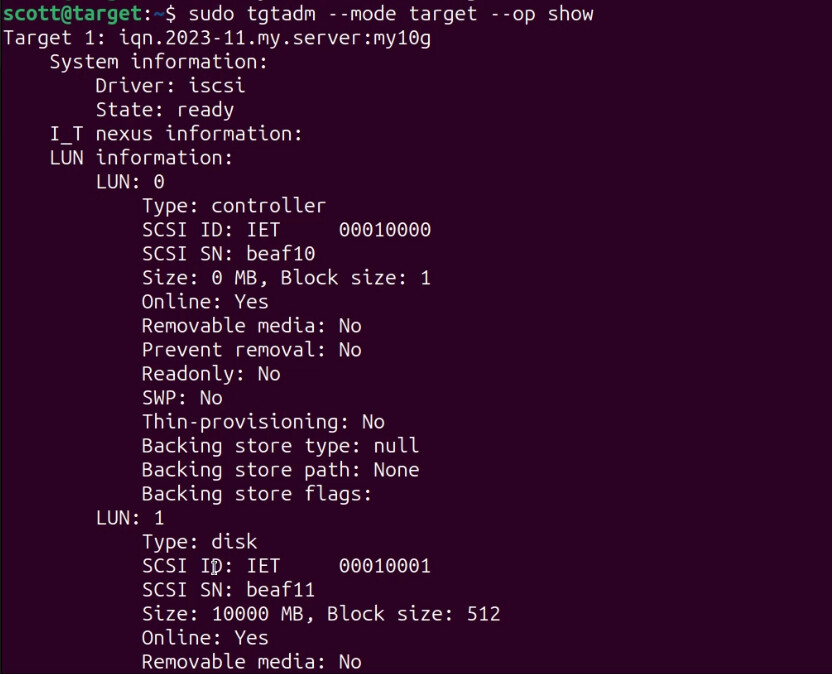
Note in the above listing that there will be a LUN 0 for the controller and a LUN 1 which is the actual disk and will show the size which is 10,000MB (10GB) in my case.
CONFIGURE YOUR ISCSI INITIATOR (CLIENT)
In the demo, I created a LXD VM for my iSCSI Initiator with the following commands:
lxc init images:ubuntu/23.10/desktop initiator --vm --profile default --profile untagged -c limits.memory=4096MB -c limits.cpu=2 -c boot.autostart=true
lxc config device override initiator root size=50GiB
I used Ubuntu 23.10 on both the target server and the initiator. You can choose Ubuntu 20.04 or 22.04 instead.
Sign on to your initiator machine and install the iSCSI daemon:
sudo apt install open-iscsi -y
Using the address of your target server (in my case this was 172.16.1.90) issue the following command:
sudo iscsiadm -m discovery -t st -p 172.16.1.90
Edit the following file:
sudo nano /etc/iscsi/initiatorname.iscsi
Make an entry with your IQN. Mine looks like this:
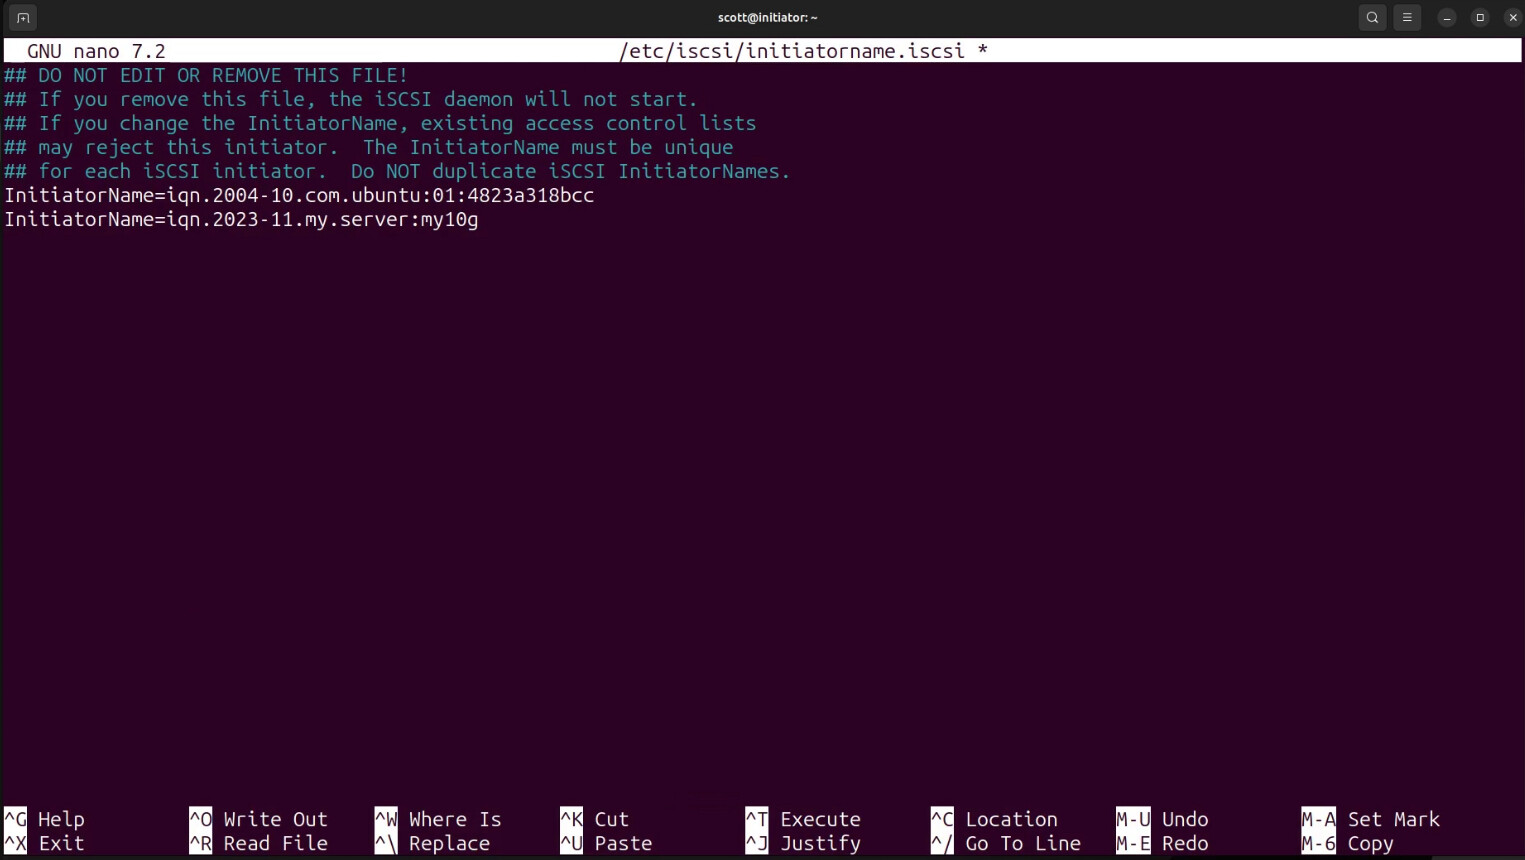
Just add your IQN below any others that might be in the file.
Save the file with CTRL O and Enter and CTRL X to exit the editor.
Edit the iSCSI configuration file:
sudo nano /etc/iscsi/iscsid.conf
Search for and change the following four entries adjusting your username/password accordingly.
node.startup = automatic
node.session.auth.authmethod = CHAP
node.session.auth.username = iscsi-user
node.session.auth.password = pa55w0rd
Save the file with CTRL O and enter and CTRL X to exit the editor.
Restart the iSCSI services:
sudo systemctl restart iscsid open-iscsi
Verify your connection with the following command:
sudo iscsiadm -m session -o show

NOTE:
If you are accessing iSCSI storage from a NAS, you might have to force a login to connect to the storage after you restart the services:
sudo iscsiadm -m node --login
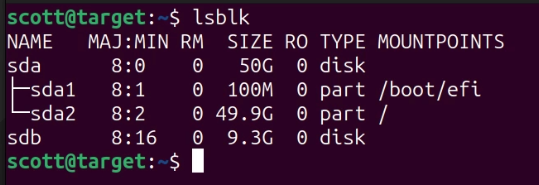
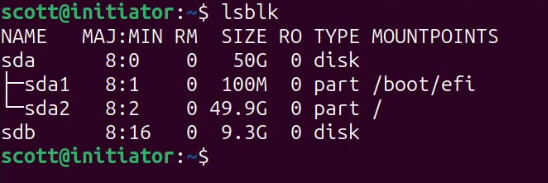
Now, if you do an lsblk, you should see a new disk drive on your client system which won’t have any partitions on it. In my case, this is “sdb” .
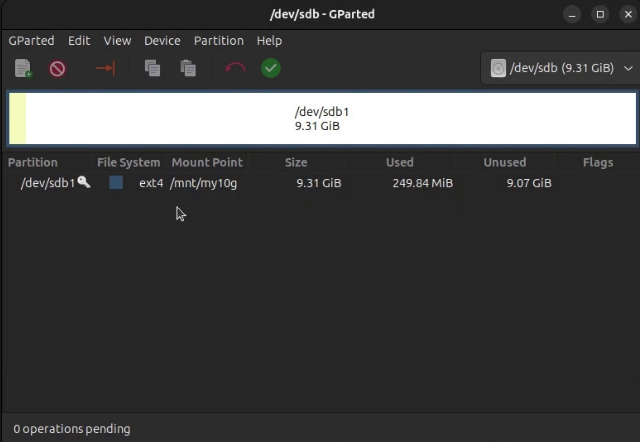
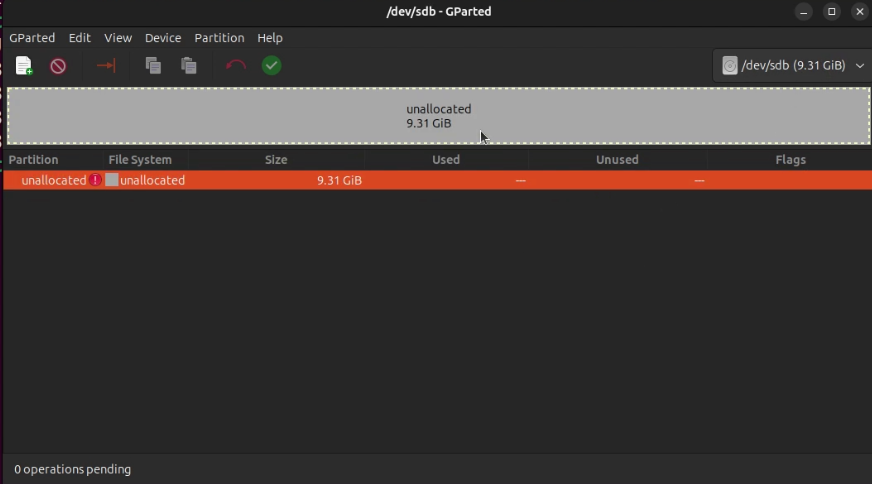
If you want to see this graphically, you can install “gparted”.
sudo apt install gparted
On my system, I used gparted to go to the “sdb” device and I can see that it is unallocated.
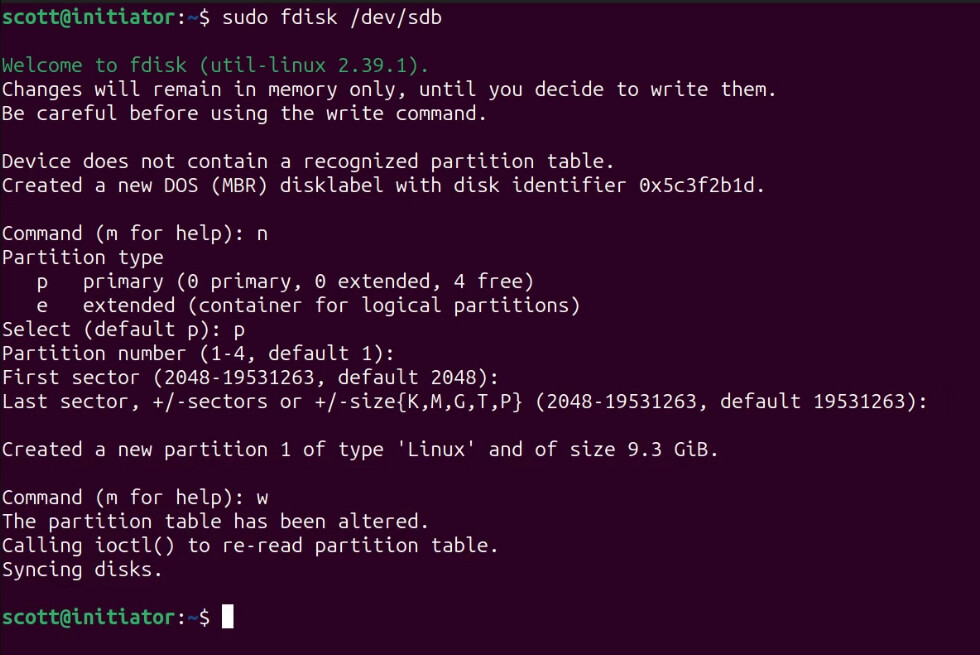
In order to format a partition on the new disk, I used fdisk to create a new partiton (n), make a primary partition (p) and I took the defaults on the start and ending blocks. Finally I write the new partition table (w):
Now we have to format the partition on the disk which is sdb1 because it is the first partition:
sudo mkfs.ext4 /dev/sdb1
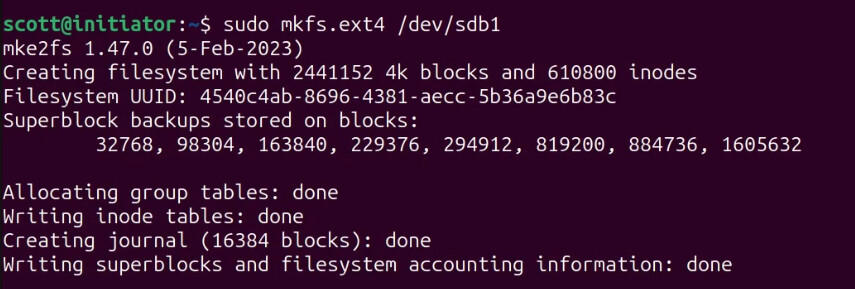
Make a note of the Filesystem UUID that you get back from the format command because we will need it to mount the disk on system reboot.
Next, I create a mount point to point the storage:
sudo mkdir /mnt/my10g
Edit the file systems table to mount the drive at boot time:
sudo nano /etc/fstab
Go to the bottom of the file and insert your mount directive adjusting for your UUID and mount point:
UUID=4540c4ab-8696-4381-aecc-5b36a9e6b83c /mnt/my10g ext4 _netdev 0 0
Save the file with a CTRL O enter and a CTRL X to exit the editor.
Now reboot your system:
sudo reboot now
When the system comes back up, you should be able to access your iSCSI served storage at /mnt/my10g or whatever you named your mount point:
ls /mnt/my10g
If you want to make the entire disk writeable for your username:
sudo chown $user:$user /mnt/my10g
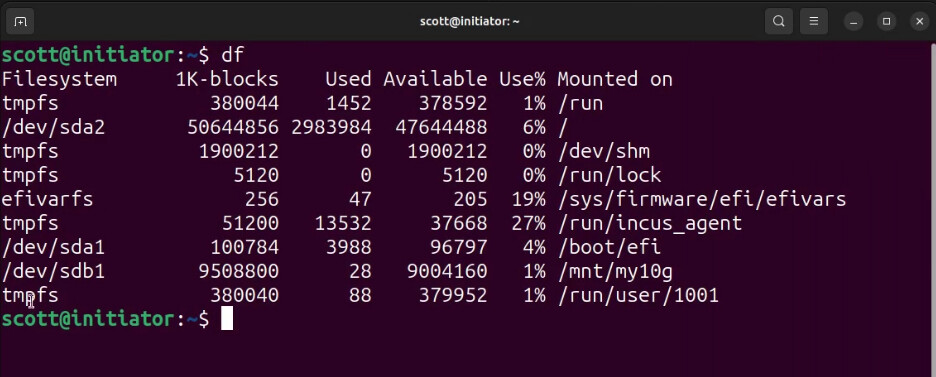
You should now be able to see your mounted iSCSI disk with the following command and it should look like any local disk even though it is shared over the network:
df
You can also see the drive mounted through its mount point in gparted: