Bitwarden is a great open source self-hosted password manager. It comes as Bitwarden or Vault Warden. Vault Warden is a lighter weight version. Bitwarden is the official release.
I have run Bitwarden both in a standard install and in a Docker install. My preference is to install Bitwarden inside of a LXD container where docker is nested inside of LXD. Bitwarden uses 11 Docker containers.
Create an LXD container with at least 4GB as the upper end memory limit. This requirement is for the SQL Server database that is one of the containers.
To install docker:
sudo apt install curl
curl -sSL https://get.docker.com | sh
Create a Bitwarden user:
sudo useradd -s /bin/bash -d /opt/bitwarden bitwarden
Add the user bitwarden to group docker so it can access Docker.
sudo usermod -aG docker bitwarden
Install some dependencies:
sudo apt install wget nano openssh-server -y
Create a working directory and grant user bitwarden full permission for it. Also install docker-compose:
sudo mkdir -p /opt/bitwarden
sudo chown bitwarden: /opt/bitwarden
sudo apt install docker-compose
Switch to the new user:
sudo su - bitwarden
Your Bitwarden Server instance needs to be directly exposed to the Internet for ports 80 & 443 for the duration of the installation for the script to properly complete. Afterwards, you can point to the Bitwarden server through NginX Reverse Proxy Manager.
Download the Bitwarden script and install the Bitwarden Server.
wget -O bitwarden.sh https://go.btwrdn.co/bw-sh
chmod +x bitwarden.sh
./bitwarden.sh install
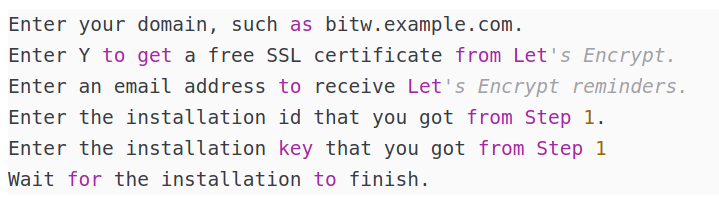
The installation will guide you to:
https://bitwarden.com/host/
This is where you will provide your admin email address to get an installation ID and Installation key which are needed during the installation.
The installation will prompt for the following:
Note: Some Bitwarden features are not configured by the bitwarden.sh installer, and must be configured in the environment file, located at ./bwdata/env/global.override.env. At a minimum, you should configure:
globalSettings__mail__smtp__host=<placeholder>
globalSettings__mail__smtp__port=<placeholder>
globalSettings__mail__smtp__ssl=<placeholder>
globalSettings__mail__smtp__username=<placeholder>
globalSettings__mail__smtp__password=<placeholder>
adminSettings__admins=<placeholder>
Run the following command to apply your changes:
./bitwarden.sh restart
The “adminSettings__admins” allows you to specify one or more email addresses to be admins. You can enter the admin Interface access screen on a running bitwarden server by appending “/admin” at the end of your Bitwarden URL. The admin interface is only required to see your user accounts and if an upgrade is available for Bitwarden.
Visit your domain in a web browser, then click the button Create Account to register an account on your server.
Install Bitwarden Client on your devices. Set the server address to your domain by clicking the Setting button in the login page’s upper left corner.
If you need to make additional configuration changes, you can modify the settings in ./bwdata/config.yml and then run: `
./bitwarden.sh rebuild or ./bitwarden.sh update
To update Bitwarden to a new version:
cd  /opt/bitwarden
./bitwarden.sh updateself
./bitwarden.sh update
To Disable New User Registration, if desired:
Login to the server.
sudo su - bitwarden
cd bwdata/env
nano global.override.env
globalSettings__disableUserRegistration=true
./bitwarden.sh rebuild