Storage is the second most critical resource after memory on an Incus server. Since I advocate for the use of mini-PC’s in the home lab as Incus servers due to their low power consumption, minimal heat dissipation, and lower cost, mini-PC’s sometimes have fewer options for attaching storage.
In this tutorial, I demonstrate making your Incus server an iSCSI initiator and connecting to network storage resources on an iSCSI target. I show how to create a storage pool on the iSCSI storage.
I make the assumption that you already have iSCSI target storage served on your network. If not, you will want to review my video entitled iSCSI Fast Network Based Storage to learn how to configure a server offering iSCSI targets.
When you first set up your Incus server and run “incus admin init”, the default or first storage pool is created for you. You can list your storage pools on your incus server with the command:
incus storage list

In Incus Containers Step by Step, I demonstrate creating the default storage pool as a ZFS file system because ZFS provides a high degree of safety and security for your containers. The command to list the ZFS storage pools are see their storage space utilization is:
sudo zpool list
Containers, images, and profiles consume space in the storage pool. This consumed space is in the form of “volumes”. To see which image and container volumes are in your default storage pool, use this command:
incus storage volume list default
Even though I had deleted the Plex media server containers from the last tutorial, I had not deleted the custom volumes that they used and so they are still consuming space in the default storage pool as you can see above. The three images listed are probably Ubuntu imagas and docker images used to create containers and they are retained only to make future container creation faster. They do take up space in the default storage pool and can be deleted if desired.
I have covered creating virtual storage pools which are storage pools created inside of a file before. Here’s a review. First, I create a 50GB file.
truncate -s 50G /home/scott/pool2.img
To create a zfs file pool that uses this file as its storage:
sudo zpool create pool2 /home/scott/pool2.img -m none
In the above command, I specified the mount point as none, because my zfs pool will be used as an Incus storage pool. To create the Incus storage pool from this zfs pool:
incus storage create pool2 zfs source=pool2
We can list the storage pools now:
sudo zpool list
To use the new storage pool more easily, I am creating a new profile:
incus profile create pool2
Edit the new profile.
incus profile edit pool2
Delete all of the lines in the editing session with successive CTRL K’s and then copy and paste the following content into the editor session.
config: {}
description: Pool2 incus profile
devices:
  eth0:
    name: eth0
    network: incusbr0
    type: nic
  root:
    path: /
    pool: pool2
    type: disk
name: pool2
Save the file with a CTRL O and enter and CTRL X to exit the nano editor. This new profile can be used to create containers in the new pool.
To create a container in the new pool, we use the new profile:
incus launch images:ubuntu/24.04 container1 -p pool2 -c boot.autostart=true
The command to see the number of overall objects in your storage pools is:
incus storage list

To see the objects in pool2:
incus storage volume list pool2
If you notice above there is a container and an image. The image is the Ubuntu 24.04 image used to create the container. The image, the container and the profile are the three objects using pool2 at this time.
You will now see space being used by these objects in pool2.
sudo zpool list

Notice that 257MB is now in use in pool2.
The exercise above was a review in how to use supplemental storage pools. Let’s now stop and delete the container, the profile, and the storage pool we just created:
incus stop container1
incus delete container1
incus profile delete pool2
incus storage delete pool2
Now we can list the zfs pools:
sudo zpool list

Note that from the ZFS perspective, the pool is gone. However, we still have the 50GB file and if we have no plans to remount it again, it can be deleted to save space:
rm pool2.img
Now we are going to create and use a storage pool using iSCSI storage. As mentioned at the onset of this document, I am assuming that you already have iSCSI targets available on your network. If not, go watch iSCSI Fast Network Based Storage.
iSCSI target storage is most often provided from a NAS such as QNAP or Synology. Unraid and Proxmox also have plugins to support offering iSCSI targets as well. So, with that in mind, let’s learn how to connect to your an iSCSI target from your Incus server.
iSCSI is block oriented storage as opposed to CIFS or NFS which are files oriented. Block oriented storage look like native disk drives on your computer or server. To list the block oriented devices on your Incus server.
lsblk
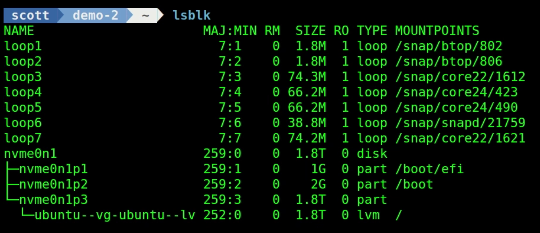
The loop devices listed above are how Linux mounts virtual disks. Loop devices are most often associated when you have snap packages installed or when you mount an ISO image.
The NVMe device is the system disk on the mini-PC Incus server I am using and it has three partitions.
In order to be able to connect to an iSCSI target, your Incus server must become an iSCSI Initiator. The first step is to install the iSCSI server daemon:
sudo apt install open-iscsi -y
Next, I perform a discovery of my target server to find out what targets that it is offering. in my case, my target server is a QNAP TS-1277 NAS which is offering three iSCSI targets. You will want to substitute the IP address of your target server.
sudo iscsiadm -m discovery -t st -p 172.16.1.58

Target storage is designated by iSCSI Qualified Names (IQNs). The IQN that I will use for my new Incus storage pool is “utility”. So, I copy that IQN from the listing above and then edit the iSCSI initiator file:
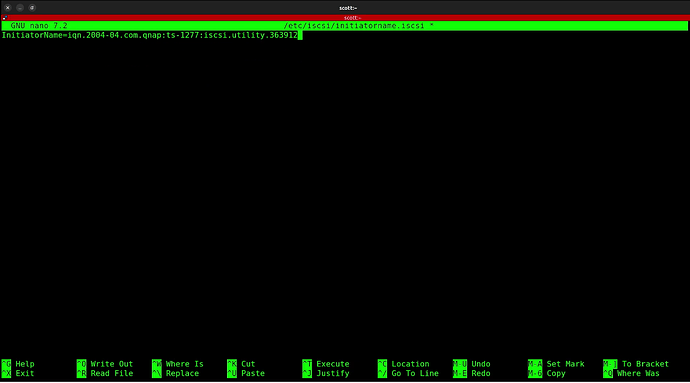
sudo nano /etc/iscsi/initiatorname.iscsi
Clear out any lines in that file if you did not configure them and make an entry like the following.
Save the file with a CTRL O and enter and CTRL X to exit the nano editor.
Next, edit the iSCSI configuration file.
sudo nano /etc/iscsi/iscsid.conf
Uncomment the line:
iscsid.startup = /bin/systemctl start iscsid.socket
Look for node.startup and change it from manual to automatic:
node.startup = automatic
Save the file with CTRL O and enter and CTRL X to exit the nano editor.
Since we made changes to the iSCSI configuration, restart the appropriate services.
sudo systemctl restart iscsid open-iscsi
List out your sessions with your target server.
sudo iscsiadm -m session -o show
At this point, if we list our block storage devices, all three devices will show up and in my case they are sda, sdb, and sdc.
lsblk
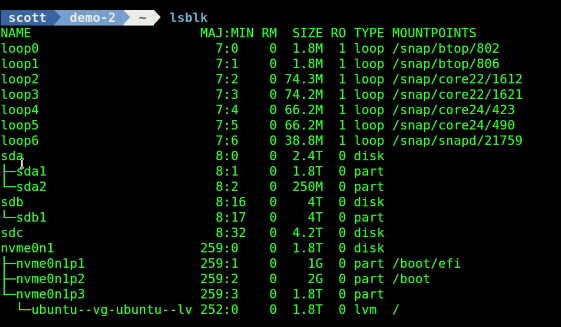
Since I really don’t want to connect to all of the iSCSI targets on the target server and I am only interested in my “utility” target, I will add a command to add that target to my list of automatically connected targets:
sudo iscsiadm --mode node --target iqn.2004-04.com.qnap:ts-1277:iscsi.utility --portal 172.16.1.58:3260 -o new
Now perform a discovery for the “send targets” record:
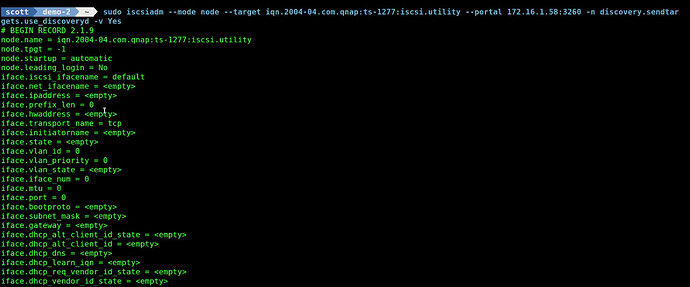
sudo iscsiadm --mode node --target iqn.2004-04.com.qnap:ts-1277:iscsi.utility --portal 172.16.1.58:3260 -n discovery.sendtargets.use_discoveryd -v Yes
This will produce a long tabular listing. Scroll to the top and you are looking for it to say that “node.startup = automatic”.
Head on over to the root account and perform a listing of the iSCSI targets that your initiator knows about:
sudo su
cd /etc/iscsi/nodes
ls
In the listing above, you will want to “rm -R xyz” where “xyz” is any target you do not want to see mounted upon reboot. Now reboot your incus server
reboot now
After rebooting, you should be able to list your block devices and see the target iSCSI device.
lsblk
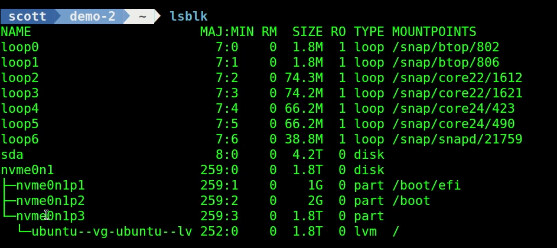
In my case, my target is device “sda” and it has no partitions on it because it has never been used. It looks just like a brand new hardware disk that I installed in the server.
The command to create my new storage pool using the iSCSI disk is:
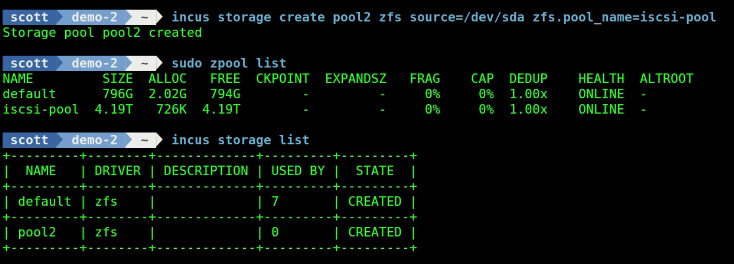
incus storage create pool2 zfs source=/dev/sda zfs.pool_name=iscsi-pool
In the command above, I am naming the pool “pool2” from the perspective of incus. I am pointing to the storage on /dev/sda and I am naming the pool iscsi-pool from the zfs naming perspective.
Once again, I am creating a profile for pool2.
incus profile create pool2
Let’s edit the new profile:
incus profile edit pool2
Clear out the contents of the file with successive CTRL K’s and then paste in the contents below:
config: {}
description: Pool2 incus profile
devices:
  eth0:
    name: eth0
    network: incusbr0
    type: nic
  root:
    path: /
    pool: pool2
    type: disk
name: pool2
Save the file with a CTRL O and enter and CTRL X to exit the nano editor.
We can now create a container on the new iSCSI storage pool.
incus launch images:ubuntu/24.04 container1 -p pool2 -c boot.autostart=true
The only real way to verify that the container is running in pool2 is to list the volumes in pool2:
incus storage volume list pool2
You can look at the new storage pool from the zfs utility and see its storage used.
sudo zpool list
So, how can we move a container that is in the “default” storage pool to our new “pool2”? First create a container in the default storage pool:
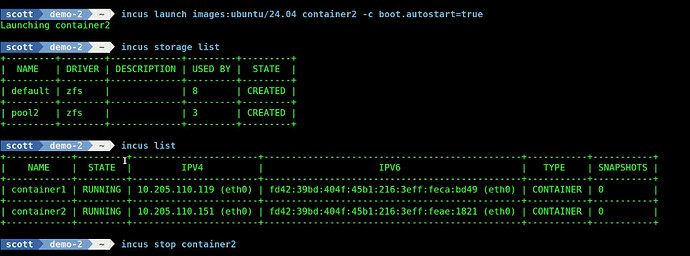
incus launch images:ubuntu/24.04 container2 -c boot.autostart=true
Before a container can be moved to another storage pool, it must be stopped:
incus stop container2
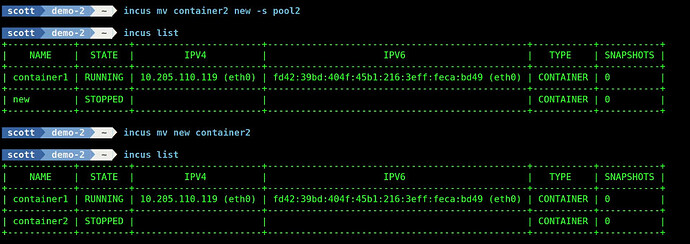
When a container is moved, it must be given a new name. In this case, I called it “new”.
incus mv container2 new -s pool2
Once the container is moved, you can rename it back if you like.
incus mv new container2
This is a great way to provide extended storage to your incus server. Be sure to review my tutorial on iSCSI storage for more details.


