This time around we learn about Incus custom images. Custom images can be created from any Incus container or container snapshot and then can be used as a starting point to create other containers. These images can be private to your Incus server or can be served in a public simplestreams repository.
Working with custom images can be complex from the command line. For that reason, I created the ScottiBYTE Incus Forge utility as a lightweight Home Lab focused web application for publishing, managing, and distributing custom Incus images through SimpleStreams repositories.
I previously created the Incus Dashboard which is a web based utility to provide a birds-eye view of all your container statistics across one or more Incus servers. I also created the Incus Backup Utility as a web based method of creating and managing full backups of your containers which can be imported into other Incus servers. The Incus Backup utility fully implements the ability to import any previously backed up (exported) container to re-create it.
Custom images are templates created from existing containers using the “incus publish” command. In this video I review the command line options for publishing custom images and then I present my “ScottiBYTE Incus Forge” utility which makes managing custom images easy.
As a review, when you create an Incus container, you might do something like:
incus launch images:ubuntu/26.04 Test
The “images” in that command references the linuxcontainers.org simplestreams web repository that contains images for many distros and versions which you can use to create containers. That “images” repository is a “public” repository that anyone can access to access images and by default it is added to your incus server during installation of Incus.
Part of what we will learn is that you can create your own public simplestreams web server and store your own custom images in it that others may access to create containers. Normally, managing images in an out of a simpestreams server is not straight-forward. My incusforge utility makes that part easy. Configuring a simplestreams repository is completely optional and not required for incusforge if all you want to do is manage your own private custom images.
Repositories are defined in your “remote” listing. These include your Incus servers that you manage as well as any public simplestreams servers. By default a new Incus server installation includes the “local” repository and the “image” public simplestreams server at linux containers.org. You can list these on your Incus server with this command.
incus remote list
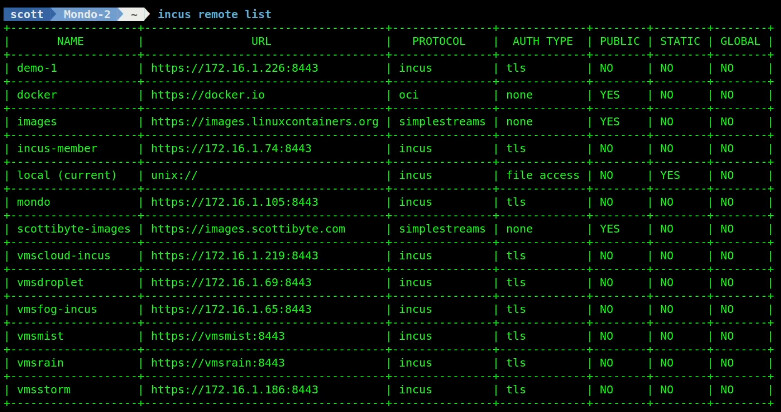
I have many incus servers defined in my remote list because I have established trusts on those servers in order to manage them from my desktop. I also have the docker OCI repository defined which I have covered in the past. The “scottibyte-images” is my public simplestreams server to which I can share images with others.
You can list images in the public simplestreams server.
incus image list images:
You can list images in my public simplestreams server, but only if you first add it to your remote list.
incus remote add scottibyte-images https://images.scottibyte.com --protocol=simplestreams
Then you can list my custom images. Note: I have only one now.
incus image list scottibyte-images:

When you create a new container on your Incus server, the required image is downloaded and cached on your server. You can delete these, but cached images improve the speed of creating other containers that use the same image. These images are stored in your default storage pool.
incus image list

Images can either be referred to by their fingerprint or by an optional alias. So, I can use one of my images to create a container.
incus launch scott-image-test Test
That command creates and starts a container named “Test” from my “scott-image-test” image. That image would have been previously created with the “incus publish” command from an existing container. The advantage with a custom image is that programs and settings may have been applied to a container and then an image of that container could be used to create other containers which would then use those changes as a starting point.
Think of something like an Ubuntu 26.04 container with net-tools, curl, nano and docker installed and a “scott” username added.
Assume we made modifications to the “Test” container. To make an image of it:
incus stop Test
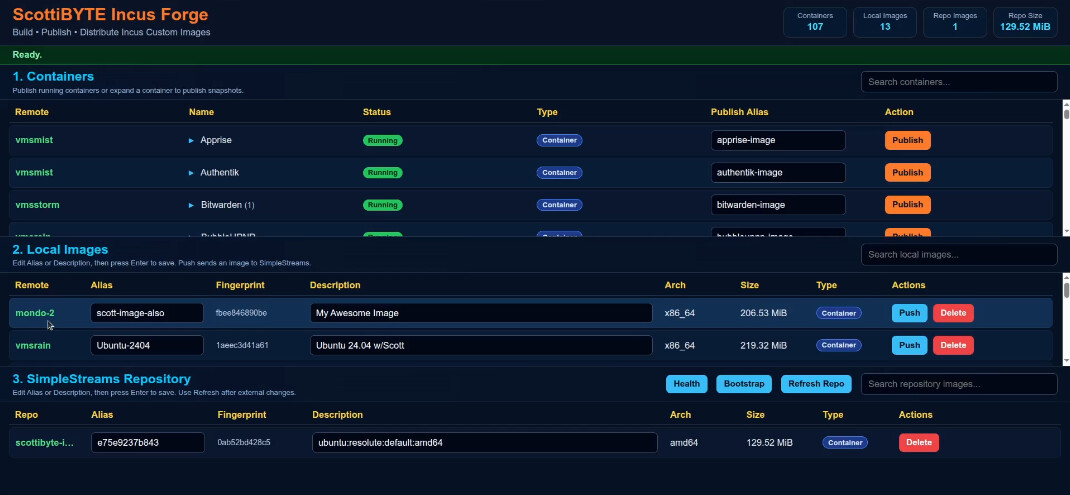
incus publish Test --alias scott-image-also
I can add a description to the image.
incus image set-property scott-image-also description="My Awesome Image"
I can list my images:
incus image list

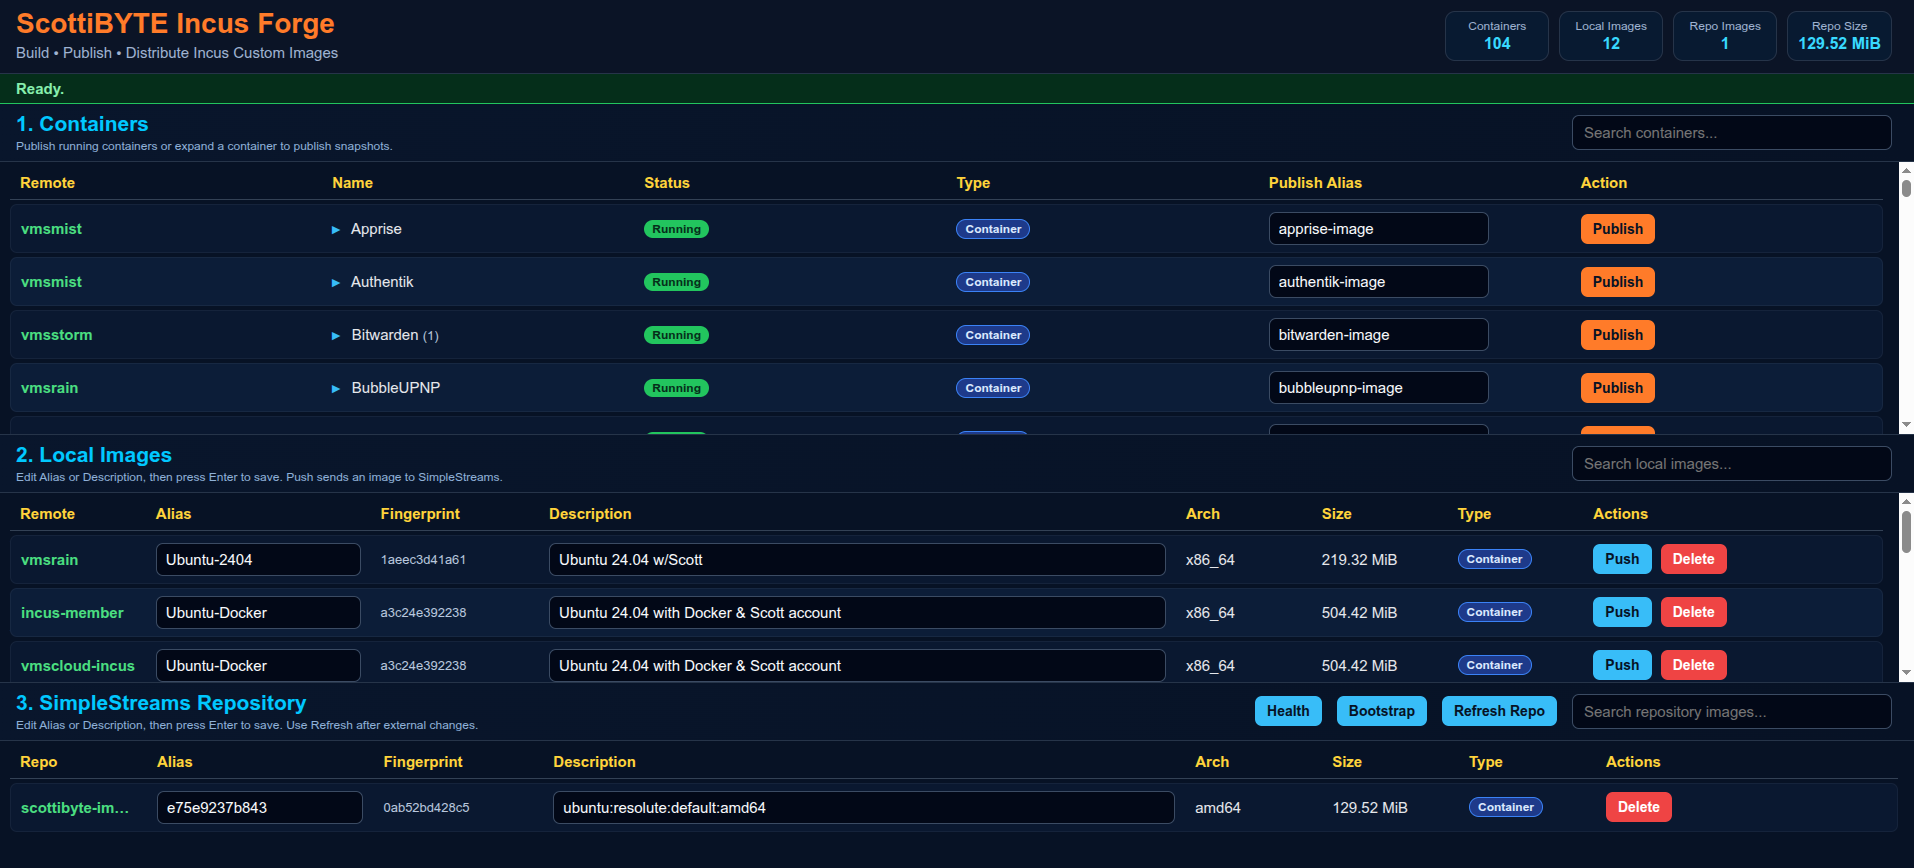
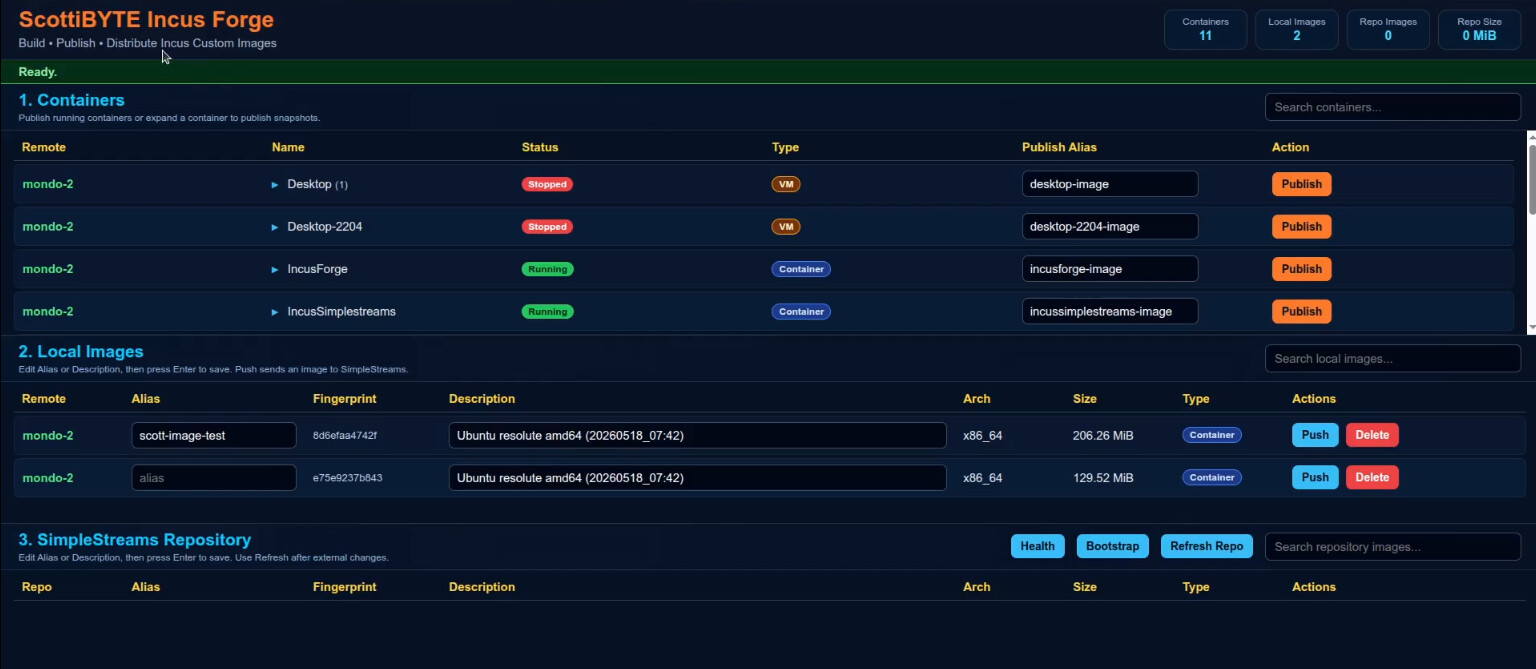
All these CLI commands are great, but they can be somewhat arduous. The ScottiBYTE Incus Forge utility was created to make this easy. Note our scott-image-also in the local image repository.
I designed the utility to be intuitive. To create a custom image, you find the container in the container listing and simply select “publish”. You can change the alias or description of an image by simply typing a new one. You can push a local custom image to your simplestreams public server if you have one simply by pressing the “Push” button.
Create an Incus container to host incusforge:
incus launch images:ubuntu/26.04 IncusForge -p default -p bridgeprofile -c boot.autostart=true -c security.nesting=true
Move inside the new container.
incus shell IncusForge
Accept updates.
apt update && apt upgrade -y
Install dependencies.
apt install nano curl net-tools incus-client openssh-server -y
Install docker.
curl https://get.docker.com | sh
Add a username and put the user in the sudo and docker groups.
adduser scott
usermod -aG sudo,docker scott
Login to the new account.
su - scott
Create an application folder and move inside it.
mkdir incusforge && cd incusforge
Edit a docker compose file.
nano compose.yml
Input the following into the editor.
services:
  incusforge:
    image: scottibyte/incusforge:latest

    container_name: incusforge

    restart: unless-stopped

    ports:
      - "80:3030"

    environment:
      PORT: "3030"
      HOME: /home/scott
      INCUS_CONF: /incus-client
      CONFIG_PATH: /app/config.json

    volumes:
      - ./config.json:/app/config.json:ro
      - ${HOME}/.config/incus:/incus-client:ro
      - ${HOME}/.ssh:/home/scott/.ssh:ro
Be sure to change the “scott” references above to your username and then CTRL O and enter to save the file and CTRL X to exit the nano editor.
Edit the configuration file for your simplestreams public server.
nano config.json
Insert the following into the editor which is different than what I presented in the video.
{
  "port": 3030,
  "simplestreams": {
    "name": "scottibyte",
    "publicUrl": "https://images.mydomain.com",
    "sshHost": "n.n.n.n",
    "sshUser": "scott",
    "webRoot": "/var/www/html",
    "imageDir": "/var/www/html/images",
    "streamsDir": "/var/www/html/streams"
  }
}
Modify the name to be what you want to call your simplestreams server. Change the public URL to be a subdomain that you have defined at your DNS provider. After we create the simplestreams server you will come back and change the n.n.n.n to the address of the simplestreams server. You will also add an NginX Proxy Manager record to expose the server publically. Lastly, be sure to change the sshUser to be your username. Then save the file with a CTRL O and enter and CTRL X to exit the editor. We will come back and edit this later.
Now go back to your Incus server and create another container which we will use to host your simplestreams web server.
incus launch images:ubuntu/26.04 IncusSimplestreams -pp default -p bridgeprofile -c boot.autostart=true
Move inside the container.
incus shell IncusSimplestreams
Take the updates.
apt update && apt upgrade -y
Add a user.
adduser scott
Grant it privilege.
usermod -aG sudo scott
Login to the account.
su - scott
Install some dependencies.
apt install nano net-tools openssh-server -y
To make the installation of the server easier, edit this script file.
nano bootstrap-simplestreams.sh
Input the following into the editor.
#!/usr/bin/env bash
set -euo pipefail

WEB_ROOT="${WEB_ROOT:-/var/www/html}"
IMAGE_DIR="${IMAGE_DIR:-$WEB_ROOT/images}"
STREAMS_DIR="${STREAMS_DIR:-$WEB_ROOT/streams}"
REPO_USER="${REPO_USER:-$USER}"

echo "=== ScottiBYTE Incus Forge SimpleStreams Bootstrap ==="

echo "[1/8] Installing required packages..."
sudo apt update
sudo apt install -y nginx xz-utils python3 python3-yaml incus-extra openssh-server curl ca-certificates rsync jq

echo "[2/8] Enabling SSH..."
sudo systemctl enable --now ssh || sudo systemctl enable --now sshd

echo "[3/8] Enabling nginx..."
sudo systemctl enable --now nginx

echo "[4/8] Creating repository directories..."
sudo mkdir -p "$IMAGE_DIR"
sudo mkdir -p "$STREAMS_DIR/v1"

echo "[5/8] Setting ownership and permissions..."
sudo chown -R "$REPO_USER:$REPO_USER" "$WEB_ROOT"
sudo chmod -R 775 "$WEB_ROOT"

echo "[6/8] Creating metadata files..."

if [ ! -f "$STREAMS_DIR/v1/index.json" ]; then
cat > "$STREAMS_DIR/v1/index.json" <<'JSON'
{"index":{"images":{"datatype":"image-downloads","path":"streams/v1/images.json","products":[],"format":"products:1.0"}},"format":"index:1.0"}
JSON
fi

if [ ! -f "$STREAMS_DIR/v1/images.json" ]; then
cat > "$STREAMS_DIR/v1/images.json" <<'JSON'
{"content_id":"images","datatype":"image-downloads","format":"products:1.0","products":{}}
JSON
fi

echo "[7/8] Validating repository..."
command -v incus-simplestreams >/dev/null
command -v xz >/dev/null
command -v nginx >/dev/null

echo "[8/8] Bootstrap complete."

echo
echo "Repository ready."
echo
echo "Next step:"
echo "ssh-copy-id $REPO_USER@<repository-ip>"
Save the file with a CTRL O and enter and CTRL X to exit the editor.
Give the script execute privilege.
chmod +x bootstrap-simplestreams.sh
Now run the script being sure to insert your username with the following command.
REPO_USER=scott WEB_ROOT=/var/www/html ./bootstrap-simplestreams.sh
That part was different from the video and should work the first time.
Find out the address of eth0 in your simplestreams container.
ifconfig
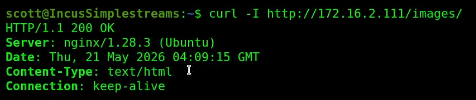
Do a curl command to the address you found to test it.
curl -I http://172.16.2.111/images
Now return back to the terminal for your IncusForge container and edit the config.json file.
nano config.json
Change the n.n.n.n address we put in the template to the actual address of your simplestreams container. Also create an NginX Proxy Manager record that exposes your simplestreams server using the subdomain you specified in the config.json using the address of the simplestreams server.
Save the config.json file and exit the editor.
Still on your IncusForge container, list your current remotes.
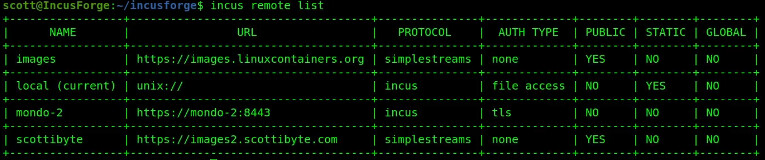
incus remote list

Edit your hosts file.
sudo nano /etc/hosts
Make entries for all of the Incus servers that you want to manage with IncusForge.
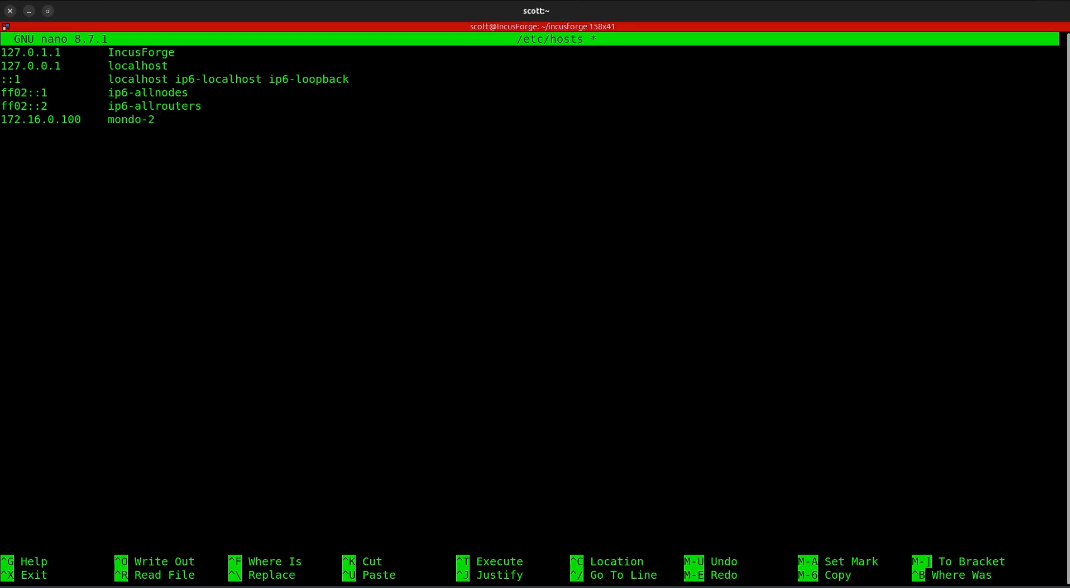
Save the file with CTRL O and enter and then CTRL X to exit the nano editor.
Here’s an example of how to add a trust for your incus server.
ssh mondo-2 "incus config trust add IncusForge"
The above command provides you a trust token. Then run the following command changing your system name.
incus remote add mondo-2 https://mondo-2:8443 --accept-certificate
Provide the password for the remote incus server and then paste the token in your received above.

You should now see your Incus server listed.
incus remote list

We can also add your simplestreams server adjusting for your subdomain and the name you want to call your image repository.
incus remote add scottibyte https://images2.scottibyte.com --protocol=simplestreams
Now we can see the simplestreams server.
incus remote list
We could list the images stored on our new simplestreams server (hint: there are none yet).
incus image list scottibyte:

Our application is not up and running yet. Start it.
docker compose up -d

Check it.
docker ps
![]()
Do an ifconfig command to find out the IncusForge container address.
ifconfig

Go to your web browser and type in the address.
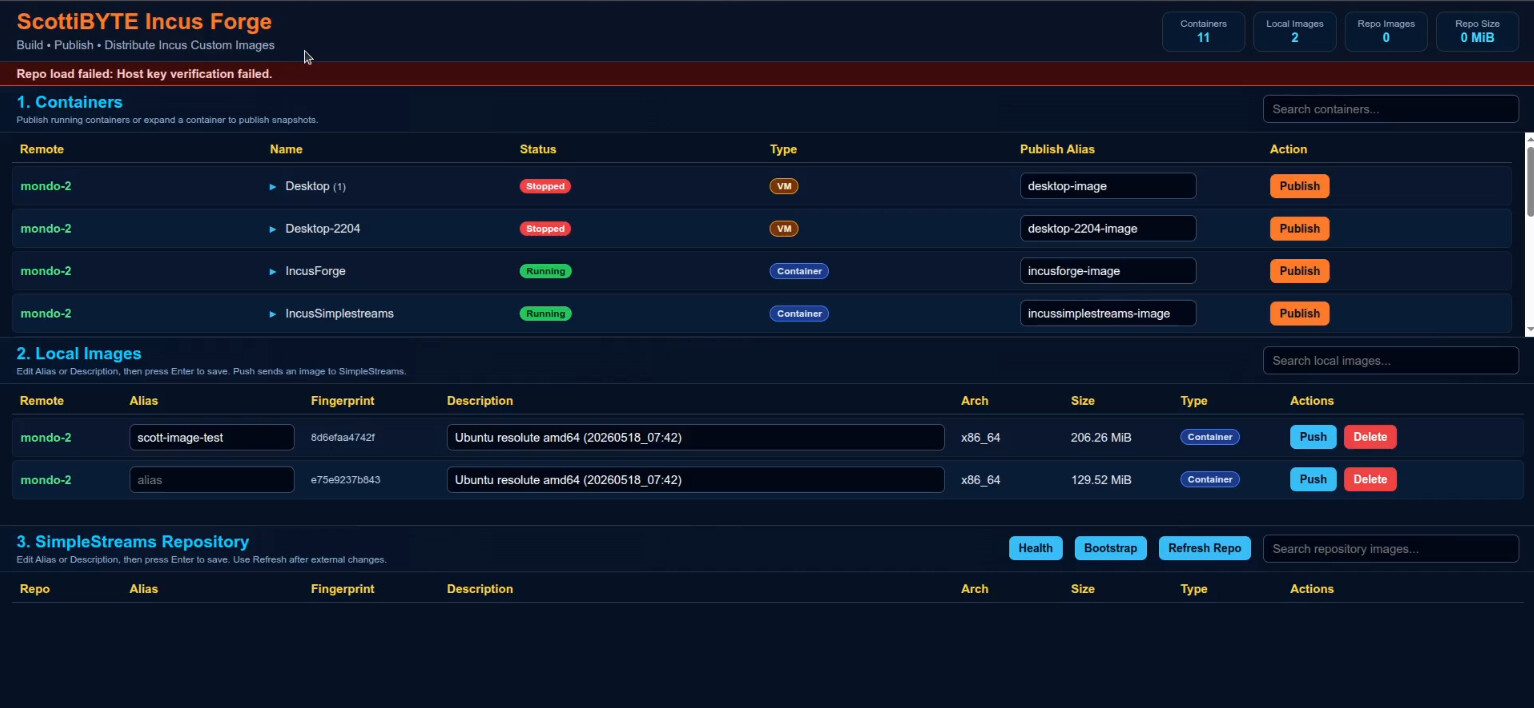
Notice the verification error above in red. That’s because we need to set up ssh keys from IncusForge to access the IncusSimplestreams container.
Create keys. Change the “scottibyte” to your repository name.
ssh-keygen -t ed25519 -C "incusforge@scottibyte" -f ~/.ssh/id_ed25519
Now copy the ID to the simplestrams server adjusting your username and the address of your simplestreams container.
ssh-copy-id -i ~/.ssh/id_ed25519.pub scott@172.16.2.111

Now restart the application to pick up the credentials we just created.
docker compose restart
Access the web page again and do a CTRL F5 in the web page to reset it and you should have a green “Ready” indicating that the app is running.
You now have a fully operational installation of IncusForge.