Homelable is a new network scanner somewhat like NetalertX except that it allows you to portray your discovered systems on a GUI canvas depicting the topology of your network.
In this tutorial, I use Homelable as an example of how to control the data flow from docker to an incus container, to the incus server and through an NFS mount pointing to external storage on a NAS. Understanding data flow in containerized storage systems in the home lab is a core competency to achieve success.
I present Homelable just as an example of how to handle external data storage. The key reason why you would want to project/store data outside of a container might be for backup, access by other applications, or minimizing storage consumption in the Incus storage pool for large data sets.
Better use cases for this would be Immich or PaperlessNGX which both have very large data sets. Since I have already covered both of those applications, I decided to do something different.
I present Homelable because it has a single docker persistent volume. Homelable only stores a relatively small database in that persistent volume. Therefore, I would not personally store its data outside of the Incus container.
Consider this presentation as an example of “technique” rather than as a suggestion regarding Homelable.
Start by creating an Incus container for Homelable:
incus launch images:ubuntu/24.04 Homelable -p default -p bridgeprofile -c boot.autostart=true -c security.nesting=true -c security.syscalls.intercept.mknod=true -c security.syscalls.intercept.setxattr=true
Move inside of the container.
incus shell Homelable
Apply the updates to the new container and install some dependencies.
apt update && apt upgrade -y
apt install openssh-server nano net-tools curl git ca-certificates -y
Install Docker:
curl https://get.docker.com | sh
Create a username and add it to the sudo and docker groups.
adduser scott
usermod -aG sudo,docker scott
Log into the new user account.
su - scott
Create the application & data folder and move into the application folder.
mkdir -p ~/homelable/data && cd homelable
Make a local copy of the Homelable project files.
git clone https://github.com/Pouzor/homelable.git temprepo
Move the files to their intended locations and remove the temporary storage space as well as the yml templates.
cp -a temprepo/. .
rm -rf temprepo
rm *.yml
Copy the environment variable file.
cp .env.example .env 2>/dev/null || touch .env
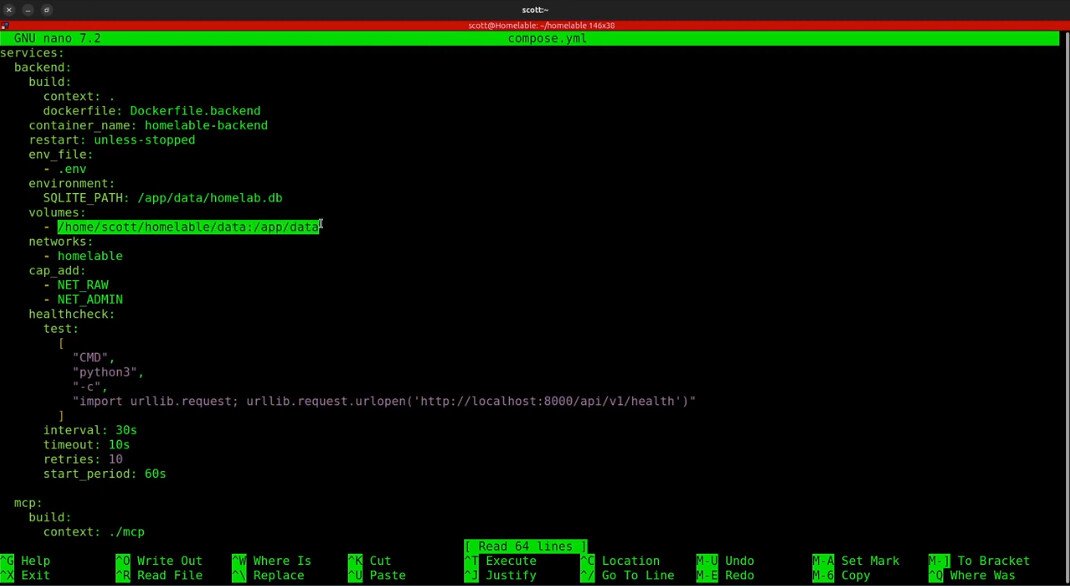
Edit the project compose file.
nano compose.yml
Insert the following into the editor.
services:
  backend:
    build:
      context: .
      dockerfile: Dockerfile.backend
    container_name: homelable-backend
    restart: unless-stopped
    env_file:
      - .env
    environment:
      SQLITE_PATH: /app/data/homelab.db
    volumes:
      - /home/scott/homelable/data:/app/data
    networks:
      - homelable
    cap_add:
      - NET_RAW
      - NET_ADMIN
    healthcheck:
      test:
        [
          "CMD",
          "python3",
          "-c",
          "import urllib.request; urllib.request.urlopen('http://localhost:8000/api/v1/health')"
        ]
      interval: 30s
      timeout: 10s
      retries: 10
      start_period: 60s

  mcp:
    build:
      context: ./mcp
      dockerfile: Dockerfile.mcp
    container_name: homelable-mcp
    restart: unless-stopped
    ports:
      - "8001:8001"
    env_file:
      - .env
    environment:
      BACKEND_URL: "http://backend:8000"
    depends_on:
      - backend
    networks:
      - homelable

  frontend:
    build:
      context: .
      dockerfile: Dockerfile.frontend
    container_name: homelable-frontend
    restart: unless-stopped
    ports:
      - "3005:80"
    depends_on:
      - backend
    networks:
      - homelable

networks:
  homelable:
    driver: bridge
Be sure to change “scott” to your username in the docker persistent volume and then save the file with a CTRL O and enter and then CTRL X to exit the nano editor.
Since Homelable requires “building” the containers rather than downloading them, execute the following command to build and start the application.
docker compose up -d --build
You can verify that the application started with:
docker compose logs
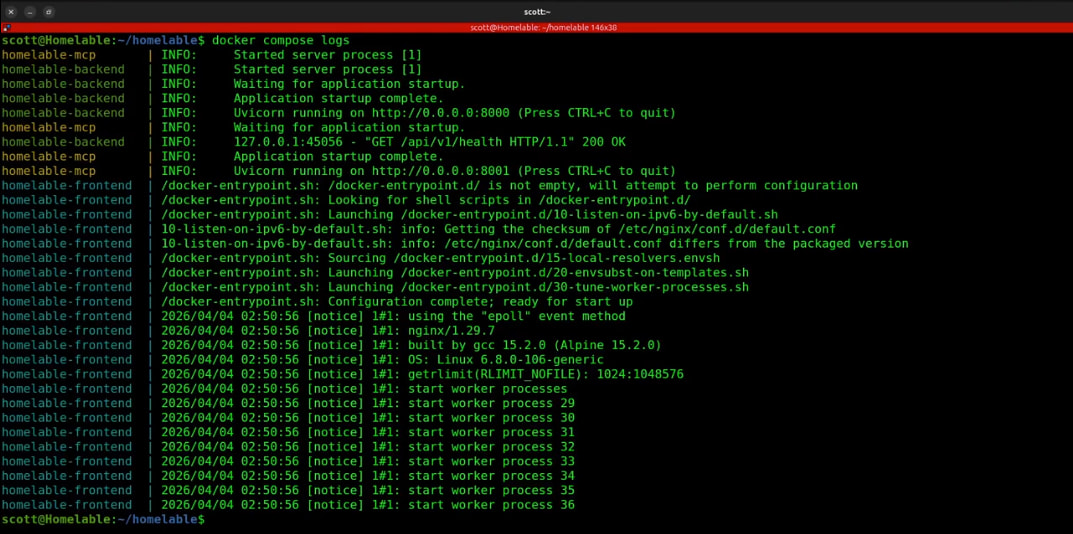
Also check that the application is healthy.
docker ps

Find out the address of your container.
ifconfig
Look for the address of eth0. Yours will differ from mine.

Go to the address you found with a “:3005” at the end to access the front end application interface.
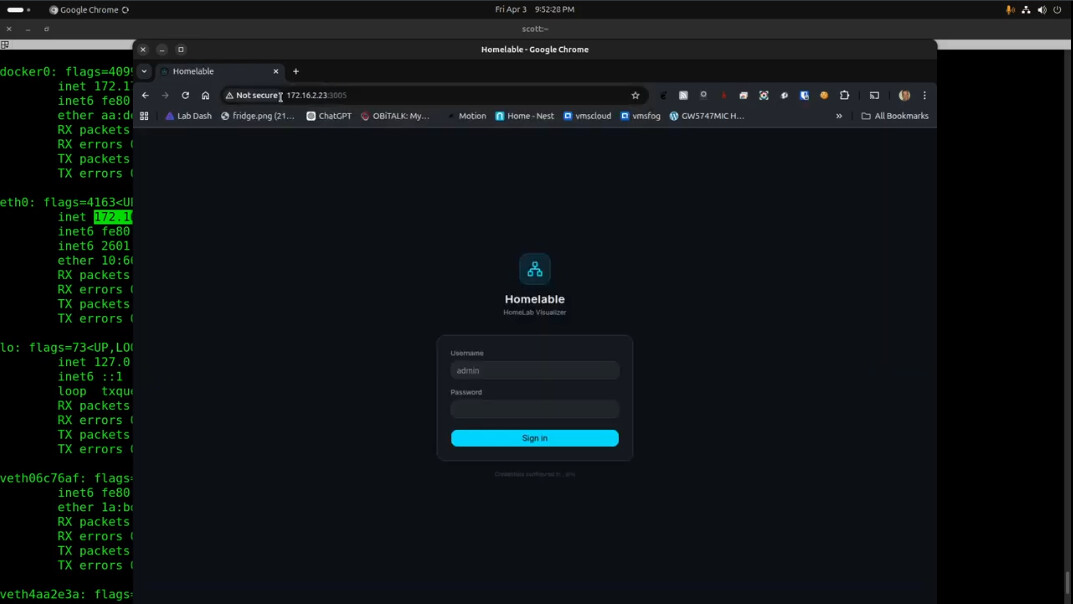
The initial username/password are both admin. You can change this by editing the .env file before starting the application as shown in the video. As of April 2026, the application has no user interface to change the password.
When you initially enter the application, an example template is provided.
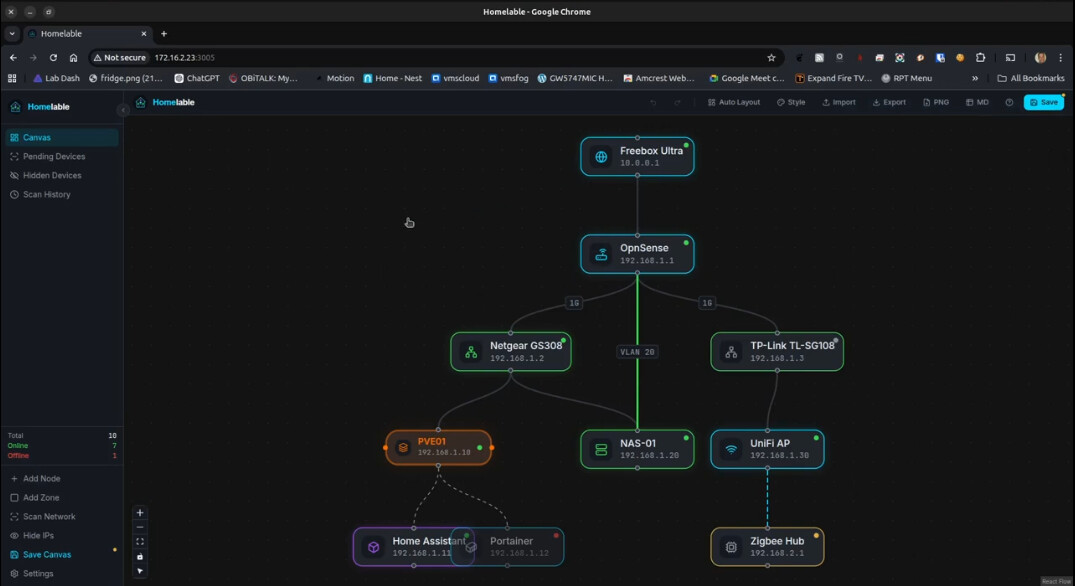
You can click on each icon and press the delete key to remove it. The scan network option allows you to enter the address range you want to scan and the “pending devices” contains the network devices discovered after a scan. At that point, it is assumed that you will selectively add the systems that you want to be a part of your diagram.
This project is very new, but I can see it becoming a valuable part of any home lab.
If all you wanted to do was to host Homelable, then you are done and you do not need to proceed any further.
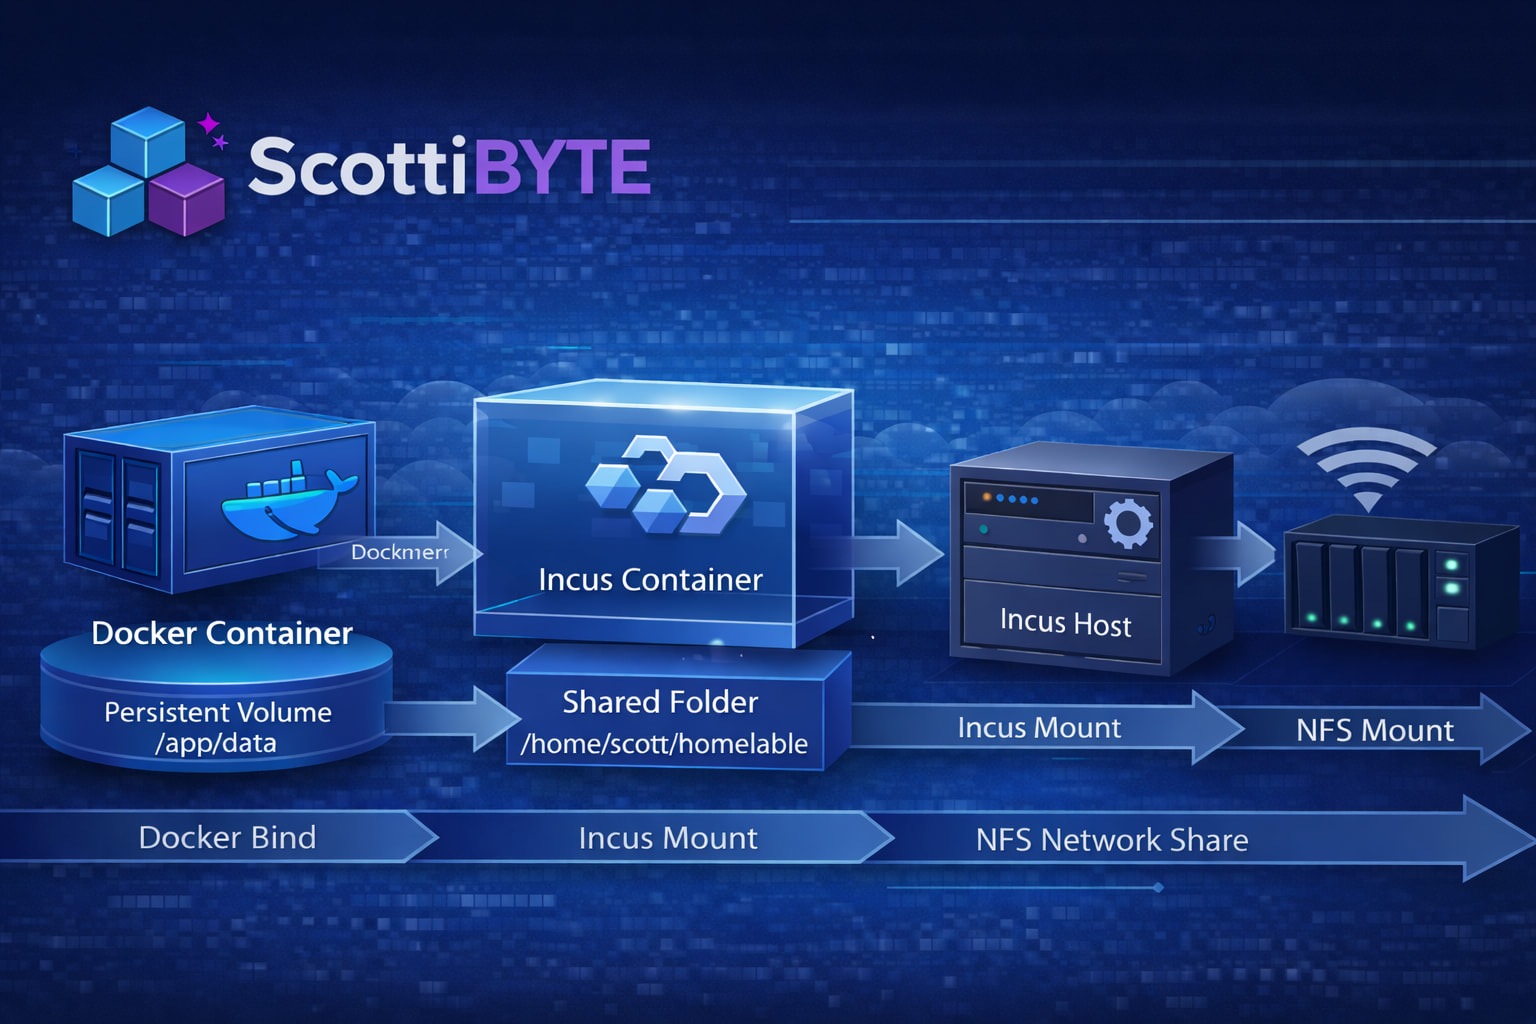
The real purpose of this video is to show how to store data from a docker container nested in an Incus container externally. Homelable isn’t the best choice for this example because it doesn’t have extensive persistent data. However, Homelable has only one persistent data mount and that will fit our use case.
Inside the Homelable Incus container we can move inside of the docker persistent volume folder and look at its contents.

As described earlier, the docker container has this data internally at “/app/data”. The volume command mapped this data to “/home/scott/homelable/data” and I provided the absolute path so that you can better understand the next steps.
The use of docker volumes is for persistent data. Without them, your data would go away once you shutdown the docker container.
We have already achieved the first step in compose.yml projecting the data folder outside of docker to the data folder in the Incus container.
Incus containers share the kernel of the host and so they are really only a virtual user space. That means that they don’t generally allow mounting block or files oriented storage. For that reason, we are going to “project” our Homelable data folder back to the Incus server on which the Homelable container is running.
Start by identifying the ID of your user inside of the container. Your ID should be 1001 if you following my instructions.
id

If we exit the container back to the Incus server, you will see that your ID is 1000 because your user account there was the first user if you followed by “Incus Containers Step by Step” tutorial.
exit
exit
id

Now create a folder on the Incus server as a mount point for the data from the Incus container.
mkdir homelable
Create the ID mapping from inside to outside of the container.
printf "uid 1000 1001\ngid 1000 1001\n" | sudo incus config set Homelable raw.idmap -
In the tutorial, I had to come back and provide the privilege to use the mapping. To accomplish this, execute the next two commands on the Incus server.
grep '^root:1000:1$' /etc/subuid || echo 'root:1000:1' | sudo tee -a /etc/subuid
grep '^root:1000:1$' /etc/subgid || echo 'root:1000:1' | sudo tee -a /etc/subgid

Now run the following command on the Incus server to map the folder inside the container to outside the container. Be sure to change the two instances of “scott” to your username. Complete absolute paths are required as shown.
incus config device add Homelable homelable-data disk source=/home/scott/homelable path=/home/scott/homelable/data
![]()
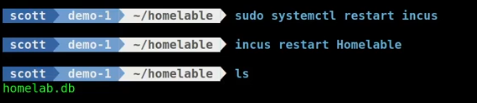
To make the privilege and ID mapping take effect, restart Incus.
sudo systemctl restart incus
The last step is to restart the Incus container.
incus restart Homelable
The process described above is the more direct route as opposed to the steps in the video. The reason for the ID mapping and the privilege settings in addition to the folder mapping is because by default a folder mapping only allows the server to write to the mapped container folder.
The extra commands allow the persistent data volume folder in the Incus container to write to the Incus server folder.
At this point, the Docker container stores its persistent data to the Homelable data folder and we mapped that back to the Incus server in a folder named homelable.
If you are still reading this, then congratulations for sticking with me!
The final step will be to show how we can store the data on a remote server instead of just on the Incus server. To do that, I used Linux Network File System (NFS) to store the data on my NAS. Since defining an NFS export is different on every NAS, that part is out of scope for this presentation.
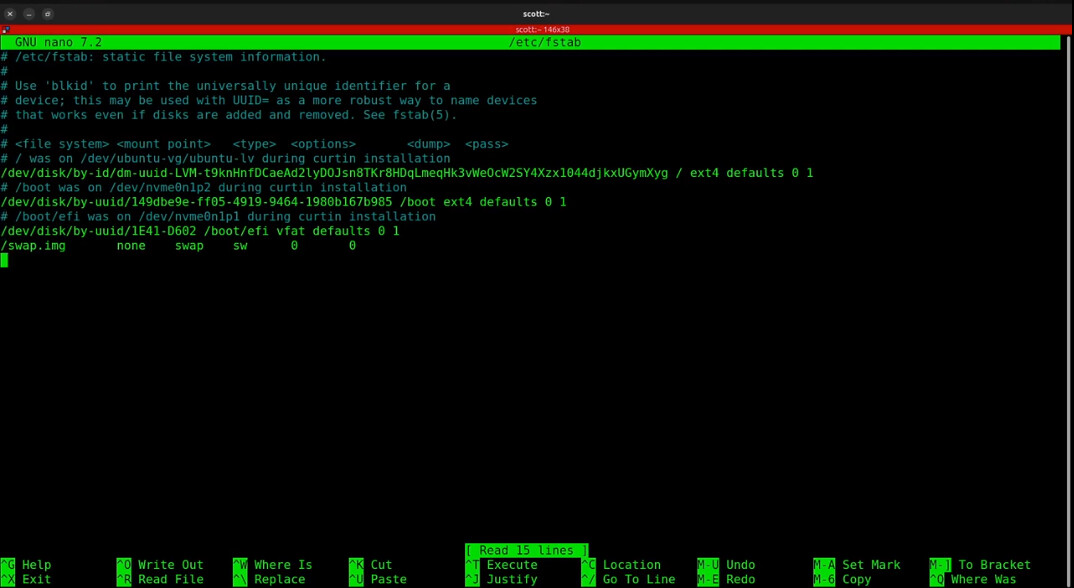
Edit the file systems table on your Incus server to add a mount command:
sudo nano /etc/fstab
Your file will differ, but here’s a look at mine.
I added a new line to the end of my fstab:
172.16.1.58:/homelable /home/scott/homelable nfs vers=3,proto=tcp,hard,intr,nofail,_netdev 0 0
The 172.16.1.58 is the address of my NAS. “/homelable” is the name of my NFS exported file system from the NAS. The “home/scott/homelable” is the folder on the Incus server that we have been working with all along. I used NFS v3. The nofail and the _netdev directives make the mount connection much more resilient in the event of network events.
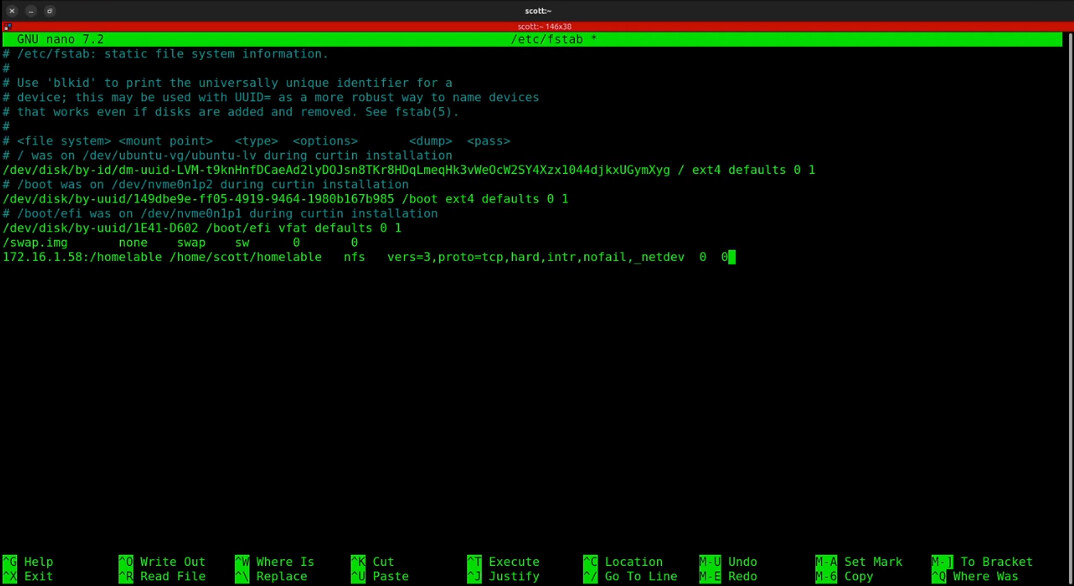
I did a CTRL O and enter to save the file and a CTRL X to exit the nano editor.
You could mount the file system by rebooting the Incus server. However, use this command instead.
sudo mount -a -t nfs
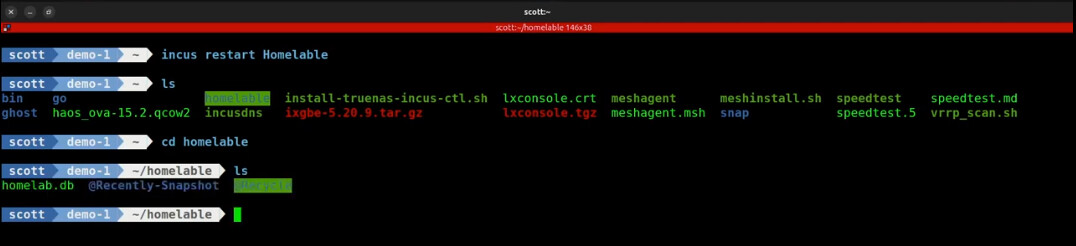
You can see that the volume is mounted with either the “mount’ command or listing the folder on on the Incus server. If you see the folder in inverse video, that indicates a mount.
![]()
As indicated in the tutorial, the order matters and so at this point, you will want to restart the Incus container after the NFS file system is mounted.
incus restart Homelable
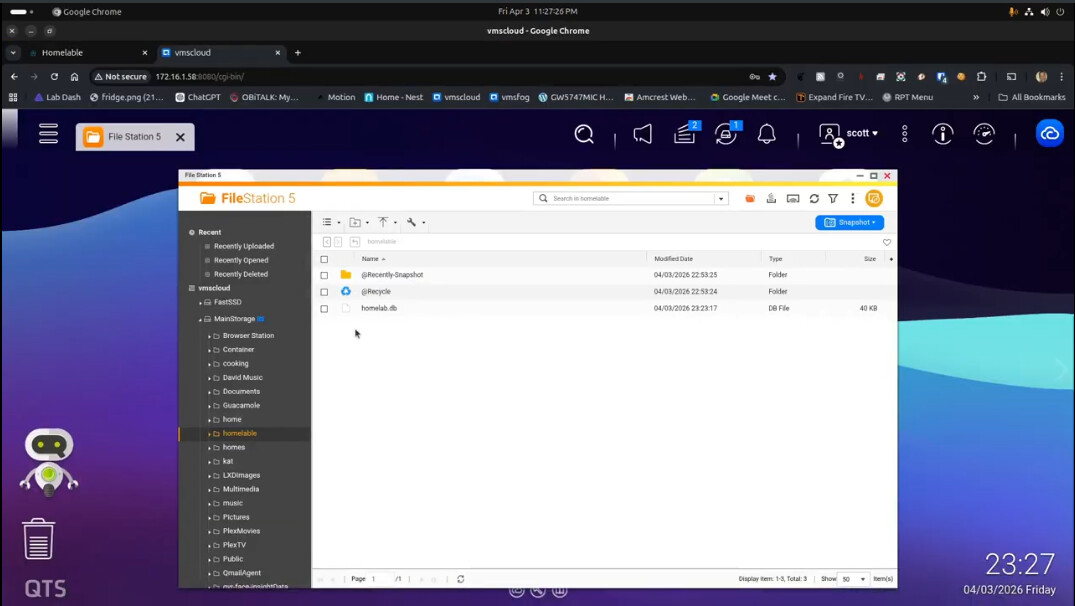
I can access the web page on my NAS and I am able to see the same data.
We have now achieved an end to end data flow from our docker container to an external NAS folder as shown below.
Hopefully this helped you understand how you can store data remotely with a concise set of steps.