In this tutorial we learn how I purchased and configured the Minisforum UM350, which is an 4 core, eight thread AMD Ryzen 5 3550H small form factor PC with 16GB of memory and a 256GB NVME drive. I configured this small form factor PC as a self-hosting server by installing Ubuntu 22.04 server and LXD.
If you watch my tutorials, you will see that I recommend both LXD and Docker containers to host applications. I showed in the video how you use Ubuntu Startup Disk creator to create a bootable USB thumb drive from a downloaded copy of Ubuntu 22.04 server.
Power on the UM350 and press F11 repeatedly to get into the boot options. From there, selection and boot from your thumb drive and install Ubuntu. The UM350 is shipped with Windows 10 home edition and during the installation you will want to erase the entire disk and have Ubuntu server maximize the root partition as well as installing the ssh server.
Once installation has completed, reboot the server and test it by making sure you can ssh into it from your network. If everything is running okay, shutdown the server and power it back on hitting the DEL key repeatedly to go into the BIOS. Once you are in the BIOS find the option to disable the integrated graphics which will free up 2GB of memory for the system to use. If you do this, the only way to use a display again is to use the CMOS reset on the front of the unit.
When you log back into the server, you should see about 15.5GB of total memory or 13.5GB of total memory if you did not disable the graphics.
In order to configure the network bridge:
cd /etc/netplan
sudo mv 00-installer-config.yaml 00-install-config.sav
sudo nano 00-installer-config.yaml
Put the following into the file and change your address to an unused address on your LAN and the “via” address to your router gateway address. Choose DNS addresses as desired.
network:
  version: 2

  ethernets:
    enp3s0:
      dhcp4: false
      dhcp6: false

  bridges:
    bridge0:
      interfaces: [enp3s0]
      addresses: [172.16.1.50/16]
      routes:
         - to: default
           via: 172.16.0.1
      nameservers:
        addresses:
          - 1.1.1.1
          - 1.0.0.1
      parameters:
        stp: true
        forward-delay: 4
      dhcp4: no
Exit the editor and save the file with the CTRL X option.
Configure the network:
sudo netplan apply
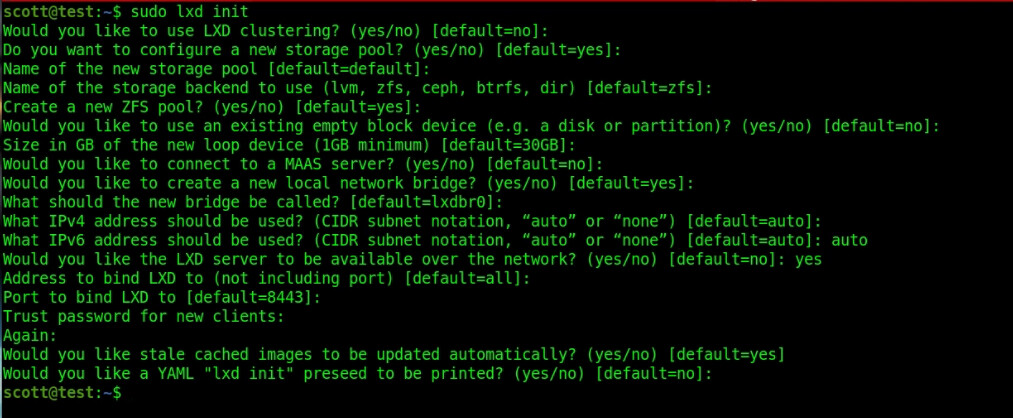
Before you can use LXD, you must perform a “sudo lxd init” which is covered on other videos on the channel. The basic options are:
To create the bridged profile:
lxc profile create bridgeprofile
lxc profile device add bridgeprofile eth0 nic nictype=bridged parent=bridge0
To create the untagged vlan profile:
lxc profile create untagged
lxc profile device add untagged eth0 nic nictype=macvlan parent=bridge0
To create a profile for a vlan using macvlan:
lxc profile create vlan30
lxc profile device add vlan30 eth0 nic nictype=macvlan parent=bridge0 vlan=30
You can edit a profile to make changes:
lxc profile edit bridgeprofile
Adding a container is easy, but watch my other videos for details.
lxc launch ubuntu:20.04 test --profile bridgeprofile -c boot.autostart=true
Log into the container we just created:
lxc exec test bash
List your containers:
lxc list
Install the btop program to monitor your server:
sudo snap install btop
Run btop:
btop
A “q” quits btop.