In this tutorial we learn how to display any RTSP Camera Stream on Fire TV (and Android TV) devices at full resolution using Home Assistant completely locally without any need for the cloud.
In January of 2023, I presented Self Hosted Camera Magic where I transcoded a 4k h.265 encoded RTSP camera stream and I used VLC to display it on a Google Chromecast 4k. The reason I did this was because my Reolink 4k camera didn’t have an option to encode the stream in other than h.265 which Alexa didn’t support.
The Reolink Alexa skill was able to display the camera, however the resolution was massively downgraded to the point where it looked horrible on my Samsung 65” 4k TV.
Over the past couple of years I tested and used many different ways to display cameras on Android TV devices. I use TinyCam Pro to this day on my Fire TV 4k Max and it’s awesome. Tinycam Pro doesn’t run optimally with cameras like my new Unifi G6 Turret, even on my Fire TV 4k Max 2nd edition. I mean it’s good, but not great.
For several years I really liked using Monocle Gateway. Monocle was great because it did support native stream resolutions and it could stream video to Echo Show devices in addition to Fire TV devices.
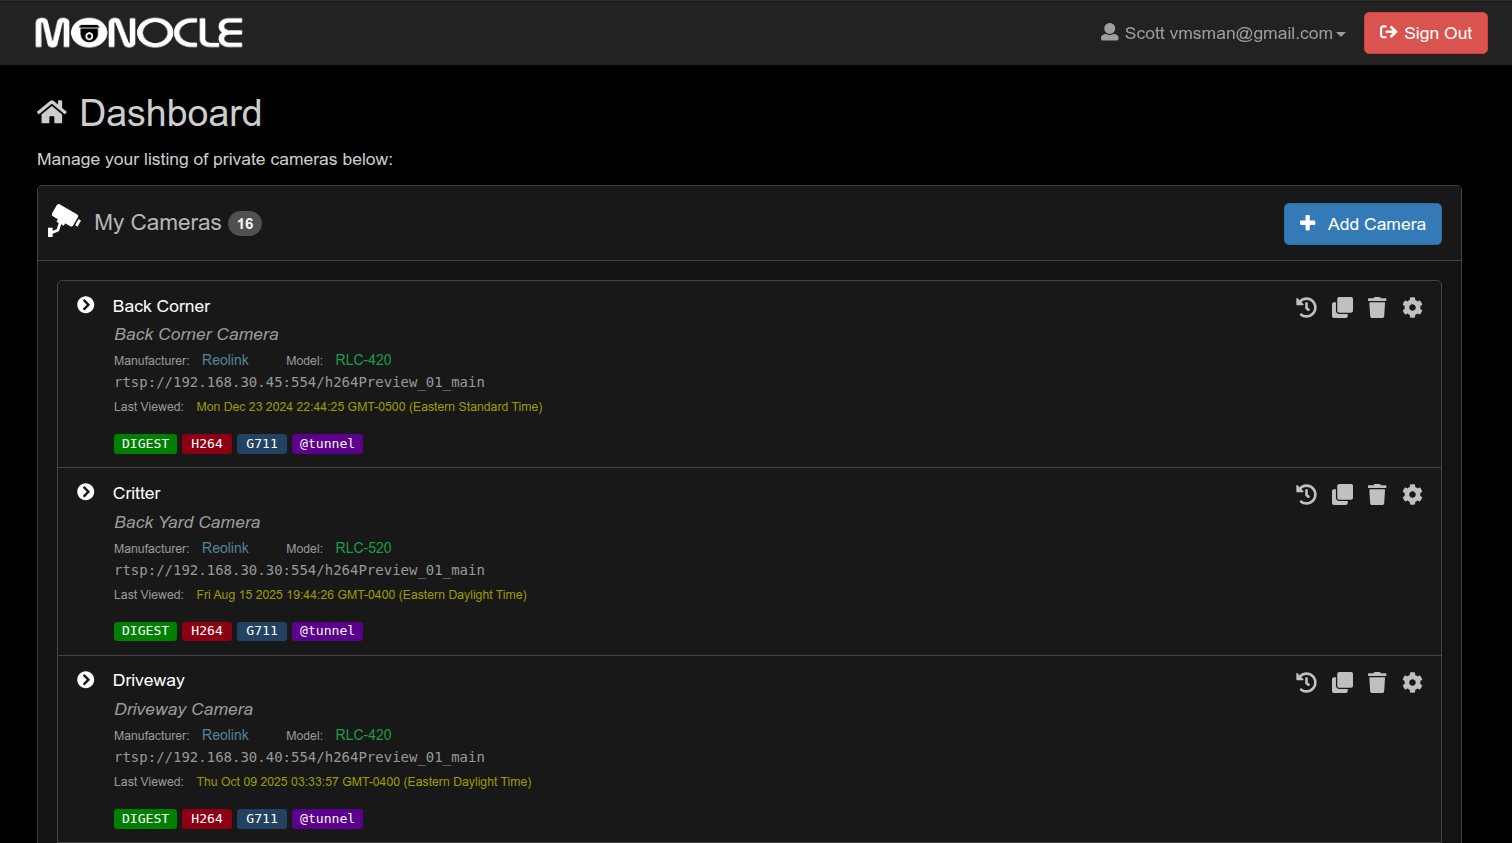
The problem with Monocle is that now that I am on the Alexa + pre-release, none of my cameras stream from the Monocle Gateway anymore. Alexa + is awesome and the AI features are really powerful. Alexa Plus (which is also on my Fire TV 4k Max 2nd Edition) increases endpoint security by placing very stringent requirements on how streaming takes place.
Fundamentally this is a great security idea and so I really can’t blame Amazon. The downside is that I have also discovered many existing Alexa skills are being deprecated by the Alexa + release. So, I needed a new solution to display my cameras.
I still use TinyCam Pro, but I wanted a nice way to voice command a switch and so Alexa was it. This is a good place to point out that I NEVER do automations on Alexa. I use Alexa routines to simply turn on a virtual switch when I speak a phrase. The switch triggers an automation that is either on my Hubitat Elevation hub or my Home Assistant instance. Watch my Home Assistant OS in Incus 101 for more information on how I installed Home Assistant as an Incus VM.
So, back to the story. I briefly worked with the Fully Kiosk Browser to initiate video streams on my Fire TV 4k Max, but Fully Kiosk was much better for displaying dashboards and web pages. That’s what led me to using the Chromecast as a better solution. In my Self Hosted Camera Magic I had to use an intermediate incus container to transcode my camera stream to something that worked better with the Chromecast.
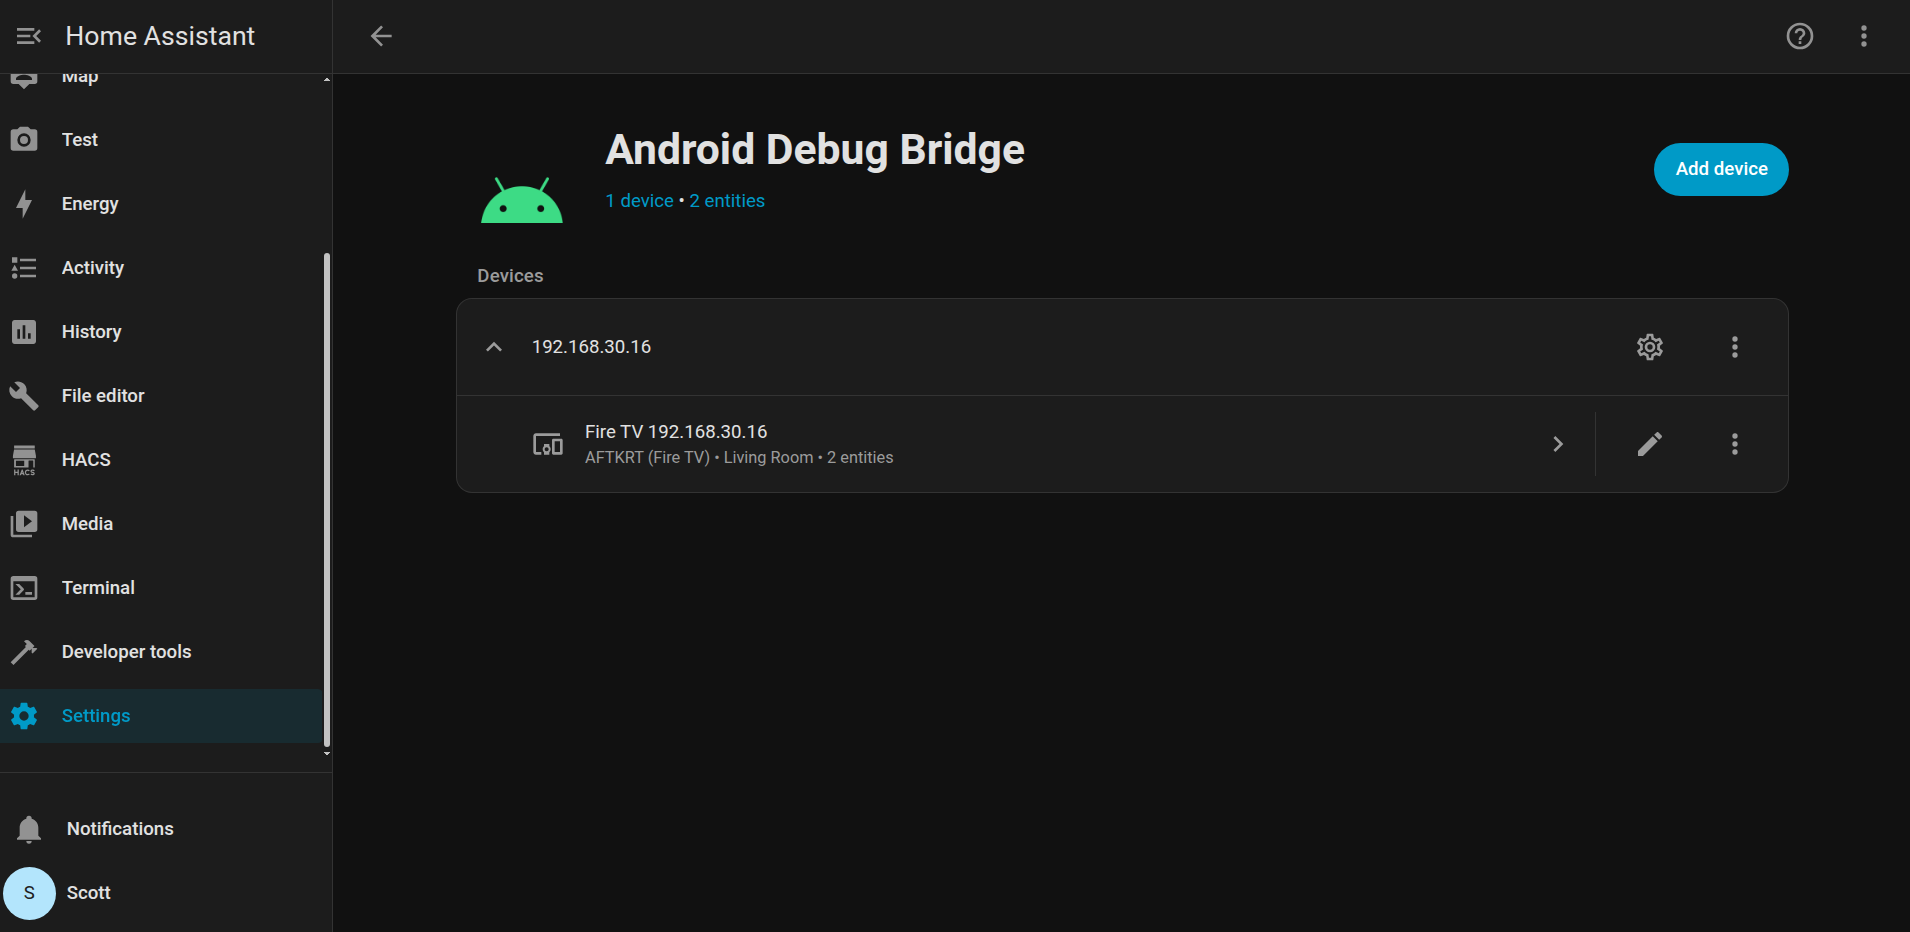
However, there is a better way. The Android Debug Bridge (ADB) is an open source tool that has been around since 2007 and and it allows for background connections via not only USB but over the network as well.
In this tutorial, I will show how to use ADB in Home Assistant (HA) to launch VLC on the Fire TV device to display any RTSP camera stream. The downside is that this does not work for displaying cameras on Echo Show devices. HA has ADB as a standard integration for connectivity to Android devices.
Before you can use ADB, you need to access your Android TV device (Fire TV stick) and go to settings – about and tap the “Build number” seven times and you will see “Developer options have been enabled”. Then in the settings menu you will see a Developer Options menu and you will want to turn on USB Debugging there. If your device is Android 11+ in developer options enable wireless debugging.
Once you enable USB Debugging, HA is pretty good at discovering that you have an Android device that can be controlled. In HA, you go to settings – devices & services and then find the Android Debug bridge.
Later on when you connect to the Android TV device remotely the first time from HA, you will get a pop-up asking permission to connect. Tap “Allow USB Debugging” and “Always Allow”. Your Android device (Fire TV stick, Nvidia Shield, etc) can now be remote controlled.
The ADB in HA will assign a media player entity name for your Fire TV device.
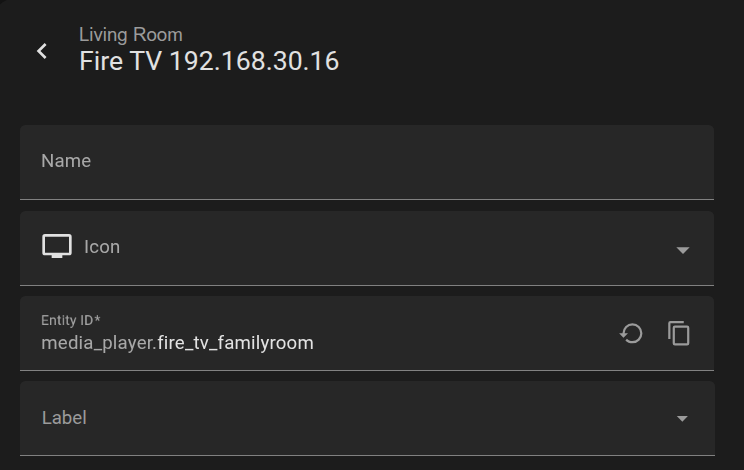
My player entity is named media_player.fire_tv_familyroom and that is my Fire TV 4k Max.
I have 16 cameras for viewing various locations outside my home and in my home lab. I created 16 virtual buttons aka momentary switches to trigger the scripts I created. In my case, the switches were created on the Hubitat Elevation Hub, but shared to HA and Alexa. Alexa turns on the appropriate switch when the right phrase is spoken. For example, I have an Alexa routine that “listens” for the phase “show me the front door” and it turns on the switch “show_frontdoor” which triggers the automation.
The automation is just there to run the script. More on that later. As an example, the script that I have in scripts.yaml for my front door follows. This particular camera is a Ubiquiti Unifi G6 Turret and so the IP address is that of my UDM Pro where Unifi Protect is running.
show_frontdoor:
  alias: Show Front Door
  mode: single
  sequence:
    - service: androidtv.adb_command
      target:
        entity_id: media_player.fire_tv_familyroom
      data:
        command: "am start -a android.intent.action.VIEW -d 'rtsp://172.16.0.1:7447/EtQN6eH4ErXKGGPiH' org.videolan.vlc"
The service is androidtv.adb_command which is targeted to run on media_player.fire_tv_familyroom. The “command” has a few parts. The “am” stands for Activity Manager. The “Start” means we want to start an application on ADB. The “-a android.intent.action.VIEW” is a directive to either open or display a link. The “-d” is the destination link and in our case that is an RTSP URI for the camera formatted according to the camera manufacturer’s instructions. At the end of the command you see “org.videolan.vlc” and that is lauching VLC to display the RTSP camera feed. So, you will need to have installed VLC from the App Library on your Fire TV device.
I presented the script for my driveway camera in the video which is using a Reolink camera.

The contents of my scripts.yaml file in HA follows. This may help you create your own.
show_frontdoor:
  alias: Show Front Door
  mode: single
  sequence:
    - service: androidtv.adb_command
      target:
        entity_id: media_player.fire_tv_familyroom
      data:
        command: "am start -a android.intent.action.VIEW -d 'rtsp://172.16.0.1:7447/EZyzN6eHTKrePiH' org.videolan.vlc"

show_family_room:
  alias: Show Family Room
  mode: single
  sequence:
    - service: androidtv.adb_command
      target:
        entity_id: media_player.fire_tv_familyroom
      data:
        command: 'am start -a android.intent.action.VIEW -d "rtsp://username:password@192.168.30.20:554/cam/realmonitor?channel=1&subtype=0" org.videolan.vlc'

show_pebbles:
  alias: Show Pebbles
  mode: single
  sequence:
    - service: androidtv.adb_command
      target:
        entity_id: media_player.fire_tv_familyroom
      data:
        command: 'am start -a android.intent.action.VIEW -d "rtsp://username:password@192.168.30.70:554/h264Preview_01_main" org.videolan.vlc'

show_mobile2:
  alias: Show Mobile 2
  mode: single
  sequence:
    - service: androidtv.adb_command
      target:
        entity_id: media_player.fire_tv_familyroom
      data:
        command: 'am start -a android.intent.action.VIEW -d "rtsp://username:password@192.168.30.22:8554/unicast" org.videolan.vlc'

show_mobile3:
  alias: Show Mobile 3
  mode: single
  sequence:
    - service: androidtv.adb_command
      target:
        entity_id: media_player.fire_tv_familyroom
      data:
        command: 'am start -a android.intent.action.VIEW -d "rtsp://username:password@192.168.30.23:8554/unicast" org.videolan.vlc'

show_backcorner:
  alias: Show Back Corner
  mode: single
  sequence:
    - service: androidtv.adb_command
      target:
        entity_id: media_player.fire_tv_familyroom
      data:
        command: 'am start -a android.intent.action.VIEW -d "rtsp://username:password@192.168.30.45:554/h264Preview_01_main" org.videolan.vlc'

show_backyard:
  alias: Show Backyard
  mode: single
  sequence:
    - service: androidtv.adb_command
      target:
        entity_id: media_player.fire_tv_familyroom
      data:
        command: 'am start -a android.intent.action.VIEW -d "rtsp://username:password@192.168.30.30:554/h264Preview_01_main" org.videolan.vlc'

show_driveway:
  alias: Show Driveway
  mode: single
  sequence:
    - service: androidtv.adb_command
      target:
        entity_id: media_player.fire_tv_familyroom
      data:
        command: 'am start -a android.intent.action.VIEW -d "rtsp://username:password@192.168.30.40:554/h264Preview_01_main" org.videolan.vlc'

show_frontyard:
  alias: Show Front Yard
  mode: single
  sequence:
    - service: androidtv.adb_command
      target:
        entity_id: media_player.fire_tv_familyroom
      data:
        command: 'am start -a android.intent.action.VIEW -d "rtsp://username:password@192.168.30.35:554/h264Preview_01_main" org.videolan.vlc'

show_garage:
  alias: Show Garage
  mode: single
  sequence:
    - service: androidtv.adb_command
      target:
        entity_id: media_player.fire_tv_familyroom
      data:
        command: 'am start -a android.intent.action.VIEW -d "rtsp://username:password@192.168.30.55:554/h264Preview_01_main" org.videolan.vlc'

show_mailbox:
  alias: Show Mailbox
  mode: single
  sequence:
    - service: androidtv.adb_command
      target:
        entity_id: media_player.fire_tv_familyroom
      data:
        command: 'am start -a android.intent.action.VIEW -d "rtsp://username:password@192.168.30.60:554/h265Preview_01_main" org.videolan.vlc'

show_gate:
  alias: Show Gate
  mode: single
  sequence:
    - service: androidtv.adb_command
      target:
        entity_id: media_player.fire_tv_familyroom
      data:
        command: 'am start -a android.intent.action.VIEW -d "rtsp://username:password@192.168.30.50:554/h264Preview_01_main" org.videolan.vlc'

show_sideyard:
  alias: Show Side Yard
  mode: single
  sequence:
    - service: androidtv.adb_command
      target:
        entity_id: media_player.fire_tv_familyroom
      data:
        command: 'am start -a android.intent.action.VIEW -d "rtsp://username:password@192.168.30.65:554/h264Preview_01_main" org.videolan.vlc'

show_sidewalk:
  alias: Show Sidewalk
  mode: single
  sequence:
    - service: androidtv.adb_command
      target:
        entity_id: media_player.fire_tv_familyroom
      data:
        command: 'am start -a android.intent.action.VIEW -d "rtsp://172.16.0.1:7447/MxIeRuxHnMlQrq" org.videolan.vlc'

show_thingone:
  alias: Show Thing One
  mode: single
  sequence:
    - service: androidtv.adb_command
      target:
        entity_id: media_player.fire_tv_familyroom
      data:
        command: 'am start -a android.intent.action.VIEW -d "rtsp://172.16.0.1:7447/1pQ50qOieNGwhE7" org.videolan.vlc'

show_thingtwo:
  alias: Show Thing Two
  mode: single
  sequence:
    - service: androidtv.adb_command
      target:
        entity_id: media_player.fire_tv_familyroom
      data:
        command: 'am start -a android.intent.action.VIEW -d "rtsp://172.16.0.1:7447/EV6bHwTNmWYiQKMU" org.videolan.vlc'
To make sure that your scripts & automations are included in your configuration, go over to the configuration.yaml file and be sure you have entries like:
automation: !include automations.yaml
script: !include scripts.yaml
Once you have your scripts defined, you will need an automation. Go over to settings – Automations & Scenes and create an automation. I called mine “Camera button pressed”. I edited my code in the yaml editor and I have included my code as a reference.
alias: Camera Button Pressed
description: Call the matching camera script when a momentary switch is toggled on
triggers:
  - entity_id:
      - switch.show_frontdoor
      - switch.show_family_room
      - switch.show_pebbles
      - switch.show_mobile2
      - switch.show_mobile3
      - switch.show_backcorner
      - switch.show_backyard
      - switch.show_driveway
      - switch.show_frontyard
      - switch.show_garage
      - switch.show_mailbox
      - switch.show_gate
      - switch.show_sideyard
      - switch.show_sidewalk
      - switch.show_thingone
      - switch.show_thingtwo
    to: "on"
    trigger: state
actions:
  - choose:
      - conditions:
          - condition: template
            value_template: "{{ trigger.entity_id == 'switch.show_frontdoor' }}"
        sequence:
          - action: script.show_frontdoor
      - conditions:
          - condition: template
            value_template: "{{ trigger.entity_id == 'switch.show_family_room' }}"
        sequence:
          - action: script.show_family_room
      - conditions:
          - condition: template
            value_template: "{{ trigger.entity_id == 'switch.show_pebbles' }}"
        sequence:
          - action: script.show_pebbles
      - conditions:
          - condition: template
            value_template: "{{ trigger.entity_id == 'switch.show_mobile2' }}"
        sequence:
          - action: script.show_mobile2
      - conditions:
          - condition: template
            value_template: "{{ trigger.entity_id == 'switch.show_mobile3' }}"
        sequence:
          - action: script.show_mobile3
      - conditions:
          - condition: template
            value_template: "{{ trigger.entity_id == 'switch.show_backcorner' }}"
        sequence:
          - action: script.show_backcorner
      - conditions:
          - condition: template
            value_template: "{{ trigger.entity_id == 'switch.show_backyard' }}"
        sequence:
          - action: script.show_backyard
      - conditions:
          - condition: template
            value_template: "{{ trigger.entity_id == 'switch.show_driveway' }}"
        sequence:
          - action: script.show_driveway
      - conditions:
          - condition: template
            value_template: "{{ trigger.entity_id == 'switch.show_frontyard' }}"
        sequence:
          - action: script.show_frontyard
      - conditions:
          - condition: template
            value_template: "{{ trigger.entity_id == 'switch.show_garage' }}"
        sequence:
          - action: script.show_garage
      - conditions:
          - condition: template
            value_template: "{{ trigger.entity_id == 'switch.show_mailbox' }}"
        sequence:
          - action: script.show_mailbox
      - conditions:
          - condition: template
            value_template: "{{ trigger.entity_id == 'switch.show_gate' }}"
        sequence:
          - action: script.show_gate
      - conditions:
          - condition: template
            value_template: "{{ trigger.entity_id == 'switch.show_sideyard' }}"
        sequence:
          - action: script.show_sideyard
      - conditions:
          - condition: template
            value_template: "{{ trigger.entity_id == 'switch.show_sidewalk' }}"
        sequence:
          - action: script.show_sidewalk
      - conditions:
          - condition: template
            value_template: "{{ trigger.entity_id == 'switch.show_thingone' }}"
        sequence:
          - action: script.show_thingone
      - conditions:
          - condition: template
            value_template: "{{ trigger.entity_id == 'switch.show_thingtwo' }}"
        sequence:
          - action: script.show_thingtwo
  - delay: 1
  - target:
      entity_id: "{{ trigger.entity_id }}"
    action: homeassistant.turn_off
mode: single
Your switch names and script names will be different and you should adjust them accordingly.
In the presentation, I created a dashboard to test the displaying of my cameras on my Fire TV 4k Max.
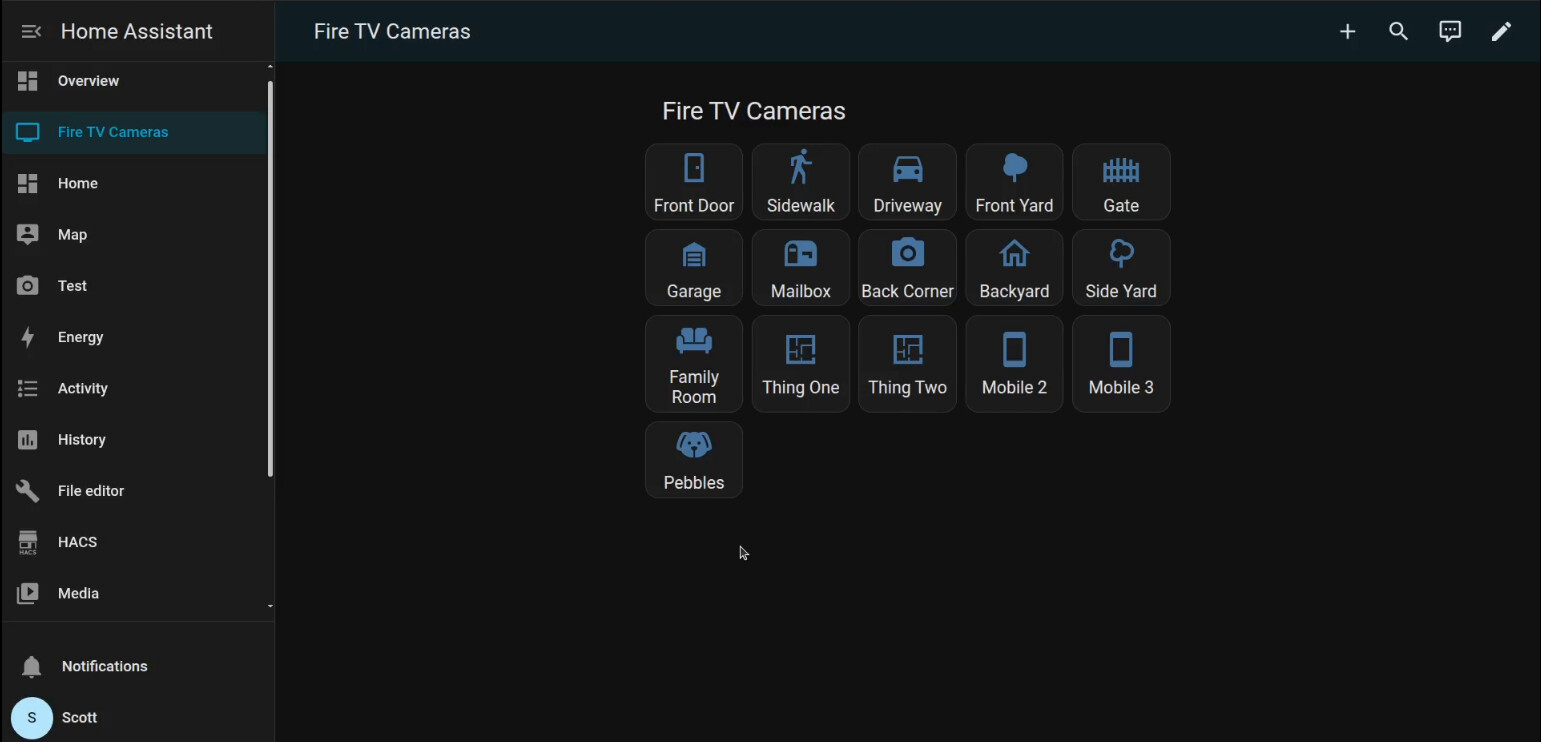
As a reference, here is the yaml code for that dashboard.
title: Fire TV Cameras
views:
  - title: Fire TV Cameras
    path: firetv_cameras
    badges: []
    cards:
      - type: grid
        title: Fire TV Cameras
        columns: 5
        square: false
        cards:
          - type: button
            name: Front Door
            icon: mdi:door
            tap_action:
              action: call-service
              service: script.show_frontdoor
          - type: button
            name: Sidewalk
            icon: mdi:walk
            tap_action:
              action: call-service
              service: script.show_sidewalk
          - type: button
            name: Driveway
            icon: mdi:car
            tap_action:
              action: call-service
              service: script.show_driveway
          - type: button
            name: Front Yard
            icon: mdi:tree
            tap_action:
              action: call-service
              service: script.show_frontyard
          - type: button
            name: Gate
            icon: mdi:gate
            tap_action:
              action: call-service
              service: script.show_gate
          - type: button
            name: Garage
            icon: mdi:garage
            tap_action:
              action: call-service
              service: script.show_garage
          - type: button
            name: Mailbox
            icon: mdi:mailbox
            tap_action:
              action: call-service
              service: script.show_mailbox
          - type: button
            name: Back Corner
            icon: mdi:camera
            tap_action:
              action: call-service
              service: script.show_backcorner
          - type: button
            name: Backyard
            icon: mdi:home-outline
            tap_action:
              action: call-service
              service: script.show_backyard
          - type: button
            name: Side Yard
            icon: mdi:tree-outline
            tap_action:
              action: call-service
              service: script.show_sideyard
          - type: button
            name: Family Room
            icon: mdi:sofa
            tap_action:
              action: call-service
              service: script.show_family_room
          - type: button
            name: Thing One
            icon: mdi:floor-plan
            tap_action:
              action: call-service
              service: script.show_thingone
          - type: button
            name: Thing Two
            icon: mdi:floor-plan
            tap_action:
              action: call-service
              service: script.show_thingtwo
          - type: button
            name: Mobile 2
            icon: mdi:cellphone
            tap_action:
              action: call-service
              service: script.show_mobile2
          - type: button
            name: Mobile 3
            icon: mdi:cellphone
            tap_action:
              action: call-service
              service: script.show_mobile3
          - type: button
            name: Pebbles
            icon: mdi:dog
            tap_action:
              action: call-service
              service: script.show_pebbles
You will notice that pressing a button in the dashboard simply calls the associated script.
I used adb on my desktop Linux to connect to my phone to see an example of an Alexa Routine where I speak a phrase and it turns on the switch to view the camera. The Alexa mobile application has routines like these:

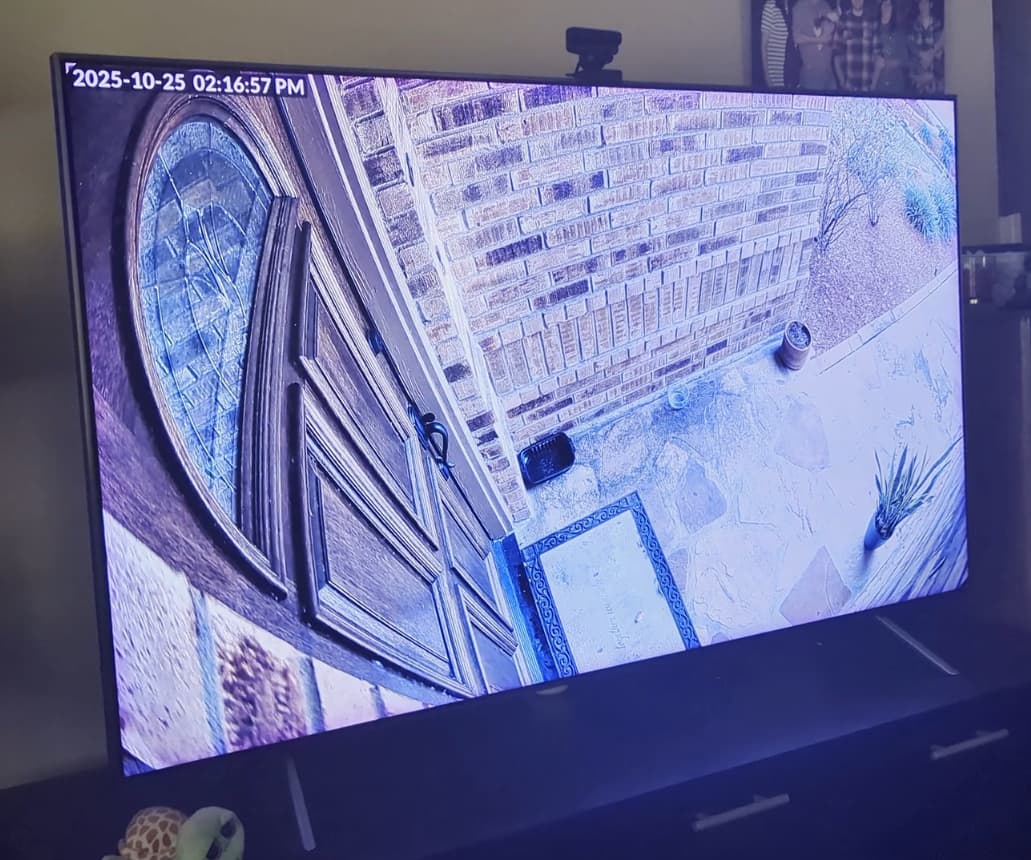
So, in the video I say “Alexa, show me the front door” and the front door camera is quickly connected in full resolution.
That’s about it! Don’t forget to load the VLC media player on your Fire TV device. This is both simple and powerfull because HA just tells the Fire TV device to access the camera and play the stream with VLC. No Cloud involved… well other than my voice prompt for Alexa.