I have a previous tutorial entitled “Incus Container Snapshots”. Snapshots are point in time backups stored inside of an incus container. Incus containers can also be backed up outside of Incus with the “incus export” command.
Start out by creating a simple Incus container:
incus launch images:ubuntu/22.04 Container1
The simplest way to initiate a backup is with the export command:
incus export Container1
The resulting file is a compressed TAR archive. Be aware that if your container has snapshots in it, that the overall size of the exported archive will be significantly larger. For that reason, I normally delete my snapshots before I perform an export command.

One important consideration in performing container exports is that any profiles used in the container being exported must be present on the server on which they are imported.
For example, if Container1 used the “bridgeprofile” then if we were to try and import the Container1 backup on a different Incus server, the “bridgeprofile” profile must exist on that server or the import command will fail.
Another consideration is that the exported archive even contains the MAC address of the container from which the backup was made.
This means that Container1 has a given MAC address and your DHCP server might assign it the address 192.168.1.100. If you continue running Container1, but import the Container1 backup to either the same system or another system and call it Container2, it will have create a duplicate MAC address on your network and that should be avoided.
As an example:
incus import Container1.tar.gz Container2

Because of the duplicate MAC address, we have an error trying to start it.
One work around to this would be to change the MAC address of the new container to a randomly generated unique value and change it on the container. Here’s an example:
incus config set Container2 volatile.eth0.hwaddr 00:16:3e:62:b9:0b
We can now start the container without error:
incus start Container2

Here’s and example of creating a backup of the new Container2.
It’s possible to assign a new profile to Container1. When assigning a new profile, you must include not only the new profile, but all profiles that you want to assign to the container. As an example, I will assign the “bridgeprofile”, but I must also ass the “default” profile.
incus profile assign Container1 default,bridgeprofile
As a result of the command above, my Container1 received a new address on my LAN on the fly:

Lets stop Container1.
incus stop Container1
As a test case, I created a new backup of Container1 which now has the bridgeprofile added to it.
incus export Container1 Container1-test.tar.gz
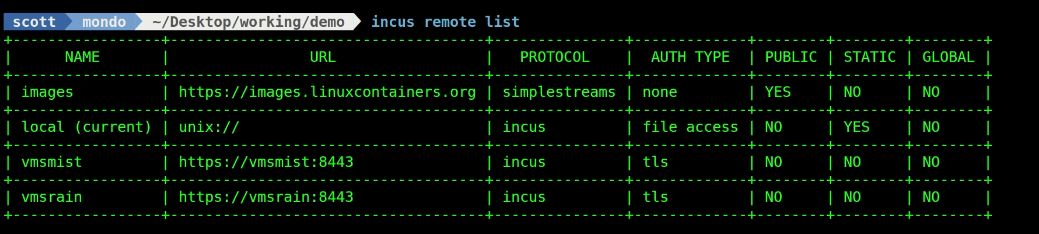
Recall from the video that I have the ability to remotely manage my vmsmist and my vmsrain servers:
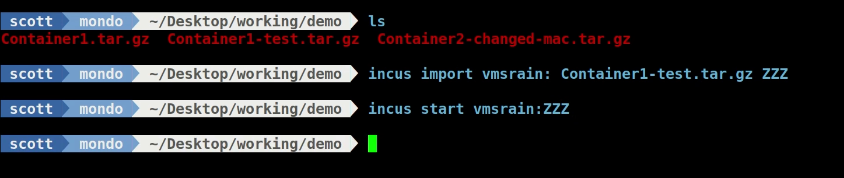
It is now possible for me to import this backup to my vmsrain server and I just gave it the very obvious name of ZZZ. Remember that the “bridgeprofile” profile must exist on the vmsrain server because it is a part of the container backup of Container1.
incus import vmsrain: Container1-test.tar.gz ZZZ
When the import is completed, you can start the container on the remote server vmsrain.
incus start vmsrain:ZZZ
If I can then do a listing of the containers on vmsrain.
incus list vmsrain:
Note that the ZZZ container has the same address as Container1 did in virtue of the “bridgeprofile” and also having the same MAC address.
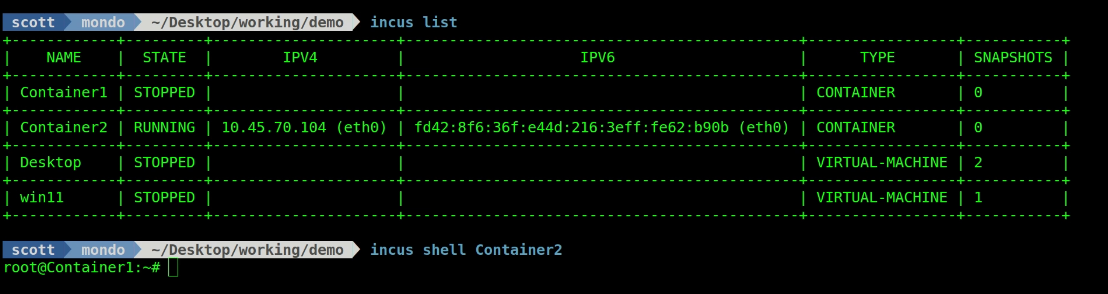
Remember that Container2 was an import from an instance of Container1 originally. We can see this by connecting to the shell of Container2.
incus shell Container2
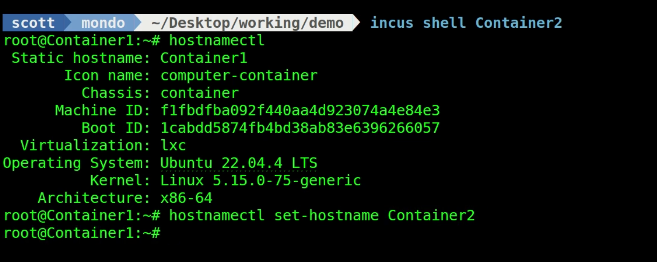
I can change the host name to be correct for the container:
hostnamectl set-hostname Container2
To see the updated name, exit the shell and reenter it and you will see that the prompt is updated to reflect the correct name.
exit
incus shell Container2

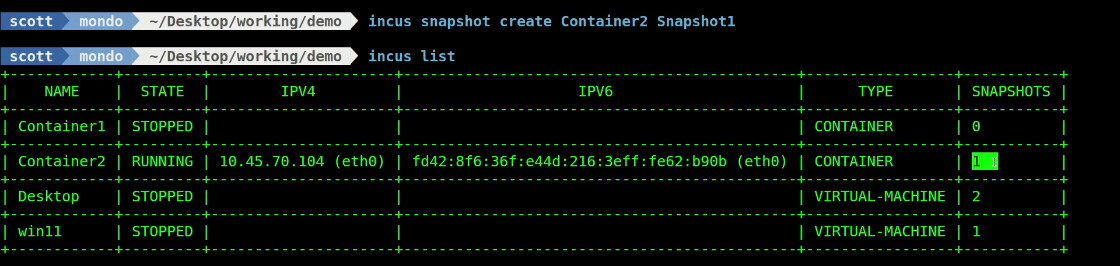
Let’s do a snapshot of Container2. Snapshots are stored inside of the container and so the backup of a container with snapshots is much larger.
incus snapshot create Container2 Snapshot1
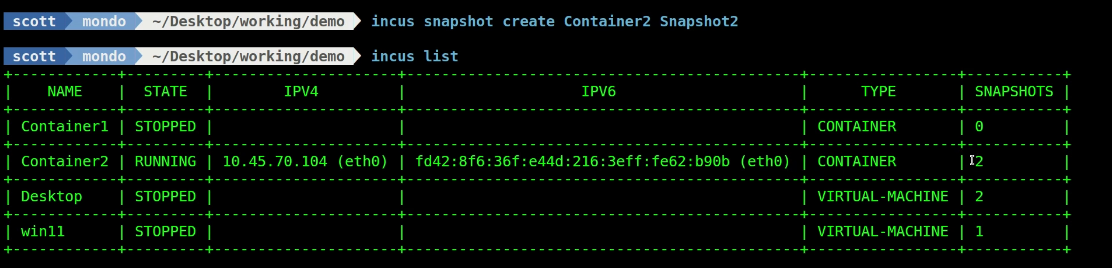
In the video I added a user account and installed net-tools to Container2 and then made another snapshot:
incus snapshot create Container2 Snapshot2
Now if we do an export of Container2, it will contain both of the two snapshots inside it as well.
incus export Container2 Container2-new.tar.gz
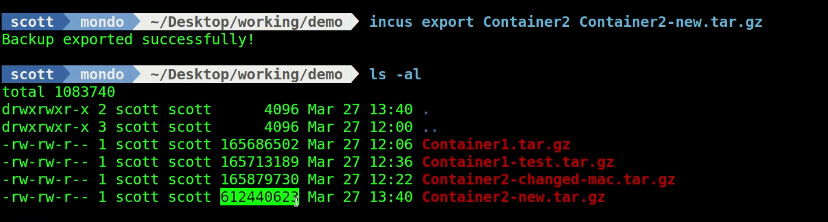
Note the dramatically larger size of the exported backup above.
Next I delete Snapshot1.
incus snapshot delete Container2 Snapshot1
You can list the info on the container:
incus info Container2
Pro Tip:
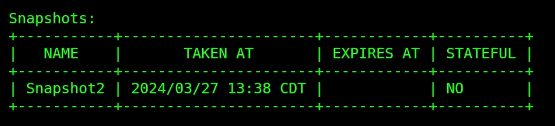
incus snapshot list Container2
Lets do another backup now that there is only one snapshot:
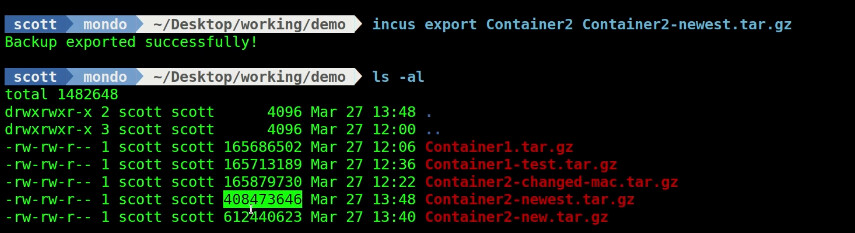
incus export Container2 Container2-newest.tar.gz
Note below that this backup is smaller than the one with two snapshots.
Incus backups are created with the “incus export” command and contain everything needed to restore them either on the same server or on a different server as indicated in this tutorial.