In my tutorial “Self Hosted Jitsi with User Accounts” we saw how to install Jitsi Meet with user accounts. This time we see how to install Whiteboard support in Jitsi.
I create a dedicated LXD container for the Excalidraw back-end to Jitsi. The primary reason for this is because I didn’t want to further complicate the Jitsi installation which was installed as an apt for easier customization.
The Excalidraw back-end is installed in a docker container.
I start by creating a LXD container for the application (note that the “bridgeproifle” is explained in my LXD Step by Step Tutorial):
lxc launch ubuntu:22.04 Excalidraw --profile default --profile bridgeprofile -c boot.autostart=true -c security.nesting=true
Enter the container:
lxc shell Excalidraw
Update the container OS:
apt update && apt upgrade -y
Add a user account:
adduser scott
Install docker and docker-compose:
curl -sSL https://get.docker.com | sh
apt install docker-compose -y
Put my account in the sudo and docker groups:
usermod -aG sudo scott
usermod -aG docker scott
Move over to the account:
su - scott
Clone the repository to make a local copy:
git clone https://github.com/jitsi/excalidraw-backend.git
Move into the new folder:
cd excalidraw-backend
Create a docker-compose file in this folder:
nano docker-compose.yml
Insert the following into the file:
services:
  excalidraw:
    build:
      context: .
      args:
        - NODE_ENV=development
    container_name: excalidraw
    ports:
      - "80:80"
    restart: always
    stdin_open: true
    healthcheck:
      disable: true
    environment:
      - NODE_ENV=development
    volumes:
      - ./:/opt/node_app/app:delegated
      - ./package.json:/opt/node_app/package.json
      - ./yarn.lock:/opt/node_app/yarn.lock
Save the file with a CTRL O and enter and then a CTRL X to exit the nano editor.
To build and launch the application:
docker compose up --build -d
At this point, the Excalidraw back-end should be up and running. Visit the IP address of the Excalidraw docker container in your web browser and it should look as follows:

Now you want to go to your DNS provider and create a subdomain name to host the Excalidraw instance. Once that is done (mine I called excalidraw.scottibyte.com) then you want to go to your NginX Proxy Manager instance and create an entry pointing to the local address of the Excalidraw LXD instance.
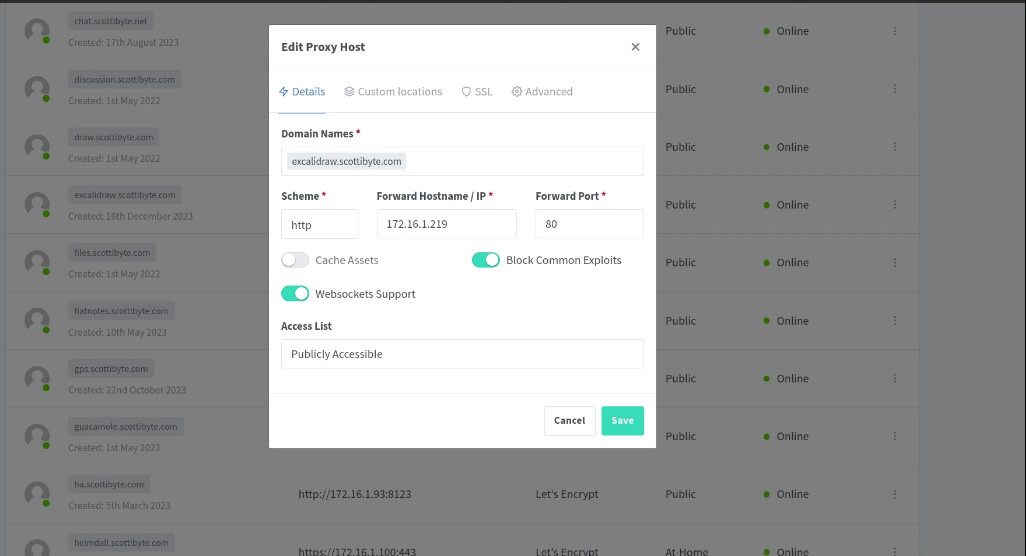
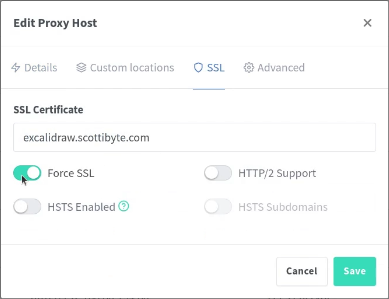
Be sure to go to the SSL tab and request a new certificate and then after saving the entry, edit it again to force SSL since that doesn’t stick while originally creating it.
At this point, you should be able to visit your Excalidraw instance using your subdomain name in your browser:

Now you can exit the shell of the Excalidraw LXD container because it is completed. So, now its time to add the Whiteboard integration.
Go connect to your Jitsi container from your LXD Server host:
lxc shell Jitsi
Edit the configuration file corresponding to your subdomain name for Jitsi in the following command.
My subdomain name is jitsi.scottibyte.com and you should substitute your subdomain name in its place.
sudo nano /etc/jitsi/meet/jitsi.scottibyte.com-config.js
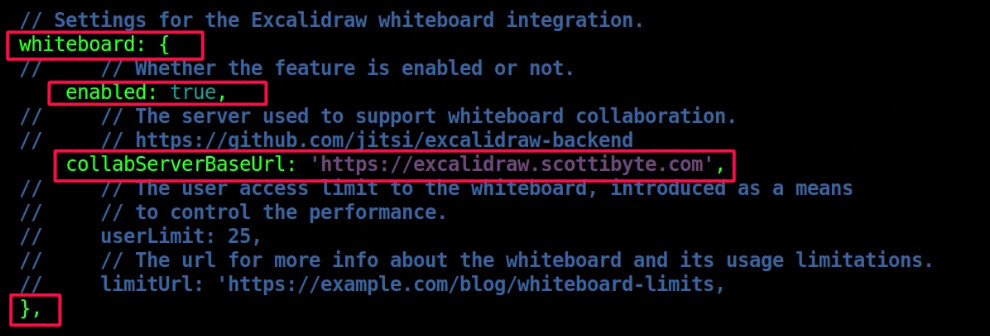
In the nano editor, use CTRL W (the search command) to look for “whiteboard”. Execute this search three times to find the third instance of “whiteboard”. When you find that location, you will need to un-comment (by removing the //) the four lines highlighted below and make sure to update to the subdomain name we created for your Excalidraw.
Do a CTRL O and Enter to save the file and a CTRL X to exit the nano editor.
Reboot your Jitsi Server:
sudo reboot now
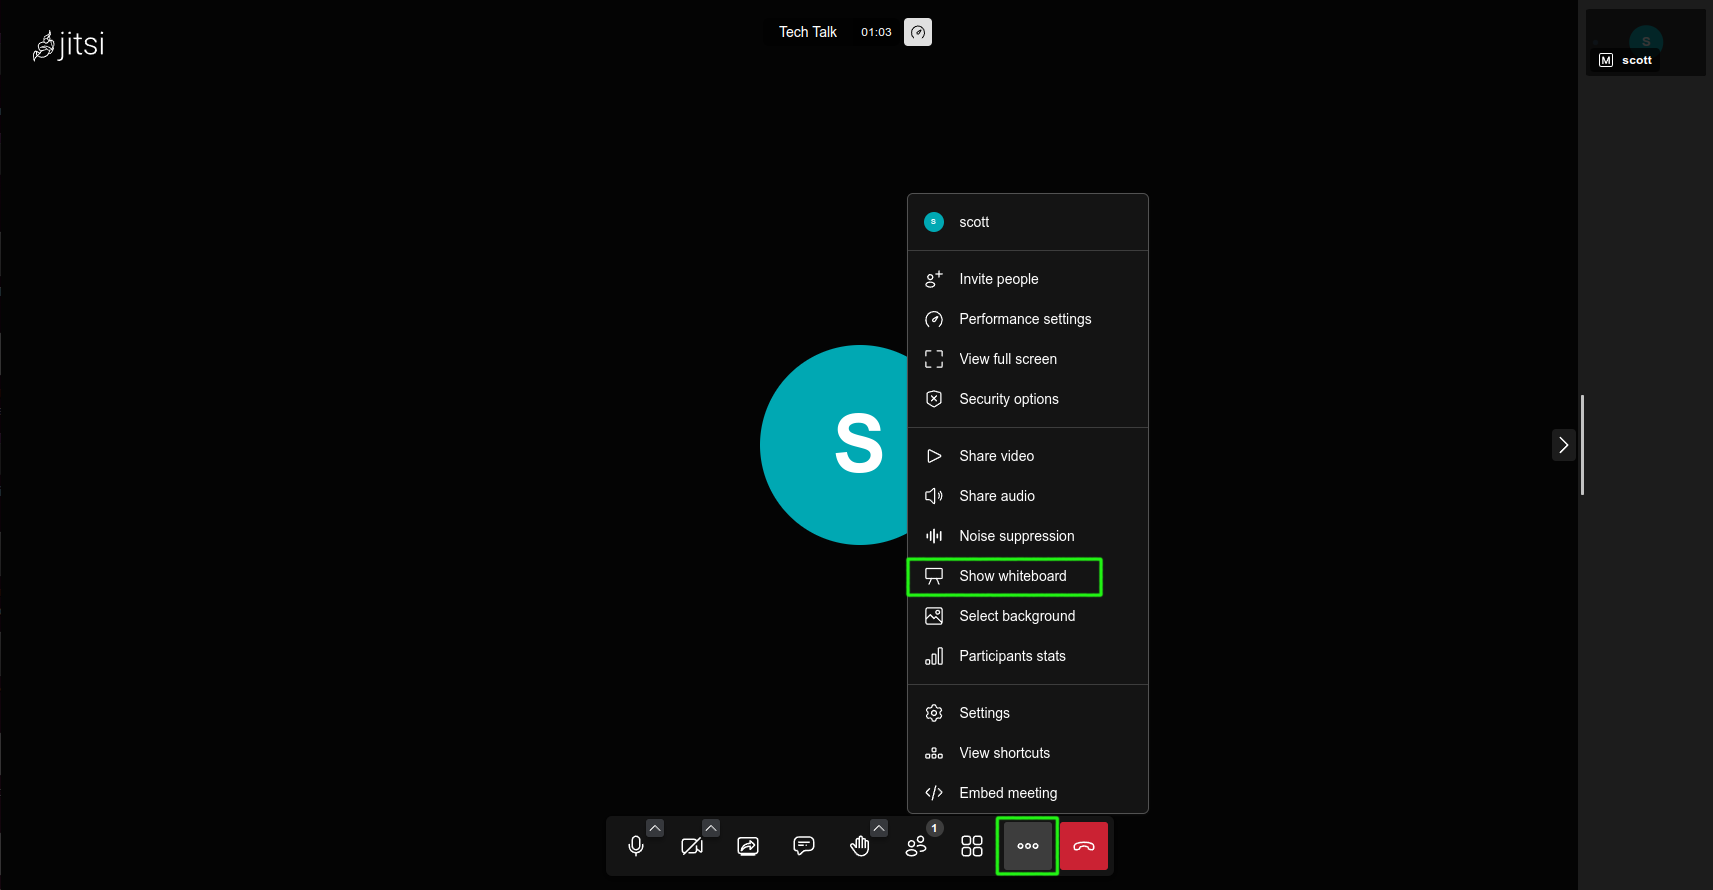
To access your Whiteboard in a Jitsi Meeting, simply choose the “…” menu as shown below and select “show whiteboard”: