I have presented many other videos on the channel that discuss aspects of LXD containers and networking. This presentation focuses on how to install LXD from scratch and configure it.
I also show how to host LXD containers on your main LAN using a bridged ethernet device. I also show how to properly nest Docker inside of a LXD container.
LXD containers are leaner, faster and more efficient on memory and CPU resources than virtual machines by far.
BIG GLARING WARNING: THIS GUIIDE DESCRIBES USING BRIDGING ON YOUR LXD HOST TO PRESENT LXD CONTAINERS TO YOUR LAN. DO NOT INSTALL DOCKER ON YOUR LXD HOST BECAUSE DOCKER NETWORKS CONFLICT WITH BRIDGING IN LXD. INSTEAD, INSTALL DOCKER INSIDE ONE OR MORE LXD CONTAINERS AS DESCRIBED IN THE VIDEO AND NOT AT THE HOST LEVEL WHERE YOU HAVE LXD INSTALLED.
I recommend an Ubuntu 20.04 server as your LXD host. To install LXD:
sudo apt install lxd
Add your user account to the lxd group (for example):
sudo usermod -aG lxd scott
newgrp lxd
groups
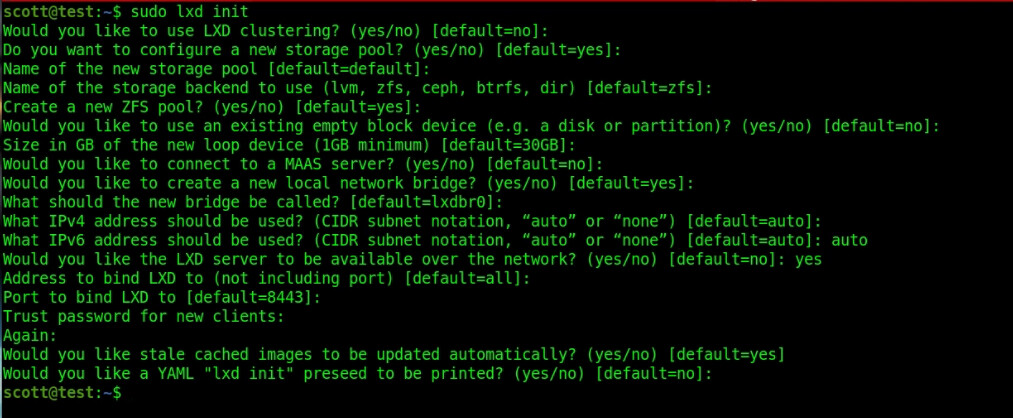
Initialize LXD to prepare it for use following the tutorial in the presentation:
sudo lxd init
List running containers:
lxc list
Create and start a container on the lxd private network:
lxc launch ubuntu:20.04 example --profile default -c boot.autostart=true
Find your default network device:
ip route show
Edit your netplan file to create a network bridge device on your LXD host (your file name may differ):
sudo nano /etc/netplan.00-installer-config.yml
Replace the contents of your file with something like the following with your network device name and appropriate addresses:
network:
  version: 2
  renderer: networkd

  ethernets:
    ens3:
      dhcp4: false
      dhcp6: false

  bridges:
    bridge0:
      interfaces: [ens3]
      addresses: [172.16.5.1/16]
      gateway4: 172.16.0.1
      nameservers:
        addresses:
          - 1.1.1.1
          - 1.0.0.1
      parameters:
        stp: true
        forward-delay: 4
      dhcp4: no
Apply the new network configuration:
sudo netplan apply
Create a LXD profile to use the bridge:
lxc profile create mainlan
lxc profile device add mainlan eth0 nic nictype=bridged parent=bridge0
Launch a LXD container using the bridge to get an address on your LAN:
lxc launch ubuntu:20.04 test --profile default --profile mainlan -c boot.autostart=true -c security.nesting=true
Connect to your new LXD container:
lxc exec test bash
Add a user account and Install docker INSIDE the new LXD container:
adduser scott
usermod -aG sudo scott

apt update && apt upgrade -y

curl -sSL https://get.docker.com | sh

usermod -aG docker scott
newgrp docker
groups
Log into your new container via ssh on your new user account. Note: You may need to uninstall and reinstall openssh-server:
apt remove --purge openssh-server
apt install openssh-server
On your new user account on the LXD instance, try out a docker container:
docker run -d --name=Whiteboard -p 8080:8080 rofl256/whiteboard
Go into a web browser and visit: http://a.b.c.d:8080 to access the whiteboard where a.b.c.d is the IP address of your LXD container in which you installed docker.
Pro Tip: If your docker container failed, because you forgot to add nesting to the host LXD container:
lxc config set test security.nesting true
If you want an alternative to adding your network bridge via netplan and your LXD host has a desktop GUI:
sudo apt install network-manager-gnome
Then, from a terminal, you can access the network connection editor GUI:
nm-connection-editor