# Incus Storage 101
**URL:** https://discussion.scottibyte.com/t/incus-storage-101/547
**Category:** Uncategorized
**Created:** [February 27, 2025, 2:11am UTC](https://discussion.scottibyte.com/t/incus-storage-101/547 "2025-02-27T02:11:54Z")
**Posts on this page:** 4
**Page:** 1
### Author:  [@scott](https://discussion.scottibyte.com/u/scott)
#### Post date: [February 27, 2025, 2:11am UTC](https://discussion.scottibyte.com/t/incus-storage-101/547/1 "2025-02-27T02:11:54Z")
Incus Storage is allocated and used from a storage pool. In [Incus Containers Step by Step](https://www.youtube.com/watch?v=ULPuU9aKyoU) I showed the steps to create your own Incus server. In that tutorial, the “incus admin init” command was used to initially configure the server and one of the things we did was to create a storage pool that we named “default”.
Incus can support multiple storage pools. For simplicity, we created a virtual storage pool (storage pool inside of a file) and used the zfs file system as the back-end storage manager for our default storage pool.
Incus uses the storage pool for containers, virtual machines, images, profiles, and metadata to support container management. In this tutorial we learn how to work with custom volumes and also how to examine the storage utilization of containers and custom volumes.
Start out by listing your zfs storage pools.
```auto
sudo zpool list
```

List all of the volumes in the default storage pool.
```auto
incus storage volume list default
```
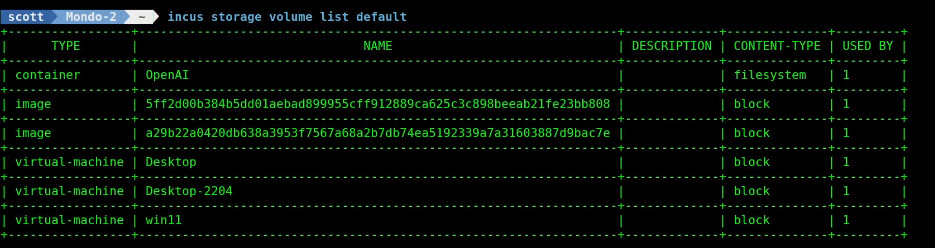
Listed above you will see a container, two images and three virtual machines. The images are downloaded from [linuxcontainer.org](http://linuxcontainer.org) and used to create containers. You can delete them at any time if storage is an issue. Local copies of images are kept to speed the creation of containers.
I created a very simple script to summarize storage utilization in a container which you can copy and paste into a terminal on your incus server.
```auto
printf "%-42s %-14s %-14s %-14s\n" "Name" "Allocated Size" "Used Size" "Referenced"
sudo zfs list -o name,volsize,used,refer | grep -E "default/(virtual-machines/.*\.block|custom/|containers/)" | awk '{printf "%-42s %-14s %-14s %-14s\n", $1, $2, $3, $4}'
```
Here’s the output of this very basic script which I will improve on later.

Regular Incus containers are “filesystem” based data structures whereas Incus virtual machines use block based storage. To understand the difference, imagine that filesystems based storage are not mounted and formatted. You simply connect to them. Examples of filesystems based storage are NFS/CIFS network shares. An example of block based storage are physical disk drives which you create partition tables and partitions on them. Files based storage read and write files and perform record oriented access. Block based storage perform indexed or direct access.
Regular Incus containers are not allocated a size and simply use space out of the storage pool until it is exhausted. Incus Virtual Machines use block oriented storage which is like a specified “chunk” of disk space of a certain size that comes out of the storage pool and is generally dedicated to a virtual machine.
In the table pictured above, used size means the total space consumed by the dataset (including snapshots and metadata). Referenced size means the amount of space uniquely held by the dataset (excluding snapshots).
In a ZFS storage pool, it might seem counter intuitive, but referenced size can be larger than used size due to the way ZFS handles compression, snapshots, and shared data. ZFS supports compression, and referenced size is reported before compression, while used size reflects actual disk consumption.
You can create a “custom volume” for an Incus container inside of the storage pool. In this example, I am creating a custom volume named “testvolume” inside of the default storage pool.
```auto
incus storage volume create default testvolume
```
We can see this volume.
```auto
incus storage volume list default
```
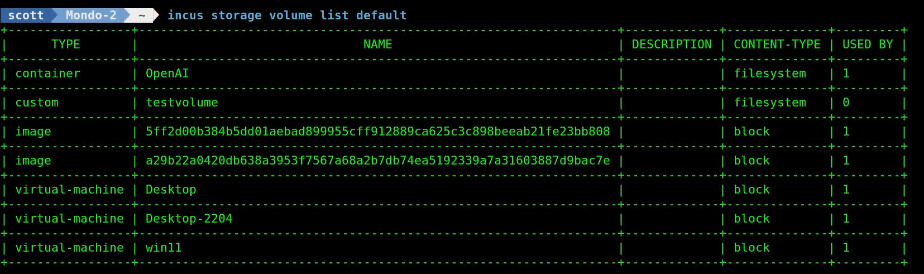
Lets create an incus container named “testcontainer”.
```auto
incus launch images:ubuntu/24.04 TestContainer -c boot.autostart=true
```

Connect to the container and create a mount point. Then exit the container.
```auto
incus shell TestContainer
mkdir /mnt/testvolume
exit
```
Attach the new container to the custom volume using the mount point.
```auto
incus storage volume attach default testvolume TestContainer /mnt/testvolume
```
Any files created in the mount point inside the container will actually be stored in the custom volume.

The real power in this is that you can attach our custom volume to more than one container at the same time and access the same files from any container.
Create an Incus Virtual Machine.
```auto
incus launch images:ubuntu/24.04/desktop --vm TestVM -c boot.autostart=true -c limits.cpu=2 -c limits.memory=4GiB
```
Ubuntu 24.04 Desktop requires a minimum of 2vcpu’s and 4GB of memory and so we specified that above. Incus virtual machines must virtualize the hardware and so they require greater resources. Incus containers all share the kernel of the Incus server OS and use fewer resources and are more efficient. There are use cases for both containers and virtual machines.
Incus Virtual Machines use block oriented storage allocated from the incus storage pool. By default, an Incus virtual machine initially allocates 10GB for a VM.
We can connect to our Incus VM in two different ways. If you want the GUI:
```auto
incus console TestVM --type=vga
```
If you just want a terminal into the shell:
```auto
incus shell TestVM
```
Examine the storage:
```auto
lsblk
```
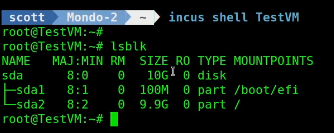
Notice that the root (/) device /dev/sda2 is allocated 9.9GB.
Exit out of the container, and enlarge the root partition:
```auto
exit
incus config device override TestVM root size=100GiB
```
If you then move back inside of the VM, you will note that /dev/sda is 100GB, but /dev/sda2 is still 9.9GB.
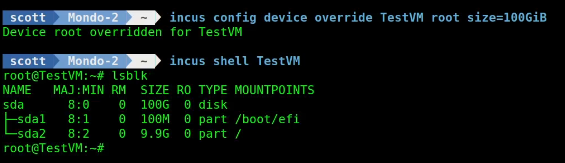
To recognize the new size, restart the container. I had to wait for the container to restart, hence the error.
```auto
incus restart TestVM
```
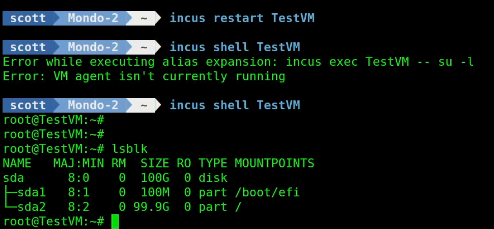
Suppose that a few days later I wanted to make the size of the root partition in TestVM 120GB. If I tried, I would get this error.
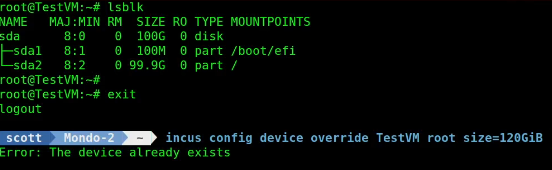
To solve this problem you simply remove the override and add a new one. This won’t remove any data.
```auto
incus config device remove TestVM root
incus config device override TestVM root size=120GiB
```
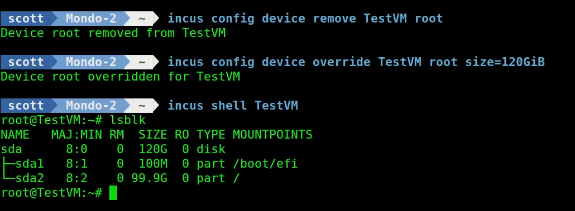
Notice above that /dev/sda is now 120GB, but /dev/sda2 will not show the increased size until after the VM is restarted.
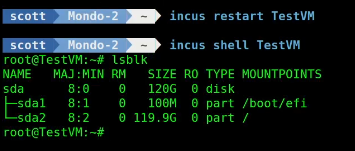
Notice that after the restart, /dev/sda2 has the expected size.
We now have a test container and a test vm.
```auto
incus list
```
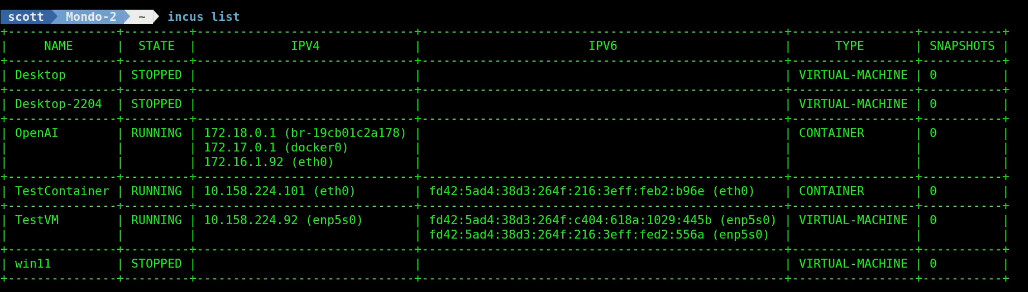
We can also list the storage volumes to see the additions.
```auto
incus storage volume list default
```
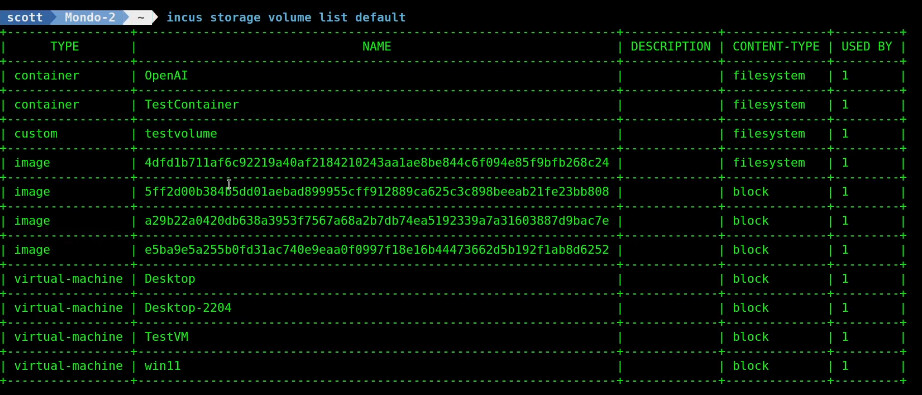
As a reminder, our TestVM has one disk drive /dev/sda. You can add disk drives to an incus VM just like you can add disk drives to a physical computer. This is how our TestVM storage appears right now.
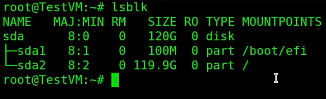
Let’s add a new 10GB custom volume that is block oriented. Note that you need to have the available space in your storage pool.
```auto
incus storage volume create default testvolume2 --type=block size=10GB
```

Attach the new block oriented custom storage volume to our VM.
```auto
incus storage volume attach default testvolume2 TestVM
```
Now when we connect to the VM, we can see /dev/sdb which is the new drive.
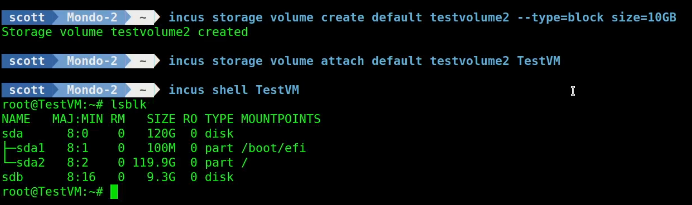
Before you can use block oriented storage, you need to create a partition table and a partition and finally, it needs to be formatted. First, install “gdisk” if not installed on the VM.
```auto
incus shell TestVM
apt install gdisk
```
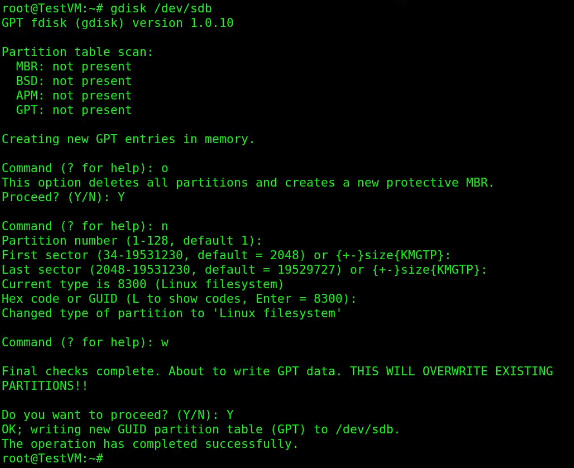
Invoke gdisk on the new device.
```auto
gdisk /dev/sdb
```
Create a new partition table with the “o” command.
Create a new primary partition with the “n” command and accept the defaults.
Issue the “w” command to write the changes to the disk.
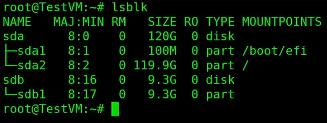
Now the lsblk will list the new partition /dev/sdb1.
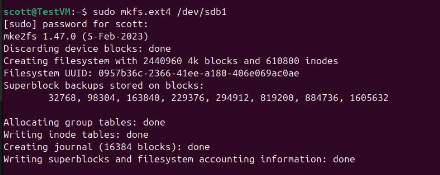
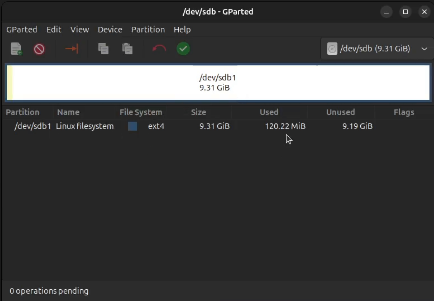
In the video, I did the next steps in the incus GUI desktop console just to illustrate the disk structure with gparted. Let’s instead just format our new partition here in the shell.
```auto
mkfs.ext4 /dev/sdb1
```
In the gparted GUI in the video, the formatted disk looks like this.
I didn’t show it in the tutorial, but you can create a mount point and mount the disk in the VM from the VM shell.
```auto
mkdir /mnt/testvolume2
mount /dev/sdb1 /mnt/testvolume2
```
I have other videos that show how to mount a drive persistently using /etc/fstab, but that is out of scope for this tutorial.
Recall the script from the start of the video that listed the volumes:

At this point, exit your VM and make sure that you are signed into the Incus server and have a prompt for your incus server.
Here’s a script that I developed that is much cleaner. Start by editing a file:
```auto
nano storage.sh
```
Insert the following in the editor.
```auto
#!/bin/bash
# Get Incus volume list and store custom volume types in an associative array
declare -A VOLTYPE
while read -r name content_type; do
# Match ZFS naming format (which uses default/custom/default_)
zfs_name="default/custom/$name"
VOLTYPE["$zfs_name"]="$content_type"
done < <(incus storage volume list default --format=json | jq -r '.[] | select(.type=="custom") | "\(.name) \(.content_type)"')
# Print Header
printf "%-30s %-18s %-14s %-14s %-14s\n" "Name" "Type" "Allocated Size" "Used Size" "Referenced"
# List ZFS volumes and determine type
sudo zfs list -o name,volsize,used,refer | grep -E "default/(virtual-machines/.*\.block|custom/|containers/)" | while read -r name volsize used refer; do
type="Unknown"
# Remove "default/" prefix
short_name="${name#default/}"
if [["$name" =~ ^default/virtual-machines/.*\.block$]]; then
type="VM Disk"
short_name="${short_name#virtual-machines/}"
elif [["$name" =~ ^default/containers/]]; then
type="Container"
short_name="${short_name#containers/}"
elif [["$name" =~ ^default/custom/]]; then
lookup_name="${name/default\/custom\/default_/default/custom/}"
content_type="${VOLTYPE[$lookup_name]}"
case "$content_type" in
block) type="Custom Block" ;;
filesystem) type="Custom File" ;;
*) type="Custom (Unknown)" ;;
esac
short_name="${short_name#custom/}"
fi
printf "%-30s %-18s %-14s %-14s %-14s\n" "$short_name" "$type" "$volsize" "$used" "$refer"
done
```
Save the file with a CTRL O and enter and a CTRL X to exit the nano editor.
Set the script to have execute privilege.
```auto
chmod +x storage.sh
```
Before we can run the script, you must install the json query utility on your incus server (not a container).
```auto
sudo apt install jq -y
```
Run the script with this command.
```auto
./storage.sh
```
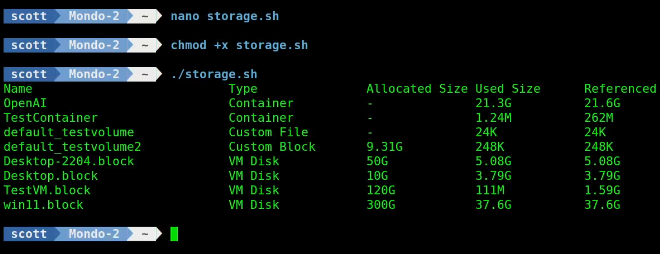
This script is great for summarizing your storage utilization in your default storage pool.
---
### Author:  [@jwhoski](https://discussion.scottibyte.com/u/jwhoski)
#### Post date: [February 27, 2025, 3:32pm UTC](https://discussion.scottibyte.com/t/incus-storage-101/547/2 "2025-02-27T15:32:03Z")
This is a very timely as I am setting up a new machine specifically for handling backups and shared storage. In this video everything was done using the default storage pool. Am i right in assuming that you can have multiple pools all using the same principles? I am planning on the default pool being on an SSD for the OS, incus, and all the containers, then having a “data” pool that will be much larger LVM array that gets attached to containers as needed. Thanks, your videos are much appreciated.
---
### Author:  [@scott](https://discussion.scottibyte.com/u/scott)
#### Post date: [February 27, 2025, 5:41pm UTC](https://discussion.scottibyte.com/t/incus-storage-101/547/3 "2025-02-27T17:41:05Z")
Yes you can have multiple pools for sure. My typical use case in my home lab is to have a much larger spinning drive pool where I create larger data volumes. For example, I might have the container for immich & paperless ngx running in the default pool, but I may map custom volumes to a pool with more available space. Be sure to come over to the [RocketChat](https://chat.scottibyte.com) to discuss and ask more questions or just to say hi.
---
### Author:  [@jwhoski](https://discussion.scottibyte.com/u/jwhoski)
#### Post date: [February 28, 2025, 3:31am UTC](https://discussion.scottibyte.com/t/incus-storage-101/547/4 "2025-02-28T03:31:25Z")
Thanks, I noticed the script had the default pool hard coded so I updated with an argument. Feel free use as desired…
```auto
#!/bin/bash
# Ensure a storage pool name is provided
if [[-z "$1"]]; then
echo "Usage: $0 "
exit 1
fi
POOL_NAME="$1"
# Get Incus volume list and store custom volume types in an associative array
declare -A VOLTYPE
while read -r name content_type; do
# Match ZFS naming format (which uses POOL_NAME/custom/POOL_NAME_)
zfs_name="$POOL_NAME/custom/$name"
VOLTYPE["$zfs_name"]="$content_type"
done < <(incus storage volume list "$POOL_NAME" --format=json | jq -r '.[] | select(.type=="custom") | "\(.name) \(.content_type)"')
# Print Header
printf "%-30s %-18s %-14s %-14s %-14s\n" "Name" "Type" "Allocated Size" "Used Size" "Referenced"
# List ZFS volumes and determine type
sudo zfs list -o name,volsize,used,refer | grep -E "$POOL_NAME/(virtual-machines/.*\.block|custom/|containers/)" | while read -r name volsize used refer; do
type="Unknown"
# Remove "$POOL_NAME/" prefix
short_name="${name#$POOL_NAME/}"
if [["$name" =~ ^$POOL_NAME/virtual-machines/.*\.block$]]; then
type="VM Disk"
short_name="${short_name#virtual-machines/}"
elif [["$name" =~ ^$POOL_NAME/containers/]]; then
type="Container"
short_name="${short_name#containers/}"
elif [["$name" =~ ^$POOL_NAME/custom/]]; then
lookup_name="${name/$POOL_NAME\/custom\/$POOL_NAME_/}"
content_type="${VOLTYPE[$lookup_name]}"
case "$content_type" in
block) type="Custom Block" ;;
filesystem) type="Custom File" ;;
*) type="Custom (Unknown)" ;;
esac
short_name="${short_name#custom/}"
fi
printf "%-30s %-18s %-14s %-14s %-14s\n" "$short_name" "$type" "$volsize" "$used" "$refer"
done
```